In Highlights display mode on your Nikon D7100, areas that the camera thinks may be overexposed blink in the camera monitor. One of the most difficult photo problems to correct in a photo-editing program is known as blown highlights in some circles and clipped highlights in others.
Both terms mean that the brightest areas of the image are so overexposed that areas that should include a variety of light shades are instead totally white.
To use the Highlights display mode, you must first enable it. Then press the Multi Selector down to shift from File Information mode to Highlights mode.
To fully understand all the features of Highlights mode, though, you need to know a little about digital imaging science. First, digital images are called RGB images because they’re created from the three primary colors of light: red, green, and blue. In Highlights mode, you can display the exposure warning for all three color components — sometimes called color channels — combined or view the data for each individual channel.
When you look at the brightness data for a single channel, though, greatly overexposed areas don’t translate to white in photos — rather, they result in a solid blob of some other color. The short story is that when you mix red, green, and blue light, and each component is at maximum brightness, you get white. Zero brightness in all three channels gives you black.
If you have maximum red and no blue or green, you have fully saturated red. If you mix two channels at maximum brightness, you also get full saturation. For example, maximum red and blue produce fully saturated magenta.
And this is why it matters: Wherever colors are fully saturated, you can lose picture detail. For example, a rose petal that should have a range of tones from light to dark red may instead be bright red throughout.
The moral of the story is that when you view your photo in single-channel display, large areas of blinking highlights in one or two channels indicate that you may be losing color details. Blinking highlights that appear in the same spot in all three channels indicate blown highlights — again, because when you have maximum red, green, and blue, you get white.
Either way, you may want to adjust your exposure settings and try again.
The Figure displays an image that contains some blown highlights to show you how things look in Highlights display mode. The screen was captured at the moment the highlight blinkies blinked “off” — the black areas in the figure indicate the blown highlights.
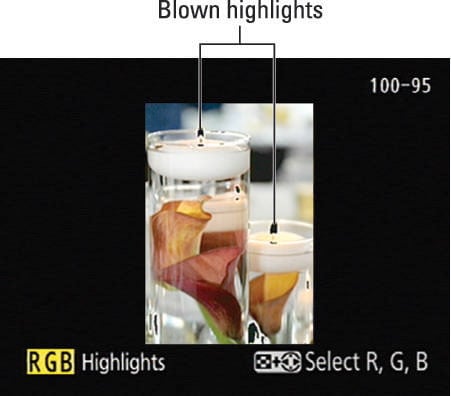
But as this image proves, just because you see the flashing alerts doesn’t mean that you should adjust exposure — the decision depends on where the alerts occur and how the rest of the image is exposed. In the candle photo, for example, there are indeed small white areas in the flames and the glass vase, yet exposure in the majority of the photo is fine.
If exposure was reduced to darken those spots, some areas of the flowers would be underexposed. In other words, sometimes you simply can’t avoid a few clipped highlights when the scene includes a broad range of brightness values.
In the lower-left corner of the display, the letters that appear highlighted in yellow tell you whether you’re looking at a single channel (R, G, or B) or the three-channel, composite display (RGB). The latter is selected in the figure. To cycle between the settings, press the ISO button as you press the Multi Selector right or left.

Along with the blinking highlight warning, Highlights display mode presents the Protect Status and Retouch Indicator icons if you used those features. In the upper-right corner, you see the folder number and the frame number — 100 and 95, respectively. The label “Highlights” also appears to let you know the current display mode.