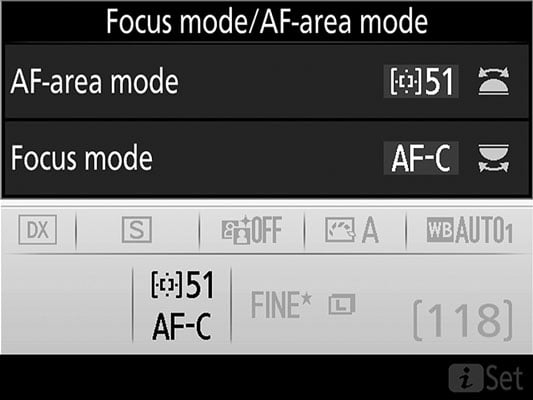
 For moving subjects, I combine AF-C Focus mode (continuous autofocusing) with one of the Dynamic Area AF-area settings.
The initial focusing process is the same as when you use the AF-S and Single Point autofocusing combo: Choose a focus point, position your subject under that point, and press the shutter button halfway. The difference is that in AF-C mode, focus isn't locked at that point. Instead, if your subject moves from the focus point, the camera checks surrounding points for focus information and adjusts focus using that data.
Also, the focus dot in the viewfinder may flash on and off as focus is adjusted. Note, though, that even if you enable the Beep On/Off option, the camera doesn't provide audio confirmation of focus as it does in AF-S mode, which is a Good Thing — things could get pretty noisy if the beep sounded every time the camera adjusted focus.
Keep these additional thoughts in mind to get the best results when photographing moving subjects:
- Try to keep the subject under the selected focus point to increase the odds of good focus. If the subject moves away from that point, it should still find the focus target as long as it falls under one of the other focus points (9, 21, or 51, depending on which Dynamic Area mode you selected). But reframing to keep the subject under the selected point gives the camera a focusing assist. Note that you don't see the focus point actually move in the viewfinder, but the focus tweak happens just the same. You can feel and hear the focus motor doing its thing, if you pay attention.
- Prevent focusing miscues with tracking lock-on. You're shooting your friend's volleyball game, practicing your action-autofocusing skills. You set the initial focus, and the camera is doing its part by adjusting focus to accommodate her pre-serve moves. Then all of a sudden, some clueless interloper walks in front of the camera. Okay, it was the referee, who probably did have a right to be there, but still.
The good news is that as long as the ref gets out of the way before the action happens, you're probably okay. A feature called focus tracking with lock-on tells the camera to ignore objects that appear temporarily in the scene after you begin focusing. Instead of resetting focus on the newcomer, the camera continues focusing on the original subject.
You can vary the length of time the camera waits before starting to refocus through the Focus Tracking with Lock-On option, found in the Autofocus section of the Custom Setting menu and shownhere. Normal (3 seconds) is the default setting. You can choose a longer or shorter delay or turn off the lock-on altogether. If you turn off the lock-on, the camera starts refocusing on any object that appears in the frame between you and your original subject.
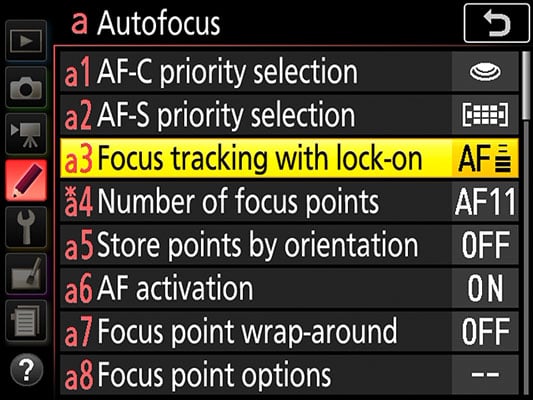 This option controls how the autofocus system deals with objects that appear between the lens and the subject after you initiate focusing.
- You can interrupt continuous autofocusing and lock focus by pressing the AE-L/AF-L button. Focus remains set as long as you hold down the button. Don't forget, though, that by default, pressing the AE-L/AF-L button also locks autoexposure. You can change this setup so that the button locks just one or the other.
• On occasion, you may want to switch to Single Point AF-area mode when using continuous autofocusing. For example, if you're photographing a tuba player in a marching band, you want to be sure that the camera tracks focus on just that musician. With Dynamic Area, it's possible that the focus may drift to another nearby band member. The difficulty with the Single Point/AF-C pairing is that you must constantly reframe to keep your subject under the point you selected. (You can always crop your image to achieve a different composition after the shot.)
- Some subjects may be easier to track with the Group-area mode. This mode also provides continuous autofocusing. But rather than favoring a single focus point, the camera considers a cluster of five focus points and locks focus on the closest object that falls under one of those points. Before initiating autofocusing, use the Multi Selector to move the focus points over your subject. (Four points appear in the viewfinder; the fifth, in the center of the group, is invisible.)
Going back to the marching band scenario, you might use Group-area mode if your subject is the drum major rather than a musician. (If you aren't a band geek like me, the drum major is the person leading the band down the street — usually wearing a tall hat shaped like Marge Simpson's hairdo.) Assuming that you're shooting at an angle that has the band coming towards you, the fact that Group-area mode targets the closest object should make it easy to lock focus on the drum major.
Remember, too, that if you pair Group-area mode with the AF-S Focus mode, the autofocusing system incorporates face detection into the mix. If the portion of the scene under the five-point grid contains a face, that face is used as the focusing target, regardless of whether another object is closer to the camera. Face detection usually works only when the subject is facing directly into the camera, however, and probably won't be successful if the eyes are shaded by the brim of a Simpsonesque hat.