- Focus mode: This setting tells the camera whether to use continuous autofocusing or lock focus at a specific distance.
- AF-area: This option determines which part of the frame is analyzed to set focus.
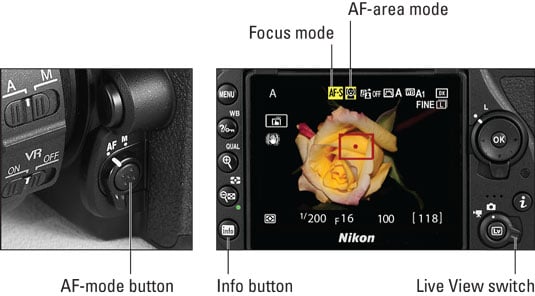 Press the AF-mode button (left) to access the Live View Focus mode and AF-area mode options (right).
It's at this point that things diverge from viewfinder photography. As you rotate the dials to set the Focus mode and AF-area mode, the settings that appear are different in Live View mode, save for one Focus mode option (AF-S). The technique you use to establish focus varies from normal focusing, too.
Upcoming sections provide details on the various Focus mode and AF-area mode settings. But here are a few general rules of the road:
- You can control the Focus mode and AF-area mode in all but a few exposure modes. The camera chooses the Focus mode in three Effects modes: Photo Illustration, Toy Camera, and Miniature. The Miniature Effects mode also prevents you from adjusting the AF-area mode.
- After you release the AF-mode button, the Focus mode and AF-area mode symbols appear only in the default Live View display. In other displays modes, press the AF-mode button to temporarily display the symbols. Neither setting appears in the Control panel even when the button is pressed — the monitor is your only avenue for checking Focus mode and AF-area mode during Live View shooting.

Press the Info button, labeled on the right, to cycle through the available Live View display modes. The figure also reminds you where to find the control that engages Live View. Rotate the switch to either the still or movie camera position, depending on what you want to shoot, and then press the LV button to turn Live View on and off.
- In Live View mode, you see a focus frame rather than the focus points displayed during viewfinder photography. The appearance of the frame varies depending on your AF-area mode. The figure shows the frame for the Wide-area mode. In this mode, you move the frame over your desired focusing area. When focus is achieved, the focus frame turns green, as shown on the right in the figure.
- Live View autofocusing is slower than viewfinder autofocusing. The reason why isn't important; just understand that Live View isn't your best choice for focusing on fast-moving targets. Unfortunately, for movie shooting, you don't have a choice: You can't use the viewfinder to compose shots when you set the Live View switch to Movie mode.
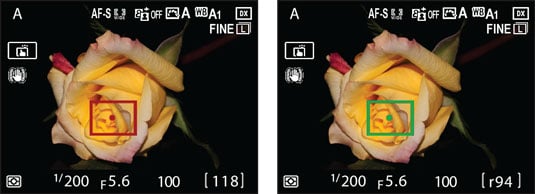 In Live View mode, you move a focus frame over your autofocus target (left); the frame turns green when focus is set (right).