Applying Retouch menu effects
For after-the-shot effects, try these Retouch menu options:- Fisheye: Apply this tool to distort the image so that it appears to have been taken with a fisheye lens.
- Cross Screen: This tool adds a starburst effect to the brightest part of the image. To access it, choose the Filter Effects option on the Retouch menu.
- Soft: Also accessed via the Filter Effects option, the Soft filter blurs your photo to give it a dreamy, watercolor-like look.
- Color Outline: Select this option from the Retouch menu to turn your photo into a black-and-white line drawing. (And please don't ask me why this filter isn't called Black-and-White Outline.)
- Photo Illustration: This effect produces a cross between a photo and a bold, color drawing.
- Color Sketch: This filter creates an image similar to a drawing done in colored pencils.
- Miniature Effect: Have you ever seen an architect's small-scale models of planned developments? The Miniature Effect filter attempts to create a photographic equivalent by applying a strong blur to all but one portion of an image. When you apply the filter, you indicate the area you want to keep in focus by moving a yellow frame over that part of the photo. The following figure offers an example. The left photo is the original; the right shows the result of keeping focus sharp in the part of the street occupied by the cars.
The Miniature Effect filter works best if you shoot your subject from a high angle — otherwise, you don't get the miniaturization result.
- Selective Color: This effect desaturates (removes color from) parts of a photo while leaving specific colors intact. For example, in an image of a red rose against a green background, you might desaturate the background and leave only the rose petals in color.
This tool is not only less than intuitive to use, but also makes it difficult to precisely adjust only specific parts of the image. Have fun experimenting, but realize that to create this effect successfully, you need to do the job in a photo-editing program that enables you to select the parts of the photo you want to change.
- Painting: The last special effect on the Retouch menu, this one produces a vividly colored, loosely rendered version of your photo.
 The Miniature Effect filter throws all but a small portion of a scene into very soft focus.
Shooting in Effects mode
When you set the Mode dial to Effects, as shown here, you can apply special effects while shooting. Effects mode lets you apply special effects to movies and still photos.
Shooting in Effects mode also brings up a problem: To create the effects, the camera puts most picture-taking controls, such as White Balance and Metering mode, off-limits. For most effects, you also must choose one of the JPEG Image Quality settings; Raw shooting is unavailable except when you choose the Silhouette, High Key, or Low Key effects.
However, Effects mode does offer some artistic filters not available on the Retouch menu. In addition, it enables you to add effects to movies, which isn't possible from the Retouch menu.
The best way to take advantage of Effects mode is to turn on Live View. You have to use Live View to shoot movies anyway, but it's beneficial for still photography, too. Several effects offer settings you can tweak to alter the result, and you can get to those settings only in Live View mode. Live View also enables you to preview the selected effect.
To shoot stills, move the Live View switch to the position shown. For movie recording, set the switch to the movie-camera symbol. Then press the Live View (LV) button to engage Live View.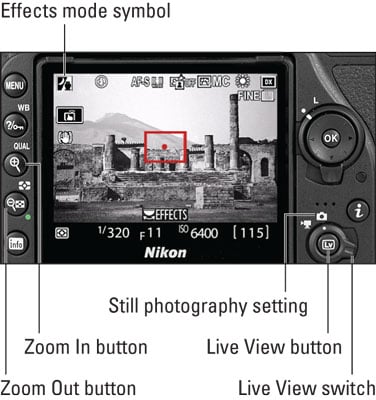 Set the camera to Live View mode to access Effects mode adjustments or to apply effects when recording movies.
As soon as you set the Mode dial to Effects and engage Live View, an icon representing the currently selected effect appears in the upper-left corner of the display, as shown here. To choose a different effect, rotate the Main command dial. A ribbon containing icons representing each effect appears near the top of the screen, as shown on the left. To scroll through the available effects, rotate the Command dial. The preview updates each time you scroll to a new setting.
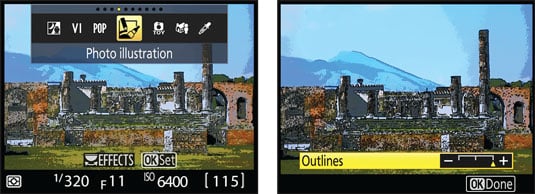 Rotate the Main command dial to scroll through available effects (left); the OK Set symbol tells you that you can adjust the impact of the effect (right).
If an effect offers tools for altering the final look of the image, you see an OK Set symbol near the bottom of the frame, as shown in the figure.
When you find an effect you like, press the shutter button halfway and release it to return to shooting mode. If an effect offers adjustments, tap the OK Set symbol or press the OK button to display a screen containing the adjustment controls. For example, the Photo Illustration effect offers the single control shown on the right. As you change the setting, the preview updates to show how the new setting affects the image. Usually, you adjust options by moving a marker along a bar like the one shown in the figure. Press the Multi Selector right to make that happen. You can also tap the bar to place the marker at the spot you tap.
After making your adjustments, tap OK Done or press OK to return to the live preview. (If you see the OK Set sign on the preview, you can tap it at any time to readjust the effect settings.)
Now for a review of the various effects:
- Night Vision: Use this setting in low-light situations to produce a grainy, black-and-white image.
- Super Vivid: Choose this setting for hypersaturated, super-contrasty images.
- Pop: One step less intense than Super Vivid, this mode amps up saturation only.
- Photo Illustration: This setting produces a bright, poster-like effect.
Autofocusing is not available during movie recording in this mode. Additionally, the resulting movie looks more like a slide show made up of still images than a standard movie.
- Toy Camera Effect: This mode creates a photo or movie that looks like it was shot by a toy camera — specifically, the type of toy camera that produces images that have a vignette effect (corners of the scene appear darker than the rest of the image). In Live View mode, you can adjust two options: Vividness, which affects color intensity; and Vignetting, which controls the amount of vignetting.
- Miniature Effect: This one is a duplicate of the one on the Retouch menu. The filter works by blurring all but a small portion of the scene, which you specify by positioning the red focus frame that appears in Live View mode.
To set up this effect, press OK or tap the OK icon to display horizontal markings that indicate the width of the sharp-focus region. Use the Multi Selector or touchscreen controls at the bottom of the screen to adjust the width and position of the in-focus region. When you achieve the look you want, press or tap OK again.
A few limitations apply: Flash is disabled, as is the AF-assist lamp. If you use the Continuous Release mode, the frames per second rate is reduced. When autofocusing, you can't use any AF-area mode except Single-point.
For movies, sound recording is disabled, autofocus is disabled during recording, and movies play back at high speed. (The high-speed playback means a movie that contains about 45 minutes of footage is compressed into a 3-minute clip, for example.)
- Selective Color: Like the Selective Color filter on the Retouch menu, this effect enables you to desaturate (turn black and white) all but a few colors. And as with the Retouch menu filter, the Effects mode version is complex to use — even more so, in fact — and doesn't give you enough control to precisely desaturate just the colors you want to alter.
- Silhouette: Choosing this setting ensures that backlit subjects will be captured as dark silhouettes against a bright background. To help ensure that the subject is dark, flash is disabled.
- High Key: A high key photo is dominated by white or very light areas, such as a white china cup resting on a white doily in front of a sunny window. This setting is designed to produce a good exposure for this type of scene, which the camera otherwise tends to underexpose in response to all the high brightness values. Flash is disabled.
- Low Key: The opposite of a high key photo, a low key photo is dominated by shadows. Use this mode to prevent the camera from brightening the scene too much and thereby losing the dark and dramatic nature of the image. Flash is disabled.
2 roads to a multi-image exposure
Two camera features combine multiple photographs into one:- Multiple Exposure (Photo Shooting menu): With this option, you can combine your next 2-10 shots. After you enable the option and take your shots, the camera merges them into one file. The Multiple Exposure option is available only when you shoot in the P, S, A, or M exposure modes and isn't available in Live View mode at all.
- Image Overlay (Retouch menu): This option, available only through the regular Retouch menu (and not the Playback version of the i-button menu), enables you to merge two existing Raw images to create a third Raw image. I used this option to combine a photo of a werewolf friend, shown on the left, with a nighttime garden scene, shown in the center. The result is the ghostly image shown on the right. Oooh, scary!
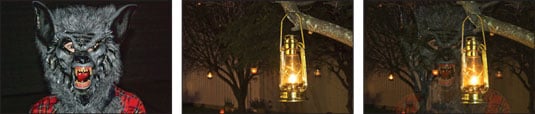 Image Overlay merges two Raw (NEF) photos into one.
On the surface, both options sound cool. The problem is that you can't control the opacity or positioning of the images in the combined photo.
However, there is one useful effect that you can create with either option: a "two views" composite like the one here. For this image, Image Overlay is used to combine the front and rear views of the antique match striker into the composite scene.
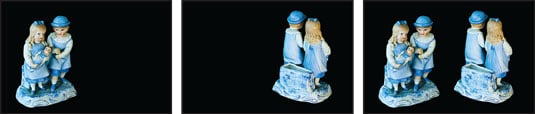 If you want each subject to appear solid, use a black background and position the subjects so that they don't overlap.
For this trick to work, the background in both images must be the same solid color (black seems to be best), and you must compose each photo so that the subjects don't overlap in the combined image, as shown here.