
The AF (autofocus) Area mode setting on your Canon EOS 70D determines which of the 19 autofocus points the camera uses to establish focusing distance. At the default setting, all points are in play, and the camera typically focuses on the closest object, but you can choose to base focus on one of five focusing zones or on a single point that you select:
19-point automatic selection: This is the default mode; the camera selects the autofocusing point for you.
Zone AF: The 19 points are divided into five zones, and you select which zone you want to use. The camera typically focuses on the closest object that falls within the selected zone. The center zone contains the most points (nine); the surrounding zones contain just four points each.
Single-point AF: You select one of the 19 points to set the focusing distance. You must then frame your subject so that it falls under that focusing point.
The fastest route to the option you want to use is the AF Area mode button, found on the top of the camera, just in front of the Main dial. If the Shooting Settings display is active, the screen shown in the following figure appears. The icons at the top represent the three AF Area modes; to cycle through them, press the AF Area mode button. (The symbol to the right of the three mode icons reminds you that you must use the button for this job.) You see a similar display in the viewfinder, minus the AF Area button symbol and the touchscreen return symbol.
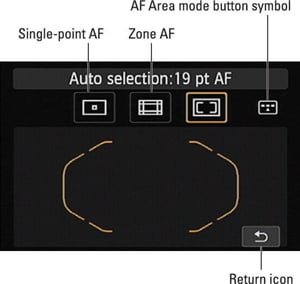
In the preceding figure, the 19-point Automatic Selection setting is selected, and the focusing brackets in the middle of the screen represent the area that contains the 19 points. If you set the AF mode to AI Servo, which is the continuous autofocusing mode, however, you see 19 rectangles within the brackets, with a single point selected. The camera will use that selected point as the starting focusing distance, but will look to the other 18 points for focusing information if your subject moves from that initial point.
In Zone AF, the displays look like the one you see on the left in the following figure. The brackets indicate which zone is selected; the focus points within the brackets are active. On the left screen in the following figure, for example, the center zone is selected. For Single-point AF, you see just one large rectangle; that's the selected focus point.

To select a different zone or point, press the Multi-controller up, down, left, or right. In Zone AF mode, you also can use the Main dial or Quick Control dial to cycle through the available zones; in Single-point mode, you can select a horizontal point by rotating the Main dial and a vertical point by rotating the Quick Command dial. If you're working with the Shooting Settings display instead of monitoring things through the viewfinder, you can also simply tap the point or zone you want to use (although tapping a single point can be tricky because they're so small).
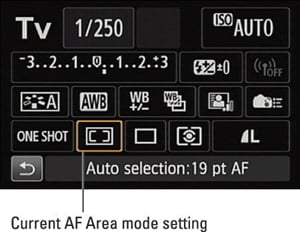
In addition to using the AF Area mode button to change the setting, you can use the Quick Control screen to get the job done, as shown in the figure below.
Here are a few additional related bits of info:
If all three AF Area modes don't appear as available, visit the Custom Functions menu, select the Autofocus category of options, and check the status of the item named Select AF Area Selec. Mode. On this screen, you can enable and disable the individual AF Area modes. By default, all three AF Area modes are enabled, and you see a check mark above each mode icon. If the check mark is gone, the mode is disabled. Bring it back into the game by pressing the Set button and then tapping the mode icon or highlighting it and pressing the Set button again. Tap OK or highlight it and press the Set button to finalize your choice.
In Zone or Single-Point mode, you can quickly select the center focus point or zone by pressing the Set button.
While the AF Area mode button is pressed and the 19-point auto or Zone mode is in force, the bottom of the viewfinder display shows the letters AF next to a dashed rectangle to remind you that the camera will automatically choose the focus point for you. This same readout appears in the LCD panel while the AF Area mode button is pressed.
For Single-Point mode, the displays show the letters SEL plus a bracket symbol when the center point is selected. If you select a different point, you see the letters SEL and AF. Again, these indicators appear only in the viewfinder and LCD panel while the AF Area mode button is pressed.
You also can display the initial AF Area mode selection screen (refer to the first figure of this article) by pressing the AF Point Selection button on the back of the camera. However, you still have to use the AF Area Mode button to cycle through the available settings. It's easy to mix up the purpose of the two buttons, so you may want to use the AF Area Mode button for both tasks and leave the AF Point Selection button out of the mix.