


To explore Custom Functions, choose that item from Setup Menu 4, as shown on the left. You then see the options screen for a specific Custom Function, as shown on the right in the figure.
 Choose Custom Functions from Setup Menu 4 to access additional customization options.
Here's a guide to using the Custom Function screens, which work a little differently from other menu screens:
- Interpreting the screens: The Custom Functions screens are a little intimidating until you know what's what:
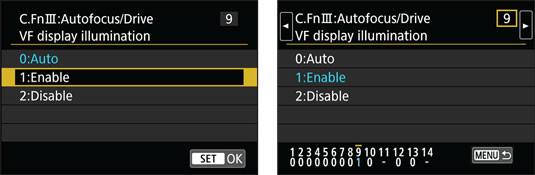
- Custom Functions are grouped into four categories: Exposure, Image, Autofocus/Drive, and Operation/Others. The category number and name appear in the upper-left corner of the screen. In the figure, for example, the label indicates that you're looking at a screen from the Autofocus/Drive category. (C.Fn III refers to Custom Functions group three.)
- The number of the selected function appears in the upper-right corner. Custom Function 9 is shown.
- Settings for the current function appear in the middle of the screen. Blue text indicates the current setting. The default setting is represented by the number 0. Auto is selected and is the default setting.
- Numbers at the bottom of the screen show you the current setting for all Custom Functions. The top row of numbers represents the Custom Functions, with the currently selected function indicated with a tiny horizontal bar over the number (9, in the figure). The lower row shows the number of the current setting for each Custom Function; again, 0 represents the default.
For Custom Function 11, you instead see a dash, which is Canon's way of letting you know that this menu option controls more than one camera setting (thus, there isn't one single default setting).
- Scrolling from one Custom Function to the next: Use the Quick Control dial or press the left or right Quick Control keys or tap the left or right scroll arrows at the top of the screen. You can see the arrows in the right screen.
- Changing the setting: You first must activate the menu by pressing the Set button or tapping one of the available setting options. The screen then changes to look similar to the one shown on the left, with the currently selected option highlighted. To select a different option, highlight it by tapping it or pressing the up or down cross keys.
To lock in your setting and deactivate the settings screen, tap the Set icon or press the Set button. The screen returns to its inactive state, as shown on the right, with the setting you selected appearing in blue and the row of digits at the bottom of the screen reflecting the number for that setting. Again, a blue number indicates that you chose a setting other than the default.
- Exiting the Custom Functions submenu: Tap the Menu icon in the lower-right corner of the screen) or press the Menu button. Press Menu again to exit the menu system entirely and return to shooting.
 After you select a setting (left), the initial menu screen updates to reflect your choice (right).