
When you shoot in Live View mode, you have three focusing options on your Canon EOS 7D Mark II. Two options are used for taking photographs of landscapes and objects, and the other focusing mode is used to detect faces. To specify the autofocus (AF) mode:
Press the Menu button.
Use the Quick Control button to navigate to the Shoot tab and then use the multi-controller button to navigate to the Shoot5 menu.
Rotate the Quick Control dial to highlight AF Method and then press the Set button.
The Live View AF mode options display on the camera LCD monitor.
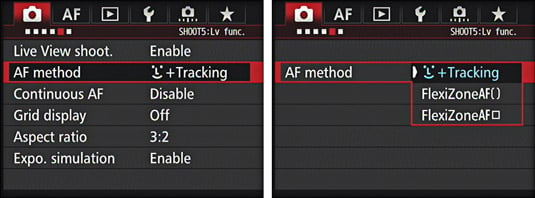
Use the Quick Control dial to highlight one of the following options:
Face Plus Tracking: Use this mode when photographing people. When a face is detected, the autofocus frame appears over the face. If the subject moves, the autofocus frame moves with her. If the camera detects multiple faces, you can use the multi-controller button to move the autofocus over the face you want the camera to focus on.
FlexiZoneAF-Multi: This option is designated by the brackets next to its title on the camera menu. The camera uses 31 autofocus points to achieve focus. The autofocus points are divided into nine zones. The camera will automatically achieve focus, but you can press Set to toggle between automatic selection and zone selection. If you switch to zone selection, use the multi-controller button to select the zone you want to use to achieve focus.
FlexiZoneAF-Single: This option is designated by the square next to its title on the camera menu, which signifies the camera uses a single autofocus point is used to achieve focus. The camera will automatically place the autofocus point over the subject with the most contrast. You can use the multi-controller button to move the autofocus point over a different part of the scene that you want to be in sharp focus, in other words, the center of attention in the photograph you are creating.
Press Set.
The selected focusing mode is used whenever you shoot images with Live View.
If you find the camera has a difficult time focusing, switch to a different autofocus mode or focus manually.
To focus the camera with Face Plus Tracking focusing:
Press the Start/Stop button to enable Live View shooting.
An AF point appears in the center of the image.
Press the shutter button halfway.
The camera sensor detects faces in front of the lens by placing a rectangular AF frame over it. When the camera achieves focus, the frame turns green and the camera beeps. If the camera detects multiple faces, an AF frame with a right- and left-pointing arrow appears. Use the multi-controller button to drag the AF frame over the person who’s the center of interest and should be in focus.
Press the shutter button fully.
The camera takes the picture.
To focus the camera while using FlexiZoneAF-Single focusing:
Press the Start/Stop button to enable Live View shooting.
An AF point appears in the center of the image.
(Optional) Use the multi-controller button to move the AF point.
Move the AF point over the part of the image that you want the camera to focus.
Press the shutter button halfway.
When the camera achieves focus, the AF point turns green and the camera beeps.
Press the shutter button fully.
The camera takes the picture.
To focus with FlexiZoneAF-Multi focusing:
Press the Start/Stop button to enable Live View shooting.
An autofocus frame point appears in the center of the image.
Press the shutter button halfway.
The AF points for the FlexiZoneAF-Multi autofocus point mode appear on the camera LCD monitor. A white frame appears over the AF points. The point used to achieve focus turns green. If you’re happy with the area the camera used to achieve focus, take the picture, if not go to Step 3.
Press Set to switch to zone focusing, and then use the multi-controller button to select the desired autofocus zone.
This is the area of the scene that you decide must be in sharp focus.
Press the shutter button fully.
The camera takes the picture.