
You can enter copyright data only when the camera is set to P, Tv, Av, or M exposure mode, but the information you enter is added to all new files you create, regardless of which exposure mode you used to capture them.
Follow these steps to create your copyright notice:- Open Setup Menu 4 and choose Copyright Information, as shown on the left.
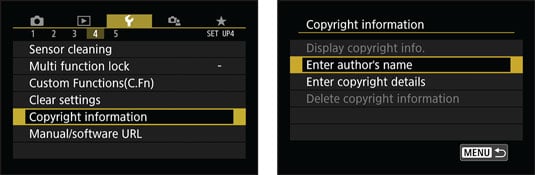 Enter your name and other copyright information that you want tagged to your images.
You see the screen shown on the right.
- Choose Enter Author's Name to display the digital keyboard shown here.
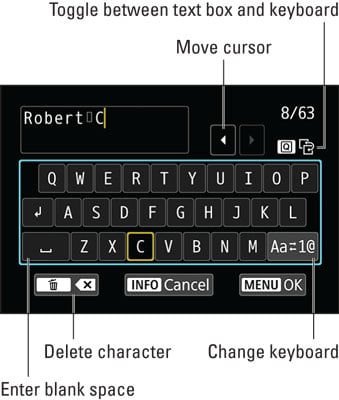 Enter the text you want to include in your copyright notice.
 - Enter your name.
The easiest option is to use the touchscreen: Just tap the letters you want to enter; the characters you select appear in the text box above the keyboard. Tap the symbol labeled change keyboard in the figure to cycle the keyboard display from all uppercase letters, to all lowercase letters, and then to numbers and symbols.
To move the cursor in the text box, tap inside the box or tap the arrows at the end of the text box. To erase the character to the left of the cursor, tap the Delete character icon, also labeled in the figure.

If you prefer button pushing to touchscreen tapping, press the Q button to toggle between the keyboard and the text box. When the keyboard is active, use the Quick Control keys, the Quick Control dial, or the Main dial to highlight a character and press the Set button to enter that character in the text box. To delete a character, press the Q button to activate the text box, move the cursor in front of the character you want to delete, and press the Erase button. Press Q again to jump back to the keyboard.
- Tap the Menu icon or press the Menu button; then confirm your decision to save the information and return to the main setup screen (right screen shown).
- Choose Enter Copyright Details to return to the keyboard and add any additional data you think necessary. You might want to add the year or your email address, for example. (You don't need to enter the word Copyright — it's added automatically.)
- Tap the Menu icon or press the Menu button once to exit the setup screen; then tap OK or highlight it and press the Set button to complete the process.
- Press the Menu button to return to the menu system.