If none of the preset white balance options on your Canon EOS 60D produces the right amount of color correction, you can create your own, custom setting. To use this technique, you need a piece of card stock that’s either neutral gray or absolute white — not eggshell white, sand white, or any other close-but-not-perfect white. (You can buy reference cards made just for this purpose in many camera stores for less than $20.)
Position the reference card so that it receives the same lighting you’ll use for your photo. Then follow these steps:
Set the camera to the P, Tv, Av, M, B, or C exposure mode.
You can’t create a custom setting in any of the fully automatic modes. You can, however, select the custom setting you create when you record movies.
Set the White Balance setting to Auto.
Set the camera to manual focusing and then focus on your reference card.
Frame the shot so that your reference card fills the center area of the viewfinder.
In other words, make sure that at least the center autofocus point and the surrounding circle (the spot metering circle) cover the reference card. (Feel free to shoot for overkill.)
Make sure that the exposure settings are correct.
Press the shutter button halfway or check exposure. In M mode, make sure that the exposure indicator is at the midway point of the exposure meter. In other modes, a blinking aperture or shutter speed value indicates an exposure problem. If necessary, adjust ISO, aperture, or shutter speed to fix the problem.
Take the picture of your reference card.
You’ll tell the camera to use this picture to establish a custom White Balance setting in the following steps.
Display Shooting Menu 2 and highlight Custom White Balance.
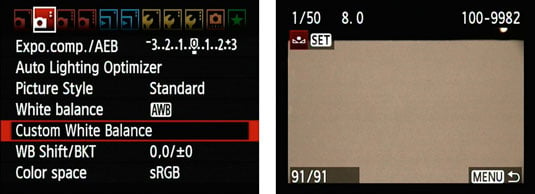
Press Set.
You’ll see the screen shown on the right. The image you just captured should appear in the display. If not, turn the Quick Control dial to scroll to the image.
Press Set to select the displayed image as the basis for your custom white balance reference.
You see a message asking you to confirm that you want the camera to use the image to create the custom White Balance setting.
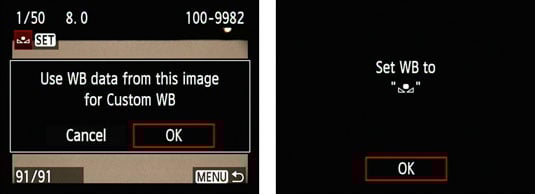
Press right or left on the multicontroller to highlight OK and then press Set.
A message tells you that the White Balance setting is now stored. The little icon in the message area represents the custom setting.
Press Set one more time to finalize the custom setting.
Your custom White Balance setting remains stored until the next time you work your way through these steps. Anytime you’re shooting in the same lighting conditions and want to apply the same white balance correction, just press the WB button or use the Quick Control screen to access the White Balance settings and then select the Custom option.