
When you shoot with flash on your Canon EOS 70D, the camera attempts to adjust the flash output to produce a good exposure in the current lighting conditions. On some occasions, you may find that you want a little more or less light than the camera thinks is appropriate.
You can adjust the flash output by using the Flash Exposure Compensation feature, which affects the output level of the flash unit. Flash exposure compensation is stated in terms of EV (exposure value) numbers — a setting of 0.0 indicates no flash adjustment — you can increase the flash power to +3.0 or decrease it to –3.0.
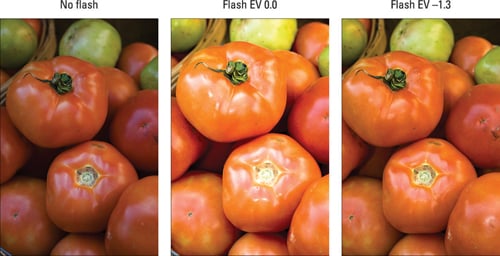
The following figure shows an example of the benefit of this feature — available only when you shoot in the advanced exposure modes. The first image shows a flash-free shot. Clearly, a little more light was needed, but at normal flash power, the flash was too strong, blowing out the highlights in some areas, as shown in the middle image. Reducing the flash power to EV –1.3, resulted in a softer flash that straddled the line perfectly between no flash and too much flash.
As for boosting the flash output, well, you may find it necessary on some occasions, but don’t expect the built-in flash to work miracles even at a Flash Exposure Compensation of +3.0. Any built-in flash has a limited range, so the light simply can’t reach faraway objects.
Whichever direction you want to go with flash power, you have two ways to do so:
Quick Control screen: This path is by far the easiest. Highlight the Flash Exposure Compensation value, as shown on the left in the following figure, and then rotate the Main dial or Quick Control dial to set the amount of flash adjustment. Or if you prefer to do things the hard way, tap the icon or press Set to display the second screen in the figure, where you can adjust the setting by using the Main dial, Quick Control dial, or Multi-controller; dragging your finger along the scale; or tapping the Brighter and Darker arrows. Tap the return arrow or press Set when you finish.
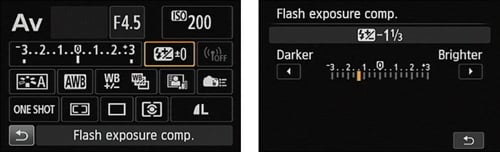 The quickest way to adjust flash power is via the Quick Control screen.
When flash compensation is in effect, the value appears in the Shooting Settings screen, in the area occupied by the icon in the left screen in the preceding figure. You see the same plus/minus flash symbol in the viewfinder but without the actual value. If you change the Flash Exposure Compensation value to zero, the flash-power icon disappears from all the displays until you enter Quick Control mode again.
Unfortunately, this method of setting flash power isn't available in Live View mode; for Live View shooting, trudge through the steps outlined next.
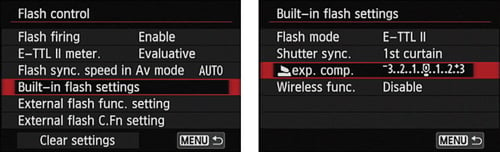
Shooting Menu 2: Display Shooting Menu 2 and select Flash Control to display the left screen shown in the figure below. Choose Built-in Flash Settings to display the right screen. Now choose Flash Exp. Comp., as shown on the right in the figure, to display the same adjustment screen shown on the right in the preceding figure.
As with exposure compensation, any flash-power adjustment you make remains in force until you reset the control, even if you turn off the camera. So be sure to check the setting before using your flash. Additionally, the Auto Lighting Optimizer feature, can interfere with the effect produced by flash exposure compensation, so you might want to disable it.