You really can’t escape using the if statement with JavaScript. The if statement is commonly used for testing whether something has happened or not, whether the data is in range or not, or whether the user wants to perform a specific task.
How to create a simple if statement in JavaScript
One of the most common uses of the if statement is to make a simple selection. When the user takes a particular action, something happens. In the following example, when the user clicks OK in the confirm dialog box, the application displays the secret message.
// Create an expression that results in true or false.
var Answer = confirm(
  "Do you want to display the secret message?");
// Test the expression using the if statement.
if (Answer)
{
  // Display the secret message when the user
  // clicks OK.
  document.getElementById("Result").innerHTML =
   "This is the secret message!";
}
In this case, Answer can contain only true or false because confirm() doesn’t output any other values. As a consequence, you don’t need to perform any sort of value checks on Answer — all you need to do is determine the truth value of Answer to make the decision.
All decision making expressions that you ever create will have a truth value of some sort — either true or false. Sometimes the truth value is hidden, as when working with the switch structure, but the truth value is there.
Computers don’t understand anything other than true or false. There are techniques that make it appear that the computer can do something else, but in reality, it all comes down to making a true or false decision as shown here.
What else can you do with the if statement?
You use the if statement in situations when an application needs to do something when the user responds correctly, but ignore the input when the response is incorrect. However, there are times when you must do something when the input is correct and something else when it’s incorrect. In this case, you add the else clause to the if statement as shown in the following example.
// Create an expression that results in true or false.
var Answer = confirm(
  "Do you want to display the secret message?");
// Test the expression using the if statement.
if (Answer)
{
  // Display the secret message when the user
  // clicks OK.
  document.getElementById("Result").innerHTML =
   "This is the secret message!";
}
else
{
  // Perform an alternative task.
  alert("Click OK next time to see the message!");
}
A clause is an extension of a structure. In this case, the else clause extends the if structure to include a second code block that handles the false condition. The example still outputs the secret message when the user clicks OK in the confirm() dialog box.
However, now the code also displays an alert() dialog when the user clicks Cancel. This secondary action helps the user understand how to react to the confirm() dialog box to obtain a different output.
How to nest if statements in JavaScript
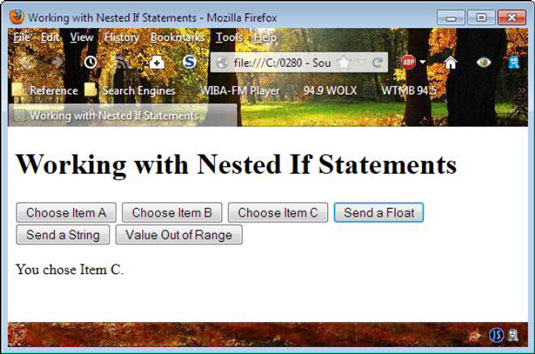
There are many reasons why you might nest if statements — that is, place one if statement within another. In this case, the user selects an option onscreen, CheckChoice() performs a check of that option, and then CheckChoice() displays the correct result onscreen.
function CheckChoice(option)
{
  // Verify that the input is a number.
  if (typeof(option) != "number")
  {
   // Display an error dialog.
   alert("Please provide numeric input!");
   // Return without doing anything more.
   return;
  }
  // Ensure that option is actually an integer.
  var Select = Math.round(option);
  // Verify that the input is in range.
  if ((Select < 1) || (Select > 3))
  {
   // Display an error dialog.
   alert("The value supplied is out of range!");
   // Return without doing anything more.
   return;
  }
  // Make a selection.
  if (Select == 1)
  {
   document.getElementById("Result").innerHTML =
     "You chose Item A.";
  }
  else
  {
   if (Select == 2)
   {
     document.getElementById("Result").innerHTML =
      "You chose Item B.";
   }
   else
   {
     document.getElementById("Result").innerHTML =
      "You chose Item C.";
   }
  }
}
This example doesn’t rely on a known source of input, so it begins by performing various checks of the data. The first check verifies that the caller has supplied a numeric value. After all, the caller could provide a string or a Boolean value instead. For that matter, the input could be a pointer to another function or anything else that JavaScript supports — you just don’t know.
The next step converts the numeric input to an integer. Data conversion is important in JavaScript because it treats both integers and floating point values as numbers. If you want an integer value, using Math.round() to get it is the best way to go. This function rounds the input to the nearest integer value, which means you don’t end up trying to perform comparisons against values such as 3.5.
At this point, you know you have a number and that the number is an integer, but you don’t know whether the number is in the correct range. A failure to range-check input values is the cause of many woes in JavaScript applications. CheckChoice() is expecting integer values in the range of 1 to 3, so the range check looks for these values.
The nested if statement is almost anticlimactic at this point. You know that Select contains 1, 2, or 3. The first if statement checks for a value of 1 and displays a message when it finds that value. When the value is something other than 1, the else clause takes over. Within the else clause is a nested if statement.
This if statement checks Select for a value of 2 and displays the appropriate message when it is. When Select is 3, the else clause of this second, nested, if statement displays the appropriate message.