
You can melt down and clean this wax for all kinds of terrific uses, such as making candles, furniture polish, hand cream, lip balm, and so on. Pound for pound, wax is worth more than honey, so it's definitely worth a bit of effort to reclaim this prize and start some fun, bee-related craft projects!
The solar wax melter
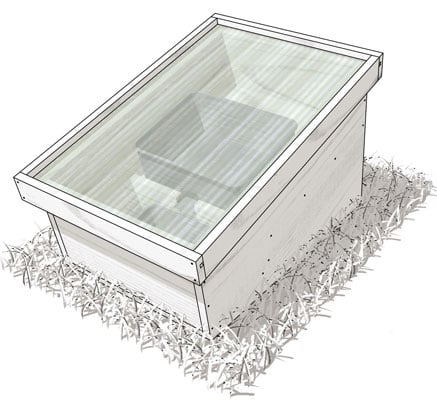
The solar wax melter (see the figure below) is a great way to render the beeswax to use for other purposes. Essentially, you melt the raw wax into a block that you can refine for various craft projects. And, best of all, this device is all natural, using no electricity — only the awesome power of the sun.Following, I provide the materials list, cut list, and instructions for building a solar beeswax melter.
 ©Felix Freudzon, Freudzon Design
Vital stats for the solar wax melter
-
Size: 27-3/4 inches x 189/16 inches x 18-1/2 inches.
-
Capacity: Depending on the size of the pan you use in the melter, this design should provide ample capacity to render up to 6 to 8 pounds of wax at a time.
-
Degree of difficulty: The butt joinery is the simplest method for assembling wood, and this design has one straightforward dado cut. All in all, an easy build.
-
Cost: Using scrap wood (if you can find some) would keep material costs of this design minimal, but even if you purchase the recommended wood, hardware, glazing, and fasteners, you can likely build this solar wax melter for less than $75. The most expensive single item is the greenhouse glazing.
Materials list for the solar wax melter
The following table lists what you'll use to build your solar wax melter. In most cases, you can substitute other lumber as needed or desired. I've included a few more screws and nails than you'll use. You might lose a few along the way — better to have a few extras on hand and save another trip to the hardware store.| 1, 10' length of 1" x 3" knotty pine lumber | A 2-pound size disposable aluminum loaf pan (approximately 8" x 4" x 2") | 60, #6 x 1-3/8" deck screws, galvanized, #2 Phillips drive, flat-head with coarse thread and sharp point |
| 2, 4' x 4' sheets of 3/4" exterior plywood | A large, disposable aluminum roasting pan (approximately 17" x 14" x 3") | 8, 5/32" x 1-1/8" flat-head, diamond-point wire nails |
| 1, 2' x 4' polycarbonate dual-wall 6mm greenhouse panel (available from greenhouse supply stores and sometimes found on online auction sites like eBay) | ||
| A quart of flat black exterior paint (either latex or oil) | ||
| Optional: weatherproof wood glue |
Use the recommended "plastic" (polycarbonate) glazing for the window. Not only does it work well, it also avoids all the potential dangers associated with fragile window glass. Keep in mind that this melter typically sits on the ground, and a playful child or bouncing pet could be seriously injured stepping on a glass top. Invest in safety and use the polycarbonate greenhouse panel. Its dual-wall design is also more effective at retaining heat than a single pane of glass.
Cut list for the solar wax melter
The following breaks down the solar wax melter into its individual components and provides instructions on how to cut those components.Lumber in a store is identified by its nominal size, which is its rough dimension before it's trimmed and sanded to its finished size at the lumber mill. The actual finished dimensions are always slightly different from the nominal dimensions. For example, what a lumberyard calls 1 inch x 3 inch lumber is in fact 3/4 inch x 2-1/2 inch.
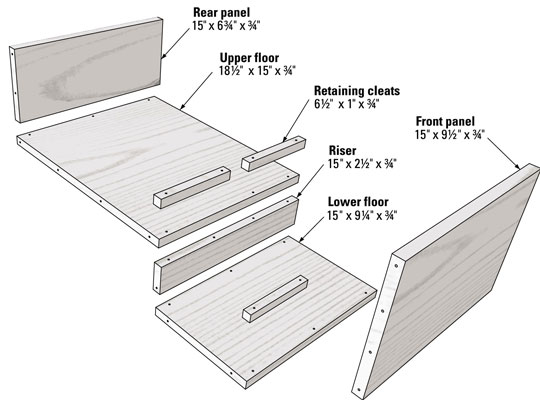
The Material column in the following table lists nominal dimensions and the Dimensions column lists the actual, final measurements.Floor assembly
| Quantity | Material | Dimensions | Notes |
|---|---|---|---|
| 3 | 1" x 3" knotty pine | 6-1/2" x 1" x ¾" | These are the retaining cleats that hold the aluminum pans in position. |
| 1 | 3/4" exterior plywood | 18-1/2" x 15" x 3/4" | This is the upper floor. |
| 1 | 3/4" exterior plywood | 15" x 9-1/2" x 3/4" | This is the front panel. |
| 1 | 3/4" exterior plywood | 15" x 9-1/4" x 3/4" | This is the lower floor. |
| 1 | 3/4" exterior plywood | 15" x 6-3/4" x 3/4" | This is the rear panel. |
| 1 | 3/4" exterior plywood | 15" x 2-1/2" x ¾" | This is the riser. |
 ©Felix Freudzon, Freudzon Design
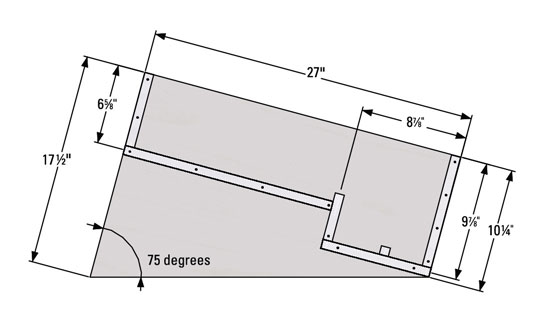
Inclined side panels
| Quantity | Material | Dimensions | Notes |
|---|---|---|---|
| 2 | 3/4" exterior plywood | 27" x 17-1/2" x 10-1/4" x ¾" | These are the inclined side panels. To create an incline of approximately 15 degrees, the front edge of the panel is 10-1/4" high and the rear edge is 17-1/2" high. |
 ©Felix Freudzon, Freudzon Design
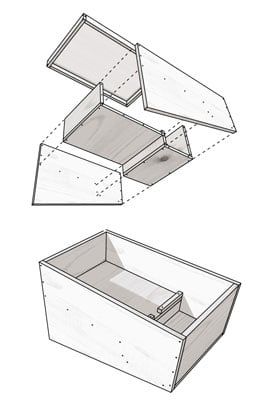 ©Felix Freudzon, Freudzon Design
Glazed top assembly
| Quantity | Material | Dimensions | Notes |
|---|---|---|---|
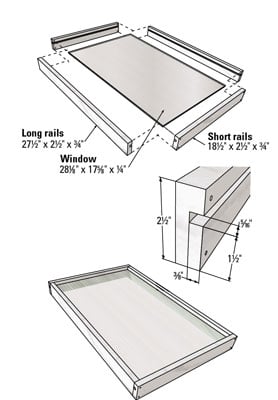
| 2 | 1" x 3" knotty pine | 27-1/2" x 2-1/2" x 3/4" | These are the long rails of the frame. Dado a 5/16" wide by 3/8" deep groove along the entire length of what will be the inside of each rail. Position the bottom edge of the dado 1-1/2" from what will be the bottom edge of the rail. |
| 2 | 1" x 3" knotty pine | 18-1/2" x 2-1/2" x ¾" | These are the short rails of the frame. Dado a 5/16" wide by 3/8" deep groove along the entire length of what will be the inside of each rail. Position the bottom edge of the dado 1-1/2" from what will be the bottom edge of the rail. |
| 1 | Polycarbonate dual-wall 6mm greenhouse panel | 28-1/8" x 17-5/8" x ¼" (6mm) | This is the window. Cut it to size using your table saw and a general purpose blade. |
 ©Felix Freudzon, Freudzon Design
Putting it together
After you've cut all the pieces of your solar wax melter, it's time to clear a good work space and put all this stuff together. You start with the floor of the solar wax melter and work your way to the top.-
Attach the riser to the lower and upper floors.
First use the deck screws and a power drill with a #2 Phillips head bit to attach the lower floor to the riser. Doing this is easiest with these elements of the floorboard assembly turned upside down on your work surface (the screws go through what will be the underside of the lower floorboard and into the lower edge of the vertical riser).
This is a simple butt joint. Just line up the edges so that they're flush with each other.
Now flip these two components right-side up on the worktable and use deck screws to attach the upper floorboard to the top edge of the vertical riser; just line up the edges so that they're flush with each other.
Throughout the entire floor assembly, consider using a weatherproof wood glue in addition to the screws. It helps make the structure as strong as possible. Apply a thin coat of glue wherever the wooden parts are joined together (the exception is the glazed top, which you do not want to glue, just in case you need to replace the glazing).
The screws will go in easier if you first drill a 7/64-inch hole in each spot you plan to place a screw. The pre-drilling also helps prevent the wood from splitting. Refer to the earlier figures to determine where the screws go.
-
Attach the cleats to the upper and lower floors.
First use the nails and a hammer to attach the two cleats to the upper floorboard. Position the cleats flush with the front and side edges of the upper floorboard. You'll have a 2-inch gap left in the center (for the melted wax to flow through). A couple of nails per cleat will do the trick. See the following figure for the approximate placement of the nails.
Now take the remaining cleat and attach it to the lower floorboard using the nails. To determine the exact placement, place your smaller disposable aluminum loaf pan on the bottom floor, as shown in the following figure. This helps you determine where to attach the cleat (the dimensions of these pans vary from brand to brand).
The objective is to position this cleat so that the pan doesn't slide out of position. After all, it will be on a 15 degree incline. This pan collects the melting wax as it flows from the larger pan that sits on the upper floor. A couple of nails per cleat should the trick.
-
Attach the floor assembly to the front and rear vertical panels.
Turn the entire floor assembly over and attach the front and rear vertical panels to the front and rear of the floor assembly. The large panel attaches to the lower floor, and the smaller panel attaches to the upper floor. Use deck screws to attach the panels to the floor assembly. The screws go through the lower and upper floors and into the edges of the vertical panels.
These are simple butt joints. The edges of the pieces should be flush with each other. Precise placement isn't critical. Now flip the entire thing over again and proceed to the next step.
-
Attach the side panels to the floor assembly.
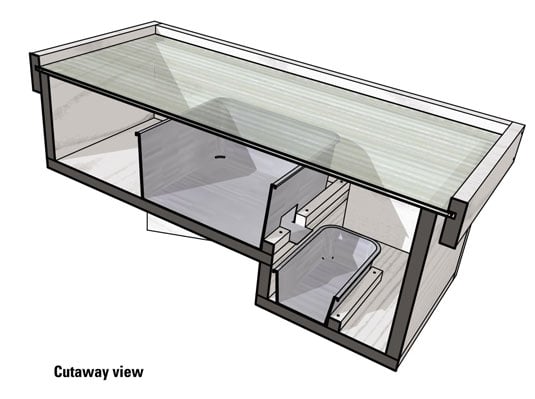
Use deck screws to attach the floor assembly (which now includes the front and rear panels) to the side panels. The screws go through the side panels and into the edges of the floor assembly. Note that the floor assembly is tilted within the side panels so that gravity will do its trick and direct the melting wax into the collection pan.
You'll make life a lot easier if you first pre-drill 7/64 -inch guide holes in the side panels. Lay a side panel on the workbench and then position the edge of the entire floor assembly on the side panel (just as it will go when screwed together). Use a pencil to trace the outline of the floor assembly's edges on the side panel.
Do the same thing for the other side panel. Now drill the guide holes in the side panels. This little step makes it a lot easier to correctly align and attach the floor assembly within the two side panels. Otherwise it will be a hit or miss exercise.
Use the following figure to determine the approximate placement of screws. The objective is to make sure that screws go into the edges of all the critical components of the floor assembly: rear panel, upper floor, riser, lower floor, and front panel.
-
Build the glazed top assembly.
Use deck screws to attach one of the short rails to the two long rails. These are simple butt joints. You're essentially building a picture frame. Take care to align and match up the dado grooves; these are the channels into which the window panel fits. Use two screws per corner (avoid placing a screw where it may interfere with the dado groove).
Now take the polycarbonate window panel and slide it into the dado grooves of the partially assembled frame. Assuming the glazed panel was cut perfectly "square," it will square up the frame nicely.
Using two deck screws per corner, attach the remaining short rail to the long rails. Again, be careful to avoid placing a screw where it may interfere with the dado groove and the newly installed window panel.
Using screws (versus nails) allows you to remove the glazed panel at a later date, should it ever need replacing. For this reason, do not use wood glue on the glazed top assembly.
-
Paint all wooden surfaces matte black.
To protect the wood and better retain solar heat, paint all the wood surfaces, inside and out, using a matte black exterior paint. Two or three coats will do the trick. Let each coat dry completely before adding the next.
-
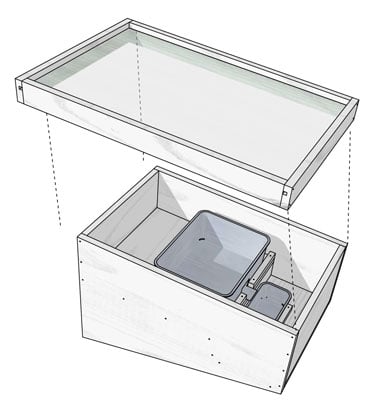
Place the aluminum pans inside the solar wax melter.
Cut a 2-inch-wide flap centered along one of the long sides of the large roasting pan (see the following figures). This hole and flap allow the melting wax to flow into the smaller pan below. The larger roasting pan sits on the inclined upper floor, with the cut-out flap aligned with the gap between the two retaining cleats. Fill the large pan with your wax cappings and other harvested comb.
The smaller loaf pan sits on the lower floor, snug against the riser and aligned to collect the melting wax from the larger pan above.
-
Put the glazed top assembly on the solar wax melter.
The removable top fits on and over the top of the wax melter (like a hat fits on a head). Position the entire unit so that the glazed top is exposed to the direct sun (facing south is best). Now all you need are some warm, sunny days and you'll soon have a lovely block of pure, natural beeswax. Time to make candles, furniture polish, and cosmetics!
 ©Felix Freudzon, Freudzon Design
 ©Felix Freudzon, Freudzon Design