

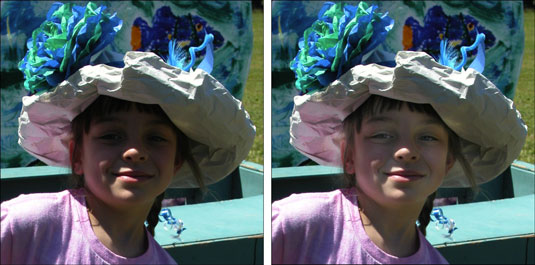
In Photoshop Elements, you can lighten or darken areas of an image using the Dodge and Burn tools, respectively. You can specify the size and softness of your tool by simply selecting from one of the many brush tips. You can also limit the correction to various tonal ranges in your image — shadows, midtones, or highlights. You also can adjust the amount of correction that’s applied by specifying an exposure percentage.
Choose either the Dodge (to lighten) or Burn (to darken) tool from the Tools panel in Edit Full mode.
Press Shift+O to cycle through the Dodge, Burn, and Sponge tools.
Select a brush from the Brush Preset Picker drop-down panel and also adjust the brush size, if necessary.

Larger, softer brushes spread the dodging or burning effect over a larger area, making blending with the surrounding area easier.
From the Range pop-up list, select Shadows, Midtones, or Highlights.
Select Shadows to darken or lighten the darker areas of your image. Select Midtones to adjust the tones of average darkness. Select Highlights to make the light areas lighter or darker.
Choose the amount of correction you want to apply with each stroke by adjusting the Exposure setting.
Start with a lower percentage to better control the amount of darkening or lightening. Exposure is similar to the opacity setting that you use with the Brush tool.
Paint over the areas you want to lighten or darken.
If you don’t like the results, press Ctrl+Z (cmd+Z on the Mac) to undo.

