Want to give your photo a little extra sparkle? Experiment with the Cross Screen filter on your Nikon D3200. This filter adds a starburst-like effect to the brightest areas of your image, as illustrated in the following figure.

Traditional photographers create this effect by placing a special filter over the camera lens; the filter is sometimes known as a Star filter instead of a Cross Screen filter. But you can apply a digital version of the filter via the Retouch menu, as follows:
Display your photo in single-image playback mode and press OK to call up the Retouch menu.
Highlight Filter Effects, as shown on the left in the following figure, and press OK.
You see the screen shown on the right in the following figure.
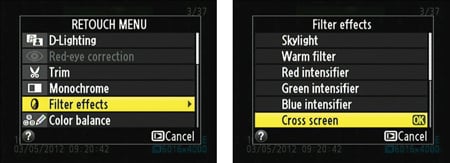 Select the Cross Screen filter from the Filter Effects submenu.
Highlight Cross Screen and press OK.
Now you see a screen containing a preview that shows you the results of the Cross Screen filter at the current filter settings, as shown in the following figure.
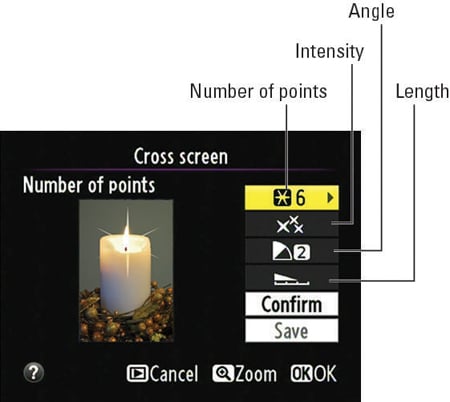 You can play with four filter settings to tweak the effect.
Adjust the filter settings as needed.
You can adjust the number of points on the star, the intensity of the effect, the length of the star's rays, and the angle of the effect. Just use the Multi Selector to highlight an option and then press the Multi Selector right to display the available settings. Highlight your choice and press OK.
To update the preview after changing a filter setting, highlight Confirm and press OK.
You can also press and hold the Zoom In button to temporarily view your image in full-screen view. Release the button to return to the normal preview.
Highlight Save and press OK to create your star-crossed image.
Keep in mind that the number of starbursts the filter applies depends on your image. You can't change that number; the camera automatically adds the twinkle effect wherever it finds very bright objects. If you want to control the exact placement of the starbursts, you may want to forgo the in-camera filter and find out whether your photo software offers a more flexible star-filter effect. (You can also create the effect manually by painting the cross strokes onto the image in your photo editor.)
It's also important to frame your original image with a little extra "head room" around the object that will get the starburst. Otherwise there won't be room in the picture for the effect.