


A named range in Excel is nothing more than a cell or range of cells that has been given a friendly, descriptive name. Naming your ranges allows you use easily recognizable names in your formulas instead of cell addresses.
For instance, say that you have line-item sales in cells A1:A25 and you have a percent tax in cell B1. You could calculate a total sale amount with tax using this formula:
=SUM(A1:A25)*(1+B1)
Now imagine that you gave your ranges descriptive names, calling cells A1:25 Sale_Items, and calling cell B1 Tax_Percent. You could then calculate the total sale amount with tax by using this formula:
=SUM(Sales_Items)*(1+Tax_Percent)
Immediately, you can see how much easier it is to understand what is going on in the formula. The formula is easier not only to read but also to explain to others who aren't familiar with the workbook.
Another benefit to naming these ranges is that creating new formulas with these named ranges becomes easier because you can simply use the easily remembered descriptive name instead of trying to remember that line-item sales live in cells A1:A25.
Creating a named range
Follow these steps to create a named range:
Select the cell or range of cells you want to name.
Choose Define Name from the Formulas tab. This activates the New Name dialog box.

In the Name input box, enter a friendly, descriptive name for your range.
In the Scope drop-down box, select whether you want your named range to be available for use throughout the workbook or just on a specific sheet.
Press the OK button to create your named range.
Keep these rules and best practices in mind when choosing a name for your range:
You cannot use spaces in range names. Use an underscore to emulate a space instead (for example, Sales_Items).
Range names must begin with a letter or an underscore.
Range names cannot be the same as cell addresses. For instance, you cannot name your range Q1 because Excel already has a cell Q1.
You can use any single letter as a range name except for R and C. These are reserved in Excel for the R1C1 reference style.
You cannot use operator symbols (+, –, *, /, , &) in range names. The only symbols valid in range names are the period (.), question mark (?), underscore (_), and backslash () symbols, as long as they are not used as the first character of the name.
Avoid using names that Excel uses internally, for example, Print_Area. Although Excel allows this name, using it can cause name conflict errors in the workbook. Other names to avoid are Auto_Activate, Auto_Close, Auto_Deactivate, Auto_Open, Consolidate_Area, Criteria, Data_Form, Database, Extract, FilterDatabase, Print_Titles, Recorder, and Sheet_Title.
The maximum length for a range name is 255 characters. That being said, you should avoid very long range names in general. Remember that the purpose of a range name is to provide a meaningful, easy-to-remember name that you can easily type into a formula.
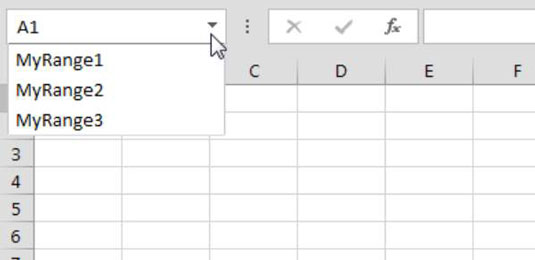
Working with the Name Box
The Name Box, found to the left of the Formula Bar, offers a couple of handy features for working with named ranges. You can click the drop-down selector in the Name Box to see all the named ranges in your workbook. Clicking any of the named ranges in the list automatically selects that range.
The Name Box also serves as a faster way to create a named range. To create a named range with the Name Box, first select the cell or range you want to name. Next, enter a valid name directly into the Name Box. Press the Enter key to create the name.
The Name Box is resizable. If you have a name that is too long for the Name Box, simply move your mouse cursor over the right edge of the Name Box until it turns into a horizontal arrow. When your cursor becomes a horizontal arrow, click and drag to widen the Name Box.
