Like many dSLR cameras, the Canon EOS 70D offers Live View, a feature that enables you to use the monitor instead of the viewfinder to compose photos. You must rely on the monitor to compose shots during movie recording; using the viewfinder isn't possible.
The basics of using Live View and Movie modes are pretty simple:
Switching from viewfinder photography to Live View mode: Set the Live View switch to the still camera icon, as shown in Figure 1, and then press the Start/Stop button. You hear a clicking sound as the internal mirror that normally sends the image from the lens to the viewfinder flips up. Then your subject appears on the monitor, and you can no longer see anything in the viewfinder. Instead of the normal Shooting Settings screen, you see symbols representing certain camera settings displayed over the live image, as shown in Figure 2. (If you see different symbols, don't panic; what's displayed depends on your camera settings and the Live View display options.)
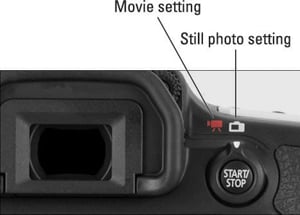 Figure 1: Set the switch to the camera icon for still photography and to the movie camera icon to record movies.
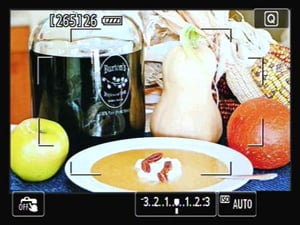 Figure 2: Picture data is superimposed over the live preview.
If nothing happens when you press the Start/Stop button, one of these two issues is the likely culprit:
The camera is asleep. By default, the camera powers down after one minute of inactivity. Wake it up by pressing the Start/Stop button and then press again.
Live View shooting is disabled. To turn it on, visit Live View Menu 1 and set the Live View Shoot option to Enable, as shown in Figure 3.
 Figure 3: The Live View Shoot option determines whether Live View photography is possible.
As with certain other menus, the options on the Live View menus vary depending on your exposure mode. The menu in Figure 3 reveals options available when you shoot in the advanced exposure modes; in the fully automatic modes, you lose access to the last two options on the menu. You also can't access an entire second Live View menu when you shoot in the fully auto modes.
Shooting photos in Live View mode: Most steps are the same as for viewfinder photography. Autofocusing methods, however, are quite different.
Just frame your subject so that it's within the area indicated by the rectangular brackets in the frame (refer to Figure 2). By default, the camera uses an autofocusing method called Face+Tracking, which means that if it finds faces in the scene, it will lock focus onto one of those faces; if not, it will focus on the nearest object. Press the shutter button halfway to set focus, and then press the rest of the way to take the picture.
Recording movies: The first step is to turn off the camera's Wi-Fi function, which you accomplish via Setup Menu 3. You can't record movies while the Wi-Fi system is active.
Next, move the Live View switch to the movie camera icon, labeled in Figure 1. Again, the monitor displays the live scene along with some shooting data. To start and stop recording, press the Start/Stop button.
Adjusting camera settings: For the most part, you use the same techniques as for viewfinder photography, selecting options on the menus, using the Quick Control screen, and so on. Note these critical differences up front:
The touchscreen Quick Control icon (Q) resides in the upper-right corner of the screen. (Refer to Figure 2.) During viewfinder shooting, it's in the lower-left corner.
Certain buttons don't perform the same functions as during viewfinder photography. For example, the AF Point Selection button plays a different role in focusing than it does during viewfinder photography.
Exposure modes work differently in Movie mode. The camera operates as it does in Scene Intelligent Auto mode for all Mode dial settings except the advanced exposure modes. Furthermore, you can control aperture and shutter speed only in M (manual exposure) mode. In P, Tv, and Av modes, the camera controls exposure, although you gain control over other settings, such as White Balance, that you don't have in the fully automatic modes.
Viewing photos and movies: Press the Playback button to look at your images and movies. To switch back to shooting, give the Playback button another press or give the shutter button a half-press and then release it.
Returning to viewfinder photography: To exit Live View mode, press the Start/Stop button. To exit Movie mode, rotate the Live View switch to the still-photography icon and then press the Start/Stop button.