The new Canon EOS 7D Mark II has a plethora of custom functions. If you’re a veteran user of the camera’s predecessor, you may have scoured the custom functions looking for Long Exposure Noise Reduction, High ISO Noise Speed Reduction, and Image Highlight Tone Priority. Not to worry. They’ve just found a different home in the EOS 7D Mark II.
Enabling Long Exposure Noise Reduction
If you take pictures using the B (Bulb) mode, the lens is open for a long time, which causes noise — the scourge of digital photography — to raise its ugly head. When you enable Long Exposure Noise Reduction, the camera greatly reduces the amount of noise in the resulting image. To apply noise reduction to images with an exposure duration of 1 second or longer:
Press the Menu button.
The menu displays.
Use the Quick Control button to navigate to the Shoot tab, use the multi-controller button to navigate to the Shoot3 menu, and then use the Quick Control dial to highlight Long Exp Noise Reduction.
Press Set.
The Long Exp Noise Reduction menu appears.
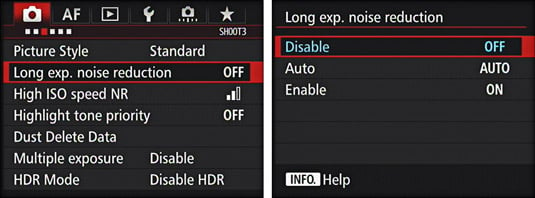
Choose one of the following options:
Disable: Does not apply noise reduction regardless of the exposure duration.
Auto: Applies noise reduction to images with an exposure duration of 1 second or longer when noise typical of long exposures is detected.
Enable: Applies noise reduction to all images with an exposure duration of 1 second or longer. This option may do a better job of cleaning up long exposure noise than the Auto option.
Press Set.
The Long Exposure Noise Reduction option of your choice is now in effect.
When you enable Long Exposure Noise Reduction, the camera takes longer to save the image to the memory card because the noise reduction is applied before the image is saved.
Enabling High ISO Speed Reduction
If you shoot in dim lighting conditions — some wedding photographers shoot in rooms just slightly brighter than caves — you need to bump the ISO to achieve a shutter speed capable of freezing motion. Even though you’re able to capture the image, you’ll find noise in the darker areas of the image. Enabling High ISO Speed Reduction helps get rid of the nasty noise, resulting in an almost squeaky clean image. To enable high speed noise reduction:
Press the Menu button.
The menu displays.
Use the Quick Control button to navigate to the Shoot tab, use the multi-controller button to navigate to the Shoot3 menu, and then use the Quick Control dial to highlight High ISO Speed NR.
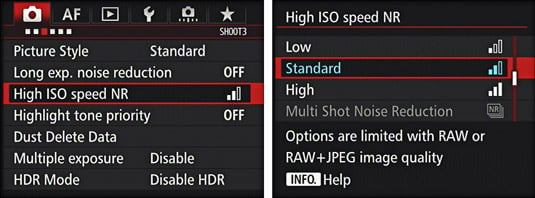
Press Set.
The High ISO Speed NR menu displays.
Choose one of the following options:
Low: Applies minimal noise reduction to images photographed with a high ISO speed.
Standard: The default option applies noise reduction to all images.
High: Applies the maximum amount of noise reduction to images photographed with high ISO speed. This option may be ideal if you shoot lots of images with a high ISO speed.
Multi Shot Noise Reduction: This option is available when you use the camera’s multi-shot option. It applies more noise reduction than the High option.
Press Set.
Your favorite flavor of high ISO speed noise reduction is applied to every image you shoot until you reset the camera to its default settings or choose a different high ISO speed noise reduction option.
Change these custom functions at your discretion and with however many grains of salt you choose.
Enabling Highlight Tone Priority
Another custom function that’s found a new home is Highlight Tone Priority. This option is very useful if you do a lot of photography in bright conditions. In essence, the camera gives priority to the bright parts of your scene or subject you are photographing, which prevents them from being overexposed. If you do wedding photography, this feature enables you to capture images with subtle details such as the bride’s veil. It also extends the dynamic range. To enable Image Highlight Tone Priority:
Press the Menu button.
The menu displays.
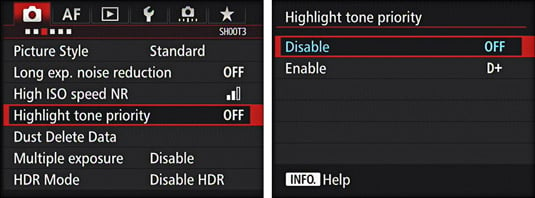
Use the Quick Control button to navigate to the Shoot tab, use the multi-controller button to navigate to the Shoot3 menu, and then use the Quick Control dial to select Highlight Tone Priority.
Press Set.
Choose one of the following options:
Disable: The default option disables Highlight Tone Priority.
Enable: Enables Highlight Tone Priority, which boost the dynamic range of the image by approximately 18 percent, the increase noticeable in the bright tones of the image.
Rotate the Quick Control dial to highlight Enable and press Set.
The option is displayed in blue. Highlight Tone Priority is in effect until you disable the option or reset all custom functions.
You can’t use ISO expansion when Highlight Tone Priority is enabled. With this option, you’re limited to an ISO range from 200 to 6400.