The real name of the Fisherman's knot is the Improved Clinch knot. But way back when, many people called it the Fisherman's knot because every angler knew how to tie it, and it was often the first knot they learned to attach a fishing line to a hook.
Knot-tying instructions use a few standard terms. These terms are pretty self-explanatory, but just to make sure the instructions are clear, here they are:
Tag end: The end of your line. This is the part that does the knot-tying.
Standing line: The rest of the line that runs up toward the reel.
Turn: Sometimes called a wrap. A turn occurs when you pass the tag end completely around the standing line.
To tie the Improved Clinch knot, a.k.a the Fisherman's knot, follow these steps:
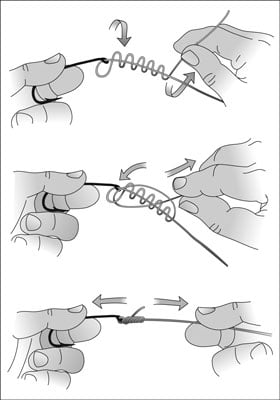
Run the tag end of the line through the eye of the hook and pull 8–10 inches of line through the hook eye.
Wrap the tag end around the standing end for five wraps or turns.
Now pass the tag end through the loop next to the hook eye.
You have formed another loop that includes your wraps.
Pass the tag end through that loop.
Wet the loops with some saliva to lubricate the knot.
Hold the tag end and standing end in one hand and the bend of the hook in the other; then pull with steady pressure.
If you are not sure about safely holding the hook, grip it firmly but not super firmly with needle-nose pliers.
Tighten slowly.
Clip the tag end so that only 1/8-inch is left.
A standard fingernail clipper is a great tool for making a clean final cut on the tag end.
Instead of clipping the tag end to 1/8 inch, you could leave the remaining tag end about 1/4-inch to 3/8-inch long and then touch the very tip of the tag end to the hot end of a lit cigarette (or a just-blown-out match) in order to create a ball on the end of the line, which prevents the tag end from pulling out under stress.