Through the Retouch menu on your Nikon D7200, you can do simple photo editing in the camera. It's a no-risk proposition: The camera doesn't alter your original file; it makes a copy and applies changes to the copy only. Here are the basics you need to get started:
Access retouching tools: You can take two routes:
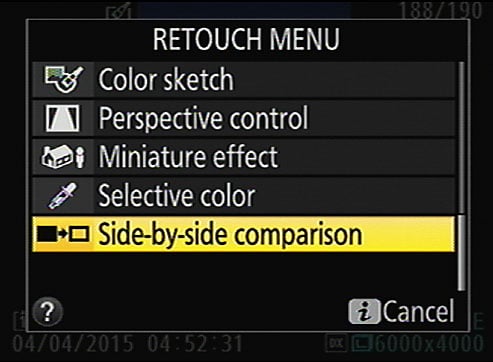
Retouch menu: Display the Retouch menu, shown on the left in this figure. (Scroll to the menu's second page to see more tools.) Select a tool and press OK to display image thumbnails, as shown on the right in the figure. Use the Multi Selector to select a thumbnail and press OK to display options related to the chosen retouching tool.
 After selecting a Retouch menu option (left), select the photo you want to edit (right).
Playback i-button menu: In Playback mode, select the photo you want to alter, press the i button, and choose Retouch to display the Retouch menu over your photo. Select a tool and press OK to access the tool settings.

You can't use the i-button menu to access one tool, Image Overlay. This feature combines two Raw files to create a new Raw original.
Determine which files can be edited: If the camera can't apply the selected tool, it displays an X over the thumbnail, as shown on the right, or dims or hides the tool on the menu. A file or tool may be off-limits for these reasons:
The tool isn't relevant to the current file. For example, if you didn't use flash when taking the picture, the Red-Eye Correction tool is dimmed. For Movie files, indicated by the dotted frame shown, the only available Retouch option is Edit Movies.
You previously applied a tool that prevents further editing. You can apply multiple tools to the same original, but you need to be careful in what order you use them because some tools produce a file that can't be altered. After you use the Trim tool to crop your image, for example, you can't do anything else to the cropped version. A Retouch symbol, shown on the right, indicates an edited file.
Adjust tool settings: After you select certain tools, you see a preview of your image along with options that enable you to adjust the tool effect. In most cases, you use the Multi Selector to adjust settings, and the monitor updates the preview to show you the results. For example, this figure offers a look at the adjustment available for the D-Lighting tool.
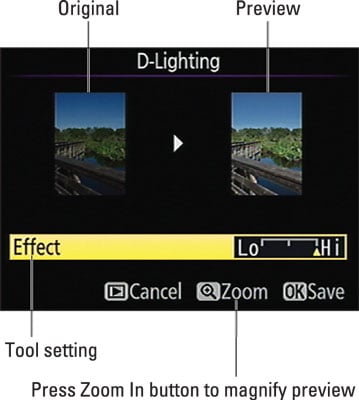 Some tools enable you to vary the impact of the adjustment and offer a before-and-after preview of the effect.
Get a bigger preview: If the word Zoom or the Zoom In button symbol appears on a screen, as shown on the right, press the Zoom In button to magnify the image. Release the button to exit the magnified view.
Save the edited copy: Press OK to finalize your edits and save the edited copy. The file is saved in the JPEG format, using the same Image Quality setting as the original. If you began with a Raw image, the JPEG version is saved using the Fine setting. (Again, Image Overlay is the exception: It combines two Raw files to create a new Raw file.)
The retouched image is assigned the next available file number. Make note of the number so that you can find the image later.
Compare the original and retouched image: Put the camera in playback mode and display the original or retouched image. Then press the i button, choose Retouch, and select Side-by-Side Comparison, as shown here. (You can't get to this feature via the standard Retouch menu; you must use the Playback mode version of the i button menu.)
 To get to this option, put the camera in playback mode, press the i button, and select Retouch.
A screen similar to the one shown in the following figure appears, with your original on the left and the edited version on the right. A text label indicates the tool used to create the edited version.
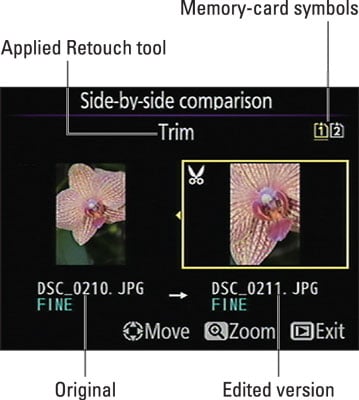 The left image is your original; the right, the retouched version.
The yellow box indicates the selected image; use the Multi Selector to switch between the original and edited version. You can then press the Zoom In button to study the selected image at a larger size. If two memory cards are installed, the yellow card icon in the top-right corner of the screen indicates which card holds the selected file (Card 1, in the figure).
When the retouched version is selected, you can also use these tricks:
If you applied more than one tool to the picture, press the Multi Selector right and left to display thumbnails that show how each tool affected the image.
If you created multiple edited copies of the photo, press the Multi Selector up and down to scroll through them.
To return to normal playback, select the image you want to display (the original or the altered version). Then press the Playback button.