The Nikon D3300 uses different focusing technologies depending on whether you’re using the viewfinder or taking advantage of Live View. The information here deals with viewfinder photography.
Two settings determine autofocusing behavior:
Focus mode: You can set the camera to lock focus when you press the shutter button halfway; to adjust focus continually up to the moment you depress the button fully to take the picture; or to decide for you which option is best. You also get a setting that disables autofocusing so that you can focus manually.
AF-area mode: This setting determines which focus points the camera uses to establish focus. You can tell the camera to select a point for you or to base focus on a specific point.
View your autofocusing settings
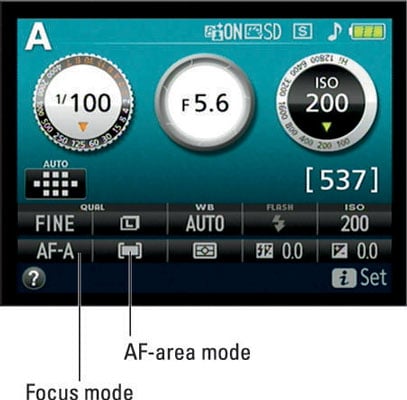
You can view the current settings in the Information display, as shown in this figure. The symbols in the figure represent AF-A for the Focus mode and Auto Area for the AF-area mode, which are the default settings for most exposure modes. At these settings, the camera decides whether to lock focus when you press the shutter button halfway and also selects the focus point for you.
A note before you dig in: When you use the Night Vision Effects mode, you can autofocus only in Live View mode. If you use the viewfinder, you’re limited to manual focusing. In Easy Panorama Effects mode, you must shoot in Live View mode, so follow the Live View focusing directions.
Change the Focus mode setting
First up on your list of focus settings to investigate is the Focus mode. You get three settings for tweaking autofocusing behavior and one option that turns off the autofocus system.
Choose the Focus mode via the Information display control strip, as illustrated in this figure. Remember: To activate the control strip, just press the i button.
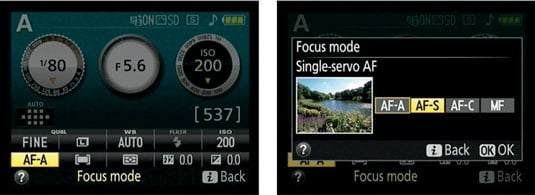
In the P, S, A, or M exposure mode, you can choose from four options, which work as detailed in the following list; in other exposure modes, you can choose only the last two options. The exception, again, is the Night Vision Effects mode, which limits you to manual focusing when you use the viewfinder.
AF-S (single-servo autofocus): Designed for shooting stationary subjects, this setting tells the camera to lock focus when you depress the shutter button halfway.
AF-C (continuous-servo autofocus): Geared to photographing moving subjects, this mode causes the camera to adjust focus continuously while the shutter button is pressed halfway.
AF-A (auto-servo autofocus): This mode, which is the default, gives the camera control over whether focus is locked when you press the shutter button halfway or continuously adjusted until you snap the picture. The camera bases its decision on whether it detects motion in front of the lens.
AF-A mode works pretty well but can get confused sometimes. If your subject is motionless but other people are moving in the background, the camera may mistakenly switch to continuous autofocus. By the same token, if the subject is moving only slightly, the camera may not make the switch. So my advice is to choose AF-S or AF-C instead.
MF (manual focus): Choose this setting to shut off the autofocusing system and focus manually.
On Nikon AF-S lenses, simply setting the switch on the lens to M automatically sets the Focus mode to MF. However, the opposite isn’t true: Choosing MF as the Focus mode does not free the lens focusing ring so that you can set focus manually; you must set the lens switch to the M position. For other lenses, check the lens instruction manual for focusing details.
In all of the autofocus modes, the camera won’t release the shutter to take a picture until focus is achieved. If you can’t get the camera to lock onto your focusing target, switching to manual focusing is the easiest solution. Also be sure that you’re not too close to your subject; if you exceed the minimum focusing distance of the lens, you can’t focus manually, either.