
Because it depends on which lens you're using for your Nikon D3300, there are no full instructions here on its operation. But the following basics apply to most Nikon AF-S lenses as well as to certain other lenses that support autofocusing — you should explore the lens manual for specifics, of course:
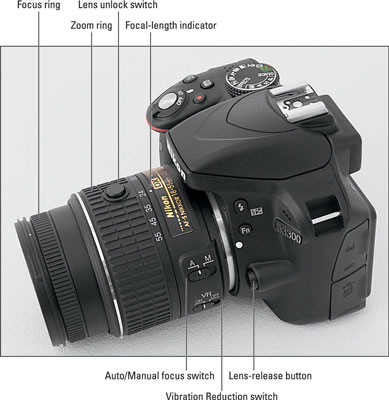
Extending/retracting the lens: If you use the kit lens, press the button labeled Lens Unlock Switch in the figure while rotating the lens barrel to extend and retract the lens. The camera won't take a picture with the lens in the retracted position.
Focusing: First, set the lens to automatic or manual focusing by moving the focus-method switch on the lens. For example, the figure shows the switch as it appears on the 18–55mm kit lens. On this lens, move the switch to the A position for autofocusing and to M for manual focusing.
Autofocusing: Press and hold the shutter button halfway to rev up the autofocusing system.
Manual focusing: Rotate the focusing ring on the lens barrel. The position of the focusing ring varies depending on the lens; the one found on the kit lens is labeled in the figure.
 Here are a few features that may be found on your lens.
Zooming: If you bought a zoom lens, it has a movable zoom ring. The location of the zoom ring on the kit lens is shown in the figure. To zoom in or out on this lens, rotate the ring. (Some lenses instead use a push/pull setup, where you push and pull the lens away from you or toward you to zoom.)
You can determine the current focal length of the lens by looking at the number that’s aligned with the white dot labeled focal-length indicator in the figure.
Enabling Vibration Reduction: Many Nikon lenses, including the kit lens, offer Vibration Reduction, which compensates for small amounts of camera shake that can occur when you handhold the camera. Camera movement during the exposure can produce blurry images, so turning on Vibration Reduction can help you get sharper handheld shots.
When you use a tripod, however, turn off the feature so that the camera doesn’t try to compensate for movement that isn’t occurring. Turn Vibration Reduction on or off by using the VR switch. (Refer to the figure.) The available settings vary depending on the lens, so again, see the lens manual for details.
Vibration Reduction is initiated when you depress the shutter button halfway. If you pay close attention, the image in the viewfinder may appear to be a little blurry immediately after you take the picture. That’s a normal result of the Vibration Reduction operation and doesn’t indicate a problem with your camera or focus.
Removing a lens: After turning off the camera, press the lens-release button on the camera (refer to the figure) and turn the lens toward that button until it detaches from the lens mount. Put the rear protective cap onto the back of the lens and, if you aren’t putting another lens on the camera, cover the lens mount with its cap, too.
Always switch lenses in a clean environment to reduce the risk of getting dust, dirt, and other contaminants inside the camera or lens. Changing lenses on a sandy beach, for example, isn’t a good idea. For added safety, point the camera body slightly down when performing this maneuver; doing so helps prevent any flotsam in the air from being drawn into the camera by gravity.