
Brushes iPad app is a powerful artistic tool that's simple enough for students to learn to use quickly. Students who use Brushes iPad app learn how to express themselves better through art.
The brilliant thing about the Brushes iPad app is that it’s used by artists all over the world, yet it’s still simple enough for beginners. Brushes has multiple layers that you can work on separately and that can be used with or without a stylus, which is a bonus in an educational setting. Another unique feature is that it has a Playback function that allows you to see any art redrawn onscreen.
![[Credit: Copyright 2012, Debbie Azar]](https://www.dummies.com/wp-content/uploads/370158.image0.jpg)
Get started with Brushes iPad app
Tap the + button on the Gallery page to create a new blank painting.
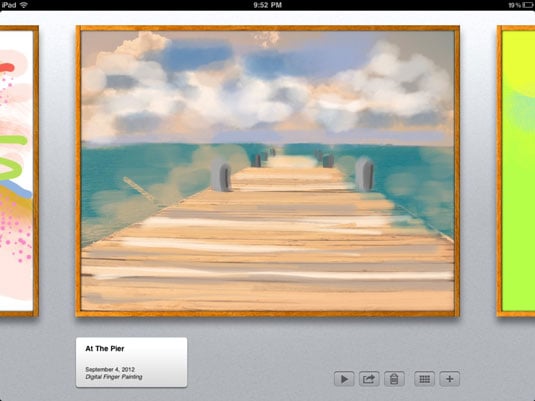
The first thing that you see when you open Brushes is the gallery. It displays your paintings and allows you to navigate between them. Simply swipe your finger to switch from one painting to the next and tap a painting to select it.
The gallery is really a digital sketchbook and can be used as such. Why not create a series of paintings to create a storyboard for a video, a presentation, or to tell a story?
Choose your color, brush size and shape, and begin painting.
Paint by moving your finger across the screen. Brushes creates a painting on multiple layers. Each layer is independent of the others so you can work on a layer without disturbing the contents of the other layers.
A navigation bar runs along the top of the screen, and a toolbar runs along the bottom. If you want more screen space, tap and hold the bars anywhere on the screen to turn them off.
To name your masterpiece, tap the Settings icon on the top right and select Properties; type the name of your painting in the first line.
The name of the artist (yes, that would be you) goes on the second line.
When you’re finished, tap the Gallery button to return to Gallery.
Your painting will automatically be saved. Brushes also allows you to share and export your paintings.
Brushes' painting interface
The painting interface offers the following set of tools:
Color palette: Tap the white rectangle in the lower-left corner to bring up an RGB color wheel. Select a color from the boxes on the right, or mix your own individualized palette by using the hue/saturation color wheel on the left. Note that you can also change the darkness and opacity by using the two sliders underneath the wheel.
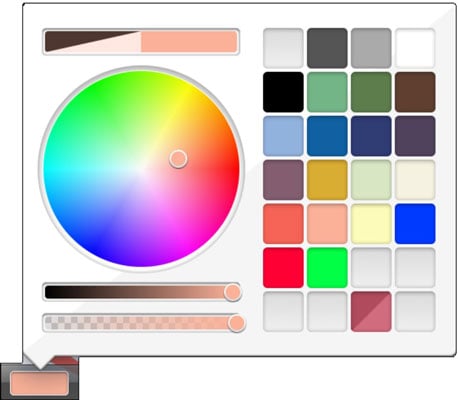
Sometimes you’ll want to blend colors in your painting. Use the transparency slider to make any color more transparent and easier to blend.
Eyedropper: Tap the Eyedropper tool or tap and hold anywhere onscreen to activate it. It reads the color under your touch, and makes it the active color. Note that after you use the Eyedropper, the active tool automatically reverts to the Paintbrush.
![[Credit: Copyright 2012, Benny Ferdman]](https://www.dummies.com/wp-content/uploads/370161.image3.jpg) Credit: Copyright 2012, Benny Ferdman
Credit: Copyright 2012, Benny FerdmanPaint Bucket: Use this tool to fill an entire layer with color.
Paintbrush. Select this tool to start painting.
Brush Settings: Tap the brush icon to bring up the Settings menu. There’s a sliding selection of brush shapes in a row toward the top. Swipe through and tap to select a brush type. You can control brush spacing, size, and opacity with the sliders underneath.
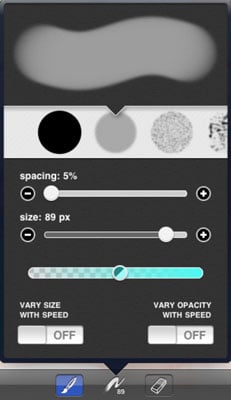
Although the iPad is not pressure-sensitive, you can make lines with varying thickness that will give you the tapered look of a natural paintbrush stroke. Tap the Brush Settings icon and turn on the options Vary Size with Speed and Vary Opacity with Speed. This enables you to create a truly organic-looking line.
Eraser: This tool removes color instead of adding it. Use the Brush settings to control the quality of the eraser. Just make sure you’re on the right layer when you’re using it.
Undo: Use the Undo tool to step back through the actions you’ve taken.
Redo: It looked better before, didn’t it? Press Redo to reverse your Undo.
Layers: Brushes allows you to create up to six individual layers that can be separately manipulated and worked on. Work on any one layer without disturbing the contents of other layers. This feature gives you a lot more control over the final result, and layers can be duplicated or discarded as needed.
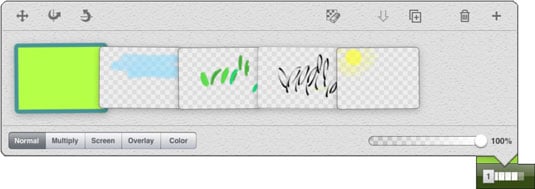
Layers can be rearranged, deleted, merged, and copied between paintings. You can also adjust the opacity of each layer.
You might have a colored layer as a background, do your drawing in a dark outline on the top layer, and color it in on the middle layer. You can change the background at any time without altering any other layer.
Tap the Layers icon to display the layers menu. Your layers will appear as thumbnails with the base layer to the far left. Some things you can do with layers include the following:
To add a new layer, tap the + icon on the top right.
To delete a layer, select it by tapping, then tap the Trash icon.
Use the slider on the bottom-right corner to change the opacity/transparency of a layer.
Tap any layer to make it the active layer. The selected layer will have a blue highlight around it.
Change the order of your layers by dragging and dropping them.
Paint a little blob of your favorite colors on a separate layer of your painting. That way, using the Eyedropper tool, you can quickly select colors from your palette by tapping and holding the blobs.