Excel 2013 makes it easy to share your spreadsheets with trusted clients and co-workers. If you save your workbook files in the cloud on your SkyDrive, you can easily share their worksheets by inviting co-workers and clients to open them in Excel on their own devices or, if they don’t have Excel, in their web browsers with the Excel web app.
Additionally, you yourself can edit the workbooks you save on your SkyDrive when you’re away from your office and the computer or device to which you have access doesn’t have a compatible version of Excel installed on it.
You simply use that device’s Internet access to log on to the Documents folder of your SkyDrive containing uploaded copies of your spreadsheets, and then you can use the Excel web app (that runs on most modern web browsers) to open and then review and edit them.
To share Excel workbooks you’ve saved on your SkyDrive, you follow these steps:
Open the workbook file you want to share and then choose File→Share (Alt+FH).
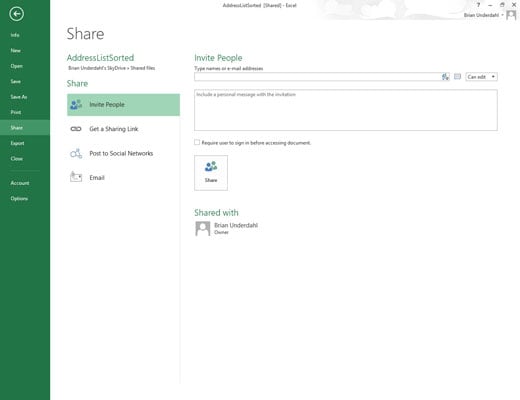
Excel opens the Share screen with the Invite People option selected.
Click the Type Names or E-Mail Addresses text box and then begin typing the e-mail address of the first person with whom you want to share the workbook.
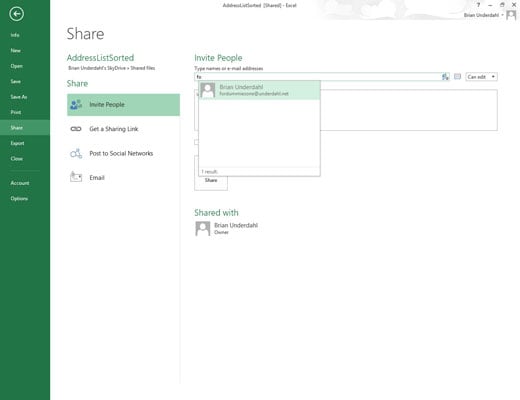
As you type, Excel matches the letters with the names and e-mail addresses entered in your Address book. When it finds possible matches, they are displayed in a drop-down menu, and you can select the person’s e-mail address by clicking his or her name in the list.
To find e-mail addresses in your Address list and add them to this text box, click the Search the Address Book for Contacts button (to the immediate left of the Can Edit drop-down list box) and then use the options in the Address Book: Global Address List dialog box. To share the workbook with multiple people, type a semicolon (;) after each e-mail address you add to this text box.
(Optional) Click the Can Edit drop-down button and choose Can View option from the menu to prevent the people you invite from making any changes to the workbook you’re sharing.

By default, Excel 2013 allows the people with whom you share your workbooks to make editing changes to the workbook that are automatically saved on your SkyDrive. If you want to restrict your recipients to reviewing the data in a read-only version without being able to make changes to the file, be sure to replace the Can Edit option with Can View before sharing the workbook.
(Optional) Click the Include a Personal Message with the Invitation text box and type in any personal message that you want to incorporate as part of the e-mail with the generic invitation to share the file.
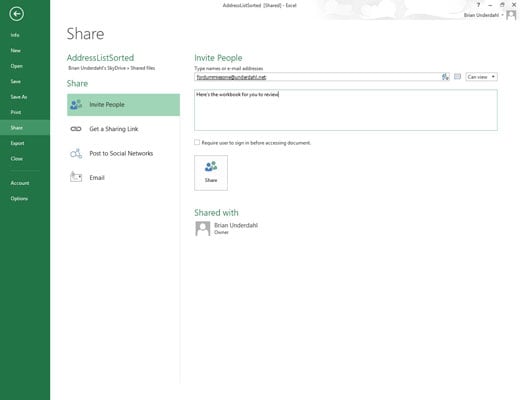
By default, Excel creates a generic invitation.
(Optional) Select the Require User to Sign-In before Accessing Document check box if you want the people with whom you share the workbook to have to log into a Windows Live account before they can open the workbook.
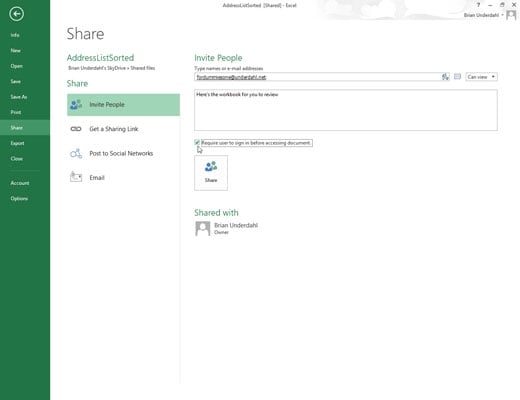
Don’t select this check box unless you’re giving your log-in information to the recipient(s) of the e-mail invitation, and don’t give this log-in information to anyone who isn’t in your inner circle or isn’t someone you trust completely.
Click the Share button.
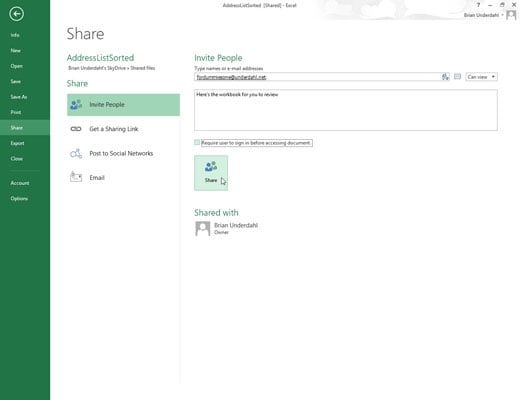
As soon as you click the Share button, Excel e-mails the invitation to share the workbook to each of the recipients entered in the Type Name or E-Mail Addresses text box. The program also adds the e-mail address and the editing status of each recipient (Can Edit or Can View) in the Shared With section at the bottom of the Share screen.
All the people with whom you share a workbook receive an e-mail message containing a hyperlink to the workbook on your SkyDrive.

