


The first step in setting up a problem in Excel 2013 for the Solver add-in utility to work on is to create the worksheet model for which you will define the objective cell, variables cells, and the constraint cells.
To define and solve a problem with the Solver add-in after you’ve loaded the add-in and have created your worksheet model, you follow these steps:
Click the Solver command button in the Analysis group at the end of the Ribbon’s Data tab.

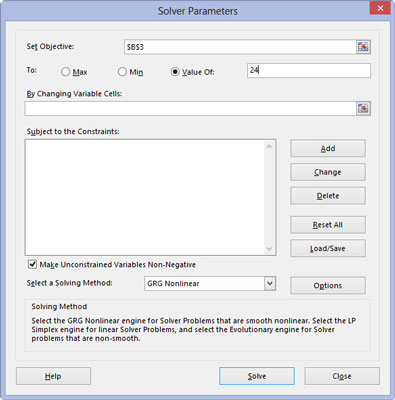
Excel opens the Solver Parameters dialog box.
Click the target cell in the worksheet or enter its cell reference or range name in the Set Objective text box.

Next, you need to select the To setting. Click the Max option button when you want the target cell’s value to be as large as possible. Click the Min option button when you want the target cell’s value to be as small as possible. Click the Value Of option button and then enter a value in the associated text box when you want the target cell’s value to reach a particular value.
Click the appropriate option button option in the To section of the dialog box. If you select the Value Of option button, enter the value to match in the associated text box.
Next, designate the variable cells — that is, the ones Solver can change to reach your Equal To goal.
Click the By Changing Variable Cells text box and then select the cells to change in the worksheet or enter their cell references or range name in the text box.
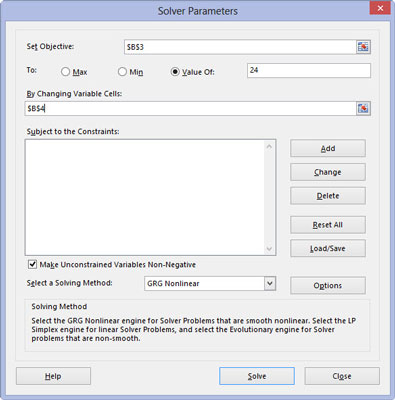
Remember that to select nonadjacent cells in the worksheet, you need to hold down the Ctrl key as you click each cell in the selection. To have Excel choose the changing cells for you based on the target cell that you selected, click the Guess button to the right of this text box.
Before having Solver adjust your model, you may add constraints for the target cell or any of the changing cells that determine its limits when adjusting the values.
(Optional) Click the Add button to the right of the Subject to the Constraints list box in the Solver Parameters dialog box.
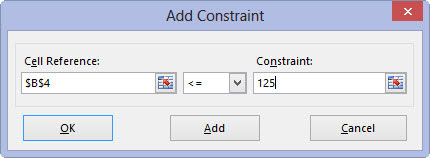
This action opens the Add Constraint dialog box. When defining a constraint, choose the cell whose value you want to constrain or select the cell in the worksheet or enter its cell reference in the Cell Reference text box.
Then select the relationship (=, <=, >=, or int for integer or bin for binary) from the drop-down list box to the right and (unless you chose int or bin) enter the appropriate value or cell reference in the Constraint text box.
To continue adding constraints for other cells used by the Solver, click the Add button to add the constraint and clear the text boxes in the Add Constraint dialog box. Then, repeat Step 5 to add a new constraint.
After you finish defining constraints for the target cell and changing values in the model, click OK to close the Add Constraint dialog box and return to the Solver Parameters dialog box (which now lists your constraints in the Subject to the Constraints list box).
(Optional) Deselect the Make Unconstrained Variables Non-Negative check box if you want to allow negative values when the variable cells are not subject to constraints.
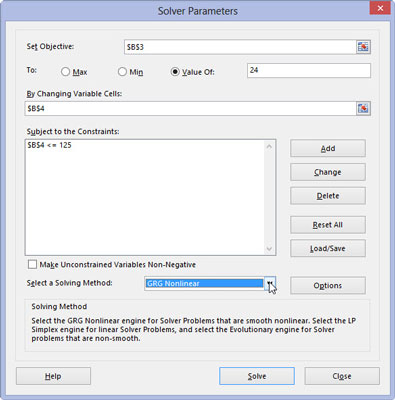
By default, the Solver Add-in employs the GRG (Generalized Reduced Gradient) Nonlinear method in solving the model whose parameters you’re setting known as a very efficient way to solve smooth nonlinear problems.
To use the LP Simplex method (for Linear Programming following the Simplex algorithm) or Evolutionary engine for solving non-smooth problems, you can select LP Simplex or Evolutionary from the Select a Solving Method drop-down list to use either one of these methods solving nonsmooth problems.
Click the Solve button.
The Solver solves the problem as you’ve defined it in the Solver Parameters dialog box.

