
If your walls were straight and true, installing your countertop would be a little easier. But your walls are likely to be off. To ensure a perfect fit for your new countertop, you check your walls for square and then scribe the contours of your walls onto your countertop laminate. The best way to check whether a corner is square is to use the 3-4-5 method. It’s a simple geometric formula:
Start in a 90-degree corner, measure out 3 feet, and mark that spot.
From the same corner, measure out 4 feet in the opposite direction and mark that spot.
Using a tape rule, measure the distance from the end marks of the 3- and 4-foot marks.
If the walls are square, the distance between the marks will be 5 feet.
If the corner where the countertops fit is out of square even by as little as 1/2 to 3/4 inch, you’re likely to damage the countertop by trying to make it fit. If you find that your walls aren’t close to square, hire a contractor to do the installation.
To shape the edges of your countertop, you need to transfer the contour of the wall onto the countertop’s edge surface. Use a compass to scribe, or transfer, the wall’s contour onto the laminate.
Set the countertop in place where you plan to install it.
When installing any section of countertop, check that it’s level. Use a 2- or 4-foot level. If the countertop isn’t level, slide shims between the countertop and the support struts of the cabinet frame to level the countertop. The shims will remain in place and won’t move after you secure the countertop to the cabinets.
Set your compass to fit the tip in the widest gap between the countertop and the wall.
Move the compass along the wall to draw a pencil line on the countertop’s surface that matches the wall contour.
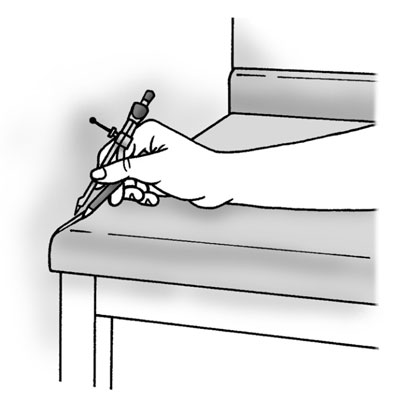
Do so for both the backsplash and for any edge that’s against a wall.
Remove the countertop and set it on a pair of sawhorses.
Secure the countertop to the sawhorses with squeeze clamps.
Place a rag or piece of cardboard between the clamp jaws and the countertop’s surface to protect the surface.
Remove the excess countertop (up to the pencil line) with a belt sander and a coarse (60-grit) sanding belt.
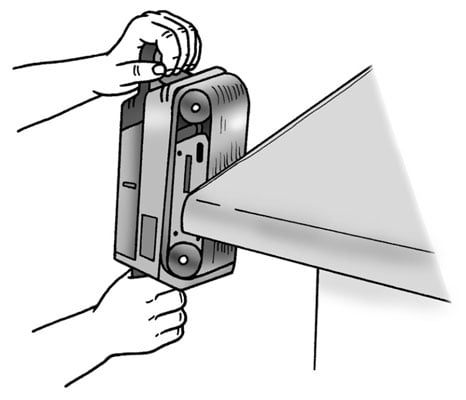 Hold the sander as shown. Avoid an upward cut, which might chip or lift the plastic laminate.
A coarse belt works best because it removes laminate and the substrate quickly yet neatly. If you have a lot of excess countertop, say 1/8 inch or more, cut off most of it with a jigsaw and then use a belt sander to finish up to the pencil line.
Reposition the countertop and check for any tight spots.
Touch up any tight spots with the sander and recheck the fit again before cutting it to length.
You want the countertop to fit, especially if you’re installing it during the humid summer months when the wall is fatter with humidity. If you’re installing the countertop in the drier winter months, leave a gap of about 1⁄16 inch along the wall to allow for movement due to changes in temperature and humidity. Fill the gap with a bead of silicone caulk as one of the final steps in the remodel.