


How to install games and other software on the Raspberry Pi
You can discover new software to install using the command line, but there’s also a friendly menu system you can use in the desktop environment. On the Applications menu, hover over the Preferences option and click Add/Remove Software to get started. You need to have an active Internet connection.
The menu looks like this:

In the top left is a search box, where you can enter the name of a program you’re looking for, or a phrase such as puzzle games to explore what’s available. On the left are categories you can click to see your options.
The main pane shows you the packages, with a scrollbar on the right that you can use to see the full list. Those that are already checked (or ticked) and shown in bold are already installed on your Raspberry Pi. You can click a package to see its description below. To select a package for installation, tick the box beside it. To remove it, untick it.
When you’ve finished choosing your software, click the OK button to install and remove the applications. You will be prompted to enter your password (which is raspberry, unless you’ve changed it). It can take some time to download and install the software, so it’s a good idea to choose a few applications and leave them to install in one batch while you do something else.
The menu ensures that any applications that your chosen application requires also get installed. When you install the puzzle game Brain Party, for example, the menu automatically installed its separate data package for you.
Your software is now installed! You should be able to run it either from the shell by entering its name (for example, penguinspuzzle), or through your Applications menu in the desktop environment.
The menu makes it easy to install software, but you might find that not all the software works well on the Raspberry Pi. It’s easy enough to try something, though, and remove it if it doesn’t do what you need. It’s all free.
Programming in Scratch
The Raspberry Pi was created partly to inspire the next generation of programmers, and Scratch is the perfect place to start. With it, you can make your own cartoons and games and discover some of the concepts that professional programmers use every day.
Scratch is designed to be approachable for people of all ages. The visual interface makes it easy to see what you can do at any time without having to remember any strange codes, and you can rapidly achieve great results. Scratch comes with a library of images and sounds, so it only takes a few minutes to write your first Scratch program.
The Scratch screen layout
There are two versions of Scratch installed in Raspbian:
- Scratch: This is the original version of Scratch, widely known as Scratch 1.4. If you’re a newcomer to Scratch, we recommend you start by using the original Scratch, because your programs will run much more quickly.
- Scratch 2: This adds some features that are not available in the original Scratch, including the ability for sprites (which are, roughly speaking, game characters) to create copies of themselves, and a feature to make your own blocks (or instructions). Because Scratch 2 requires the Flash software to work, it only runs on the Raspberry Pi 2 and Raspberry Pi 3. Some programs, especially action games, run significantly slower in this version of Scratch, because of all the layers of software required to run Flash on the Raspberry Pi. Simple programs will run fine, but if you want to make games you will soon notice a performance difference.
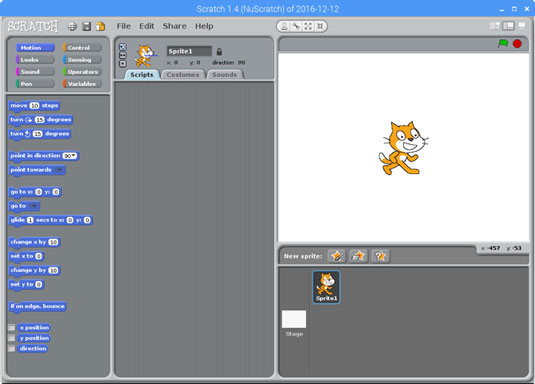
Scratch divides the screen into four main areas. The Stage is where you can see your game or animation take shape. There’s a cat on it already, so you can get started straightaway by making it do things, as you see in a minute. In Scratch, the Stage is in the top right, and in Scratch 2, it’s in the top left.
Underneath the Stage is your Sprite List. You can think of sprites as the characters in your game. They’re images that you can make do things, such as move around or change their appearance. For now, there’s just the cat, which has the name Sprite1 in Scratch and Cat1 in Scratch 2.
You create a Scratch program by snapping together blocks, which are short instructions. You find the blocks in the Blocks palette, which is on the left in Scratch and in the middle in Scratch 2. In both cases, it displays the Motion blocks by default. They include instructions to move ten steps, rotate, go to a particular grid reference, and point in a particular direction.
The Scripts area is where the magic happens! You assemble your program in this space, by dragging blocks into it from the Blocks Palette. The Scripts area is in the middle in the original Scratch, and on the right in Scratch 2.

Making your sprite move under keyboard control
You can make this simple example using either version of Scratch.
To make your sprite move under keyboard control, assemble the program in the following figure. You need to click the Control button above the Blocks Palette to view the yellow blocks, and the Motion button to see the blocks to change the x and y coordinates. The keyboard control block is called When [space] Key Pressed, and you can click where it says [space] to change that to a different key. The movement blocks to change the x and y position have the number 10 in them by default, but you can click in the box and type your chosen number.
![]()
Adding a bouncing ball
There are three or four New Sprite buttons above the Sprite List. In Scratch, the middle button, which shows a folder on a star, is for choosing a new sprite from a file. In Scratch 2.0, the first button with a spiky-haired character on it is for choosing a new sprite from the library. Click the button and use the file browser to find a ball sprite in the Things folder.
Now you have two sprites in the Sprite List. To choose which one you add blocks to, you click it first. Click the ball in the Sprite List (not on the Stage) to make sure it’s selected.
Then add the program in the following figure.

When you click the green flag above the Stage to start your program, the ball will start bouncing from left to right and back again, and you can move the cat to try to cross its path without getting hit. Well done! You’ve made your first simple game!
Online Scratch resources
For more help with Scratch, see the following links:
- Scratch Wiki: The Scratch Wiki is a community resource that includes documentation of all the Scratch blocks.
- 10 Block Demos: What can you do with Scratch in 10 blocks or fewer? These simple examples by Sean McManus, co-author of Raspberry Pi For Dummies, 3rd Edition, show you how to make a password, make a sprite explode, draw any shape, and more.
- Debugging Scratch programs: Some tips on the most common bugs in Scratch programs and how you can find them.
- Code Club Scratch Projects: Code Club provides project tutorials that are typically used in schools, but you can use them at home too.
- ScratchEd: A site for educators that includes lots of links to example Scratch projects and other resources.

