
After you finalize an Excel 2007 worksheet by reviewing formulas and proofing text, you should consider protecting the document to guard against any unplanned changes. Each cell in the worksheet can be locked or unlocked. By default, Excel locks all the cells in a protected worksheet, and then you can specify which cells you want to unlock for editing (if any).
Protecting cells
Follow these steps to protect cells in the worksheet:
Click the Protect Sheet command button in the Changes group on the Review tab.
Excel opens the Protect Sheet dialog box in which you select the options you want to be available when the worksheet protection is enabled. By default, Excel selects the Protect Worksheet and Contents of Locked Cells check box.
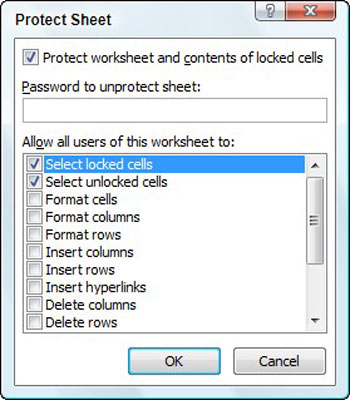 Select protection settings in the Protect Sheet dialog box.
(Optional) Select any of the check boxes in the Allow All Users of This Worksheet To list box (such as Format Cells or Insert Columns) that you still want to be functional when the worksheet protection is operational.
The Select Locked Cells and Select Unlocked Cells check boxes are selected by default, but you can deselect either or both of these options if you prefer.
If you want to assign a password that must be supplied before you can remove the protection from the worksheet, type the password in the Password to Unprotect Sheet text box.
Click OK.
If you typed a password in Step 3, Excel opens the Confirm Password dialog box. Re-enter the password in the Reenter Password to Proceed text box exactly as you typed it previously and then click OK. Notice that if you try to edit a cell, Excel displays an error message.
To remove worksheet protection, click the Unprotect Sheet button in the Changes group on the Review tab. You’ll be prompted to type the password if you previously set one.
Unlocking cells
Usually, your intention in protecting cells is not to prevent all changes but to prevent changes in certain areas of the worksheet. For example, in a budget worksheet, you may want to allow changes only in the cells where you enter the budgeted amounts. That way, you can’t inadvertently wipe out a title or formula in the worksheet by entering a value in the wrong column or row.
To unlock cells in a worksheet, follow these steps:
If the worksheet is protected, click the Unprotect Sheet button in the Changes group on the Review tab (type the password, if prompted).
Select the cells you want to unlock.
These are the cells you want to allow users to edit when the worksheet is protected.
Press Ctrl+1 to open the Format Cells dialog box and click the Protection tab.
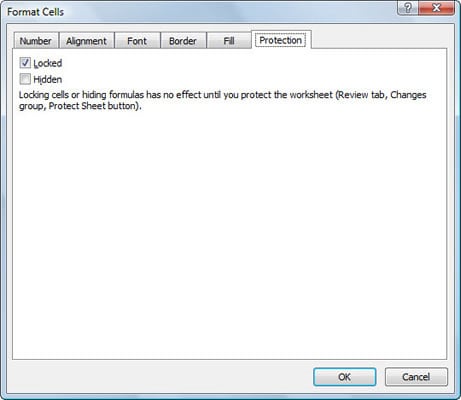 Use the Protection tab in the Format Cells dialog box to unlock cells.
Click the Locked check box on the Protection tab to remove its check mark.
Protect the worksheet (refer to the previous section).
All cells in the worksheet are now protected except the cells you unlocked.