
How to warm up your wrists for piano exercises
Before you begin piano exercises, warm up your wrists, shoulders, and other body parts. Doing so helps the physical component of playing the piano by heightening awareness of your body and the way you move. After a few stretches and warm-ups, you can bring a relaxed awareness to the piano when you practice.
Follow these steps for an effective wrist warm-up:
-
Hold your hands in front of you, palms facing away, as if you are pushing against a wall with both hands.
-
With a loose wrist, slowly circle your hands both clockwise and counterclockwise.
-
Bring your hands together in front of you like you’re praying, palm-to-palm, finger-to-finger, and extend your elbows out to the side.
-
Slowly rotate your wrists so that your fingers point toward you, and then away from you, and finally down to the ground.
-
Repeat a few times as you loosen your wrists.
Physical tension can easily become incorporated into your playing through the necessary repetition of practicing. So it’s very important to develop a pattern of releasing your muscles as you play and building this pattern into your playing. Doing this also becomes a way to unify the physical and mental components of music making, because staying comfortable while you play requires constant monitoring for areas of discomfort.
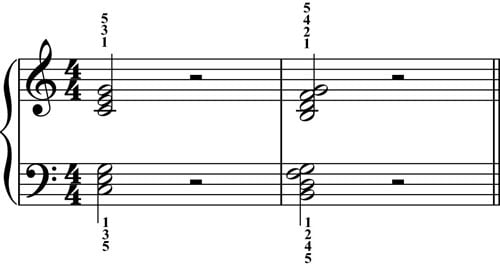
Practicing chord relaxation with a two-chord progression
Aspire to play chords with a relaxed approach — that is, don’t hold tension in your hands, arms, and body. You do need a certain amount of muscle tone and firmness in the finger joints to play nice, solid chords, but you also want to build in the habit of releasing tension while you play.
Start with this simple two-chord progression, and put the following steps into a cycle for each chord:
-
With your hands held slightly above the notes in the chord, imagine the shape of the chord in your mind and feel (but don’t play yet!) that shape in your fingers.
-
Allow your arm weight to drop onto the keyboard as you comfortably play the chord and hold the shape in your fingers.
-
With a loose, flexible feeling in your wrists, let the weight travel and be absorbed in your wrists with a light bounce.
-
Keeping the chord notes held down, let the wrist float back up and release the notes under your fingers as you lift up from the keyboard, releasing any muscle tension in your fingers, hands, arms, and shoulders.
During the rest between the two chords, release any tension throughout your arms and torso, and prepare for the next chord shape as in Step 1.
As you exercise, monitor your body for any area in which you may be holding tension — your arms, shoulders, neck, or even your face (in the form of a grimace or facial tic). Your aim is to breathe through your body as you play and to establish a cyclical pattern of tension and release.
Two piano exercises for one hand on top
Try these two piano exercises, which give you some practice with top/bottom hand positions. The exercises are fun to do on the piano and provide a visual treat, yet they can be tricky and challenge your hand independence. Your hands should be in a nestled position, with some air space in between to allow independent movement. Play these gently, with a lightly rocking rhythm.
Right hand on top exercise

Left hand on top exercise

How to breathe fluidly during piano exercises
Breathing is an integral part of piano exercises — after all, it’s the model for fluid motion where the end of an inhalation is the beginning of an exhalation. When you play the piano think of the music, your body, and your mind as part of this constant, fluid motion.
To create the smoothest, most luxurious breathing cycle you can imagine, follow these steps:
-
Stand with your shoulders and arms relaxed at your sides as you develop this slow cycle of inhalation and exhalation.
-
Inhale through your nose slowly and evenly, deeply filling your lungs over a smooth arc of time.
-
Turn the inhalation into an exhalation without holding your breath, like a swimmer reverses direction in a pool, always in motion.
-
Exhale fully, without pushing, and let go of all the air until you’re ready to begin another inhalation.
-
As you develop this slow cycle, let all your muscles relax and let go in the same rhythm.
Allow the breath to widen your upper body, back, shoulders, and neck so that you feel as if you’re loosening and lengthening throughout your body.