
Pentatonic patterns are extremely common in popular music, especially the rock and blues genres. They’re used to play melodies, riffs, lead guitar solos, and bass lines. The tips you find here focus on how you finger the patterns.
Here, you see some optional fingerings for a few of the pentatonic scale patterns (namely, patterns one, two, and four). The first pattern you see here is the pattern most guitarists learn as pattern one and the fingering they’re instructed to use. Because the scale tones stretch across four frets in this position, it makes sense to take a one-finger-per-fret approach.
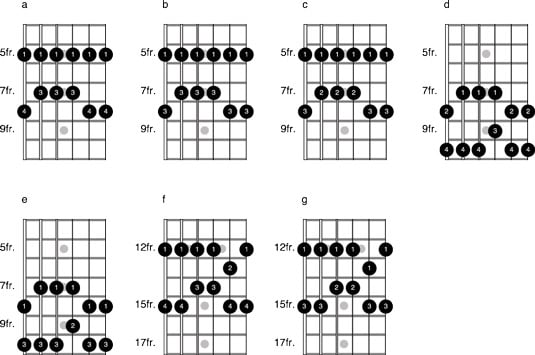
Although assigning one finger per fret makes logical sense, it may not always agree with your fine motor skill senses. Many guitarists find that their first three fingers are stronger and more coordinated than their fourth finger (referred to as the “rubbish finger” and “God’s little joke” by shred master Guthrie Govan). For this reason, it’s common to play notes at both the seventh and eighth frets with the third finger, as shown in figure b. Another option, shown in figure c, is to use your second finger at the seventh fret.
The options in figure b and figure c may be too much of a stretch for you, especially on the sixth string, but they get easier for most folks on the higher strings and in a higher position, like an octave higher in the 17th position.
Regardless of which fingers you use, you’ll notice that as you work your way to the sixth string side of the fretboard, it’s best for your thumb to move behind the neck, and when you work your way toward the first string side, it’s best for your thumb to wrap around or rest somewhere in between.
When it comes to riffing and soloing with scale patterns, many guitar players prefer to work around the fourth finger when they can; some actually do better using it. If you prosper with the pinky, then use it. On the other hand, if it’s holding you back, then work around it.
Figure d and figure e illustrate two examples of fingering the same scale in the next position in the shape of what’s commonly called pattern two. You see that you can take either a one-finger-per-fret approach, or remove your fourth finger from the equation and play it all with your first three fingers.
Another option, which is not shown, is to play the whole pattern using only your first and third fingers. Typically, when this pattern is in use, players focus on the notes in the higher register, strings one through three, and use their first three fingers in some combination, with the thumb wrapped. This works well when hammering on, pulling off, and bending, articulations that require more dexterity than many people’s fourth finger can handle.
Figure f and figure g jump two positions ahead to what most players call pattern four. This puts you in the 12th position. Because the frets are closer together, using all four fingers can get too crowded. From this position on the neck and onward, it works well to use fewer fingers with the pinky being the first to go. You can try the fingering above or any other combination that feels good to you.
As you know, the pentatonic scale creates five different patterns on the guitar fretboard and is played in all keys. This concept applies to all patterns and in all keys.
You can see all the pentatonic scale fingering options here.
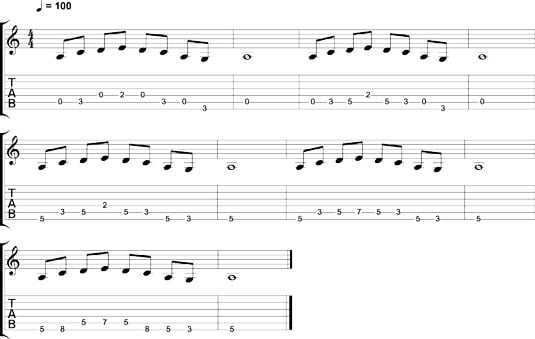
Next, you play through a sample pentatonic riff using different patterns in different positions. And “riff” is a bit of an exaggeration because there isn’t much to this part. The real point of this exercise is to demonstrate that there’s often more than one way to arrange parts on the fretboard, and you should always use positions and fingerings that work well for you.
Keep this in mind with everything that you play. You need to follow the tab with this figure in order to play each version of the riff in the intended position. The fingering is up to you. By now a natural fingering ought to fall into place.
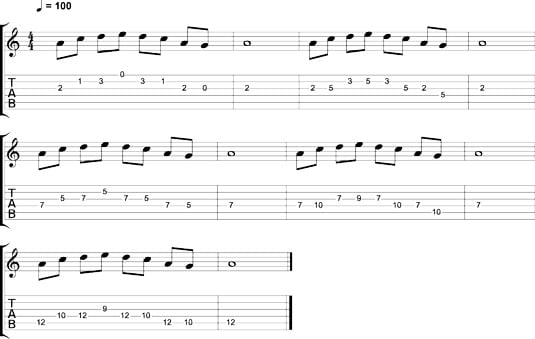
Below, you play an exercise similar to the last one but in the next register of the scale. There are five examples tabbed out in five different positions, though there are more ways to play the part. For example, the second example that begins in measure three can use the open G string in place of the G note at the fifth fret of the fourth string. Other examples can shift back into another pattern instead of staying all in one position. You have fingering options, too.
You may be wondering how you’ll know what parts look like position to position as you work through passages on your own. You have a few options:
Use your ear and trial and error to find pitches as you transpose from one position to the next.
Examine what the actual note names of a given part are, and then locate the same notes in the next position.
Identify what type of scale pattern a part is based in and move to the next pattern in the same scale.
Most guitarists use a combination of the three options to get around, which is why it’s good to know a bit about pitches, notes, and patterns.
Explore your options with everything you play. A guitar part that is awkward for you to play may feel much better when you rethink the fingering and rearrange the position.