Video enthusiasts will appreciate the fact that the Nikon D3300 enables you to tweak a variety of movie-recording settings. But if you’re not up to sorting through those options, just use the default settings. (You can restore the critical defaults by opening the Shooting menu and choosing Reset Shooting Menu.) At these settings, you get a full HD movie with sound enabled.
The following steps show you how to record a movie by using autofocusing. If you prefer manual focusing, just bypass the autofocusing instructions:
Set the Mode dial on top of the camera to Auto.
In this mode, the camera takes care of most movie settings for you, including ones that affect exposure and color.
Set the lens to autofocus mode.
Depending on your lens, you accomplish this by setting the lens switch to A, AF, or AF/M (auto with manual focus override). See your lens manual for help if you’re unsure.

Engage Live View by pressing the Live View (LV) button on the back of the camera.
The viewfinder goes dark, and your subject appears on the monitor.

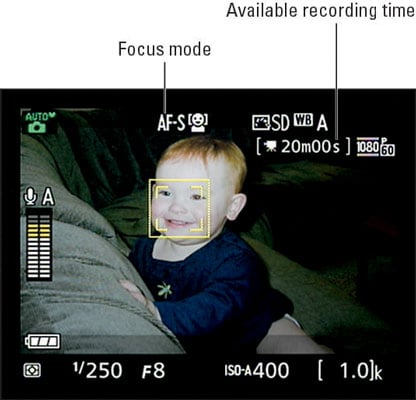
Press the Info button until the display is set to Show Movie Indicators view, as shown in the following figure.
Pay attention to the available recording time readout, labeled in the figure. At the default settings, your movie can be 20 minutes long, but that number presumes that your memory card has enough space on it to hold the entire movie. The maximum file size is 4GB.
If the upper-left corner of the screen displays the letters REC with a slash through them, something is amiss: That’s the camera’s way of telling you that movie recording isn’t possible. You see this symbol if no memory card is inserted or the card is full, for example.
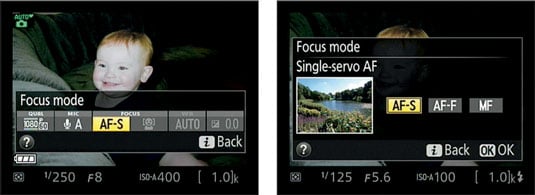
Set the Focus mode to AF-S or AF-F.
The right choice depends on two factors: whether you’re shooting a moving subject or a stationary one and whether you require pristine audio. Here’s what you need to know to make the call:
AF-S: The camera locks focus when you press the shutter button halfway. You then can lift your finger off the shutter button; for movies, focus remains set at the current distance throughout your recording unless you press the button halfway again to reset focus.
Choose this option if you expect your subject to remain the same distance from the camera throughout the movie — for example, if you’re recording a piano performance.
AF-F: This setting produces full-time, continuous autofocusing, with the camera adjusting focus as your subject moves or you pan the camera to follow the action. Focusing starts immediately after you set the Focus mode to AF-F, and if you want to lock focus, you press the shutter button halfway. When you release the button, continuous autofocusing resumes.
Although this option is best for tracking moving subjects, the built-in microphone sometimes picks up the sound of the focusing motor. To avoid this issue, you can attach an external microphone and place it far enough from the camera body that it can’t hear the focus motor. The only other solutions are to switch to AF-S mode and lock in focus before you begin recording or to use manual focusing.

You can see the current Focus mode setting at the top of the monitor, as shown in the previous figure. To change the setting, use the control strip, as shown in the following figure.
Press the i button to bring up the control strip.
Compose your initial shot in the monitor.
The shaded areas at the top and bottom of the monitor indicate the boundaries of the default frame size, 1920 x 1080 pixels, which produces a 16:9 aspect ratio.
If necessary, move the focusing frame over your subject.
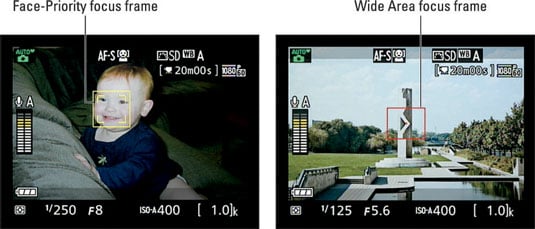
By default, the camera uses the Face-Priority AF-area mode, which means that if your scene contains a human face, the focusing system automatically focuses on that portion of the frame. In this scenario, you see a yellow focus frame over the face, as shown on the left in the following figure.
When the scene contains more than one face, you see multiple frames; the one with the interior corner markings indicates the face chosen as the focus point. You can use the Multi Selector to move the frame over a different face.
If the camera doesn’t detect a face, it instead uses the Wide Area AF-area mode, and the focus frame appears as a red rectangle, as shown on the right in the following figure. Again, use the Multi Selector to move the frame over your subject.
Focus the shot.
Again, with AF-F focusing, you don’t need to do anything; just wait for the focusing frame to turn green, indicating that initial focus is set. With AF-S focusing, press the shutter button halfway. The focusing frame turns green when focus is achieved, and you can then take your finger off the shutter button if you want.
(In Face-Priority AF-area mode, the focusing frame turns from green back to yellow when you lift your finger, but don’t worry about it — focus is still locked on your subject.)
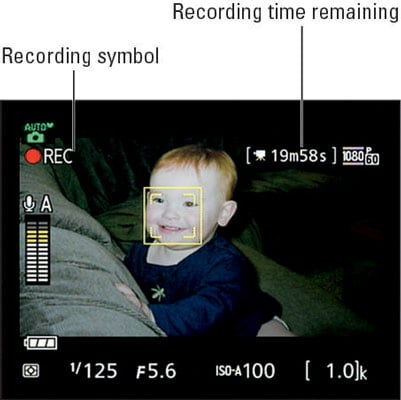
To begin recording, press the red Movie-Record button on top of the camera.
Most shooting data disappears from the screen, and a red REC symbol flashes in the upper-left corner, as shown in the following figure. As recording progresses, the area labeled Recording time remaining in the figure shows you how many more minutes of video you can record.
To stop recording, press the Movie-Record button again.
Your movie is recorded to the memory card.