Use the Move/Scale/Rotate/Shear/Distort Texture mode in SketchUp to move, scale, rotate, shear, or distort your texture (surprised?); its technical name is Fixed Pin mode — you see why in a little bit.
Follow these steps to move, scale, rotate, or skew your texture:
With the Select tool, click the face with the texture you want to edit.
Choose Edit→Face→Texture→Position.
This enables (deep breath) the Move/Scale/Rotate/Shear/Distort Texture mode. You see a transparent version of your image, along with four pins, each a different color. If all your pins are yellow, you’re in Stretch Texture mode. Right-click your textured face and select Fixed Pins to switch into the correct mode.
A quicker way to get to Texture Edit mode is to right-click the textured face and then choose Texture→Position from the context menu.
Edit your texture.
At this point, you can edit your texture in two ways: by using the options on a context menu or by dragging the colored pins.
Right-clicking your texture opens a context menu with the following options:
Done: Tells SketchUp you’re finished editing your texture.
Reset: Undoes all the changes you’ve made to your texture, returning it to how it looked before you started messing around.
Flip: Flips your texture left to right or up and down, depending on which suboption you choose.
Rotate: Rotates your texture 90, 180, or 270 degrees, depending on which suboption you choose.
Fixed Pins: When this option is selected, you’re in Move/Scale/Rotate/Shear/Distort Texture mode (Fixed Pin mode). Deselecting it switches you over to Stretch Texture mode.
Undo/Redo: Goes back or forward a step in your working process.
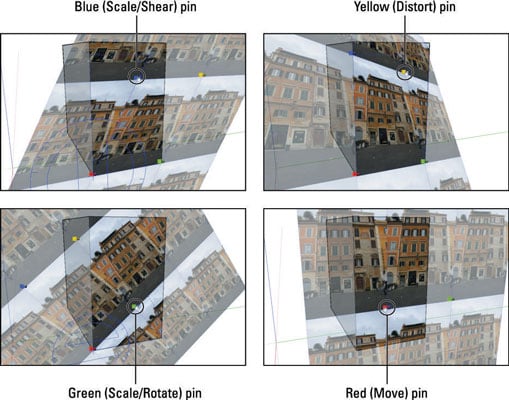
Dragging each of the colored pins has a different effect:
Scale/Shear (Blue) pin: Scales and shears your texture while you drag it. Shearing keeps the top and bottom edges parallel while making the image “lean” to the left or right.
Distort (Yellow) pin: Distorts your texture while you drag it; in this case, the distortion looks kind of like a perspective effect.
Scale/Rotate (Green) pin: Scales and rotates your texture while you drag it.
Move (Red) pin: Moves your texture around while you drag it. Of all four colored pins, this one is the most useful. You'll use it all the time to precisely reposition brick, shingle, and other building material textures in your models.
Instead of just dragging around the colored pins, try single-clicking one of them to pick it up; then click again to drop it wherever you want. This trick comes in handy especially when you’re using the Move and Rotate pins.
Click anywhere outside your texture in your modeling window to exit Texture Edit mode.
You can also press Enter or right-click and choose Done from the context menu.