


Sometimes the best way to get to know a program is to just dig in and get your hands dirty with it, actually putting its features to use as the designers intended. If you have a digital camcorder handy with some video already recorded on the tape, and you have installed Adobe Premiere Elements on your computer, you're ready to start making movies.
Starting your first project
Your first step is perhaps the most obvious one. Launch Premiere Elements, and when the welcome screen appears, click New Project. Type a name for your project in the New Project dialog box — any old name will do, as long as it's something you will remember later — and click OK. Premiere Elements creates your project and opens to the basic Premiere Elements screen. Wasn't that easy?
Capturing video
After you've created a new project in Premiere Elements, you need some source footage to work with. For now, assume you have a digital camcorder and you've already recorded some video that you want to edit. The process of getting video from the camcorder into your computer is called capturing.
To capture some video, follow these steps:
1. Connect your digital camcorder to your computer's FireWire (IEEE-1394) port.
Premiere Elements can capture video only from a digital camcorder connected to a FireWire port; if you have an older analog camcorder, you'll need to use special analog video capture hardware and probably some different video capture software.
2. Turn the Camcorder on to VTR or Player mode.
If Windows automatically opens a window stating that a digital video device was detected, click Cancel to close the window.
3. In the toolbar at the top of the Premiere Elements window, click Capture.
The Premiere Elements Capture window appears. You should see the words Capture Device Online at the top of the window.
4. Rewind the tape in your camcorder to the beginning of a section that you want to capture.
You may notice that as you play and rewind your camcorder tape, the video image from the camcorder appears in the Capture window.
5. Click the Play button in the Capture window to begin playing the tape, and click the Capture button to start capturing some video.
6. After you've captured a few minutes of video, click the Stop Capture button.
7. Close the Capture window when you're done capturing video.
You now see a collection of video clips in the Premiere Elements Media window. These are the video clips that you captured from the camcorder, and they are ready to be used in a movie project.
Assembling the movie
After you've captured some video, turning your footage into a movie is easy. Follow these steps:
1. Make sure the Premiere Elements workspace shows the basic editing layout by clicking Edit on the Premiere Elements toolbar.
If the workspace seems stubborn and won't change to the basic editing layout, choose Window --> Restore Workspace --> Edit.
2. To preview a clip, double-click it in the Media window.
The clip loads into the Monitor window, where you can click the Play button to play the clip.
3. Click-and-drag some clips from the Media window and drop them on the Timeline, as shown in Figure 1.
For now, just drop each clip on the track labeled Video 1, and drop the clips one after the other in the Timeline in the order in which you want them to play.
4. Click the Timeline button at the top of the Monitor window, and then click Play to preview the movie you have put together in the Timeline.
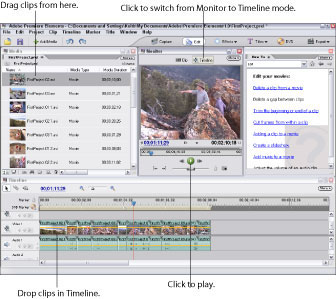
Figure 1: Drop clips in the Timeline to assemble your movie.
Saving your movie for the Web
After you've put together a basic movie in the Timeline, Premiere Elements lets you quickly save it in a Web-friendly format. One of the formats you can choose is the Windows Media format. To quickly export your movie in Windows Media format:
1. Click Export on the Premiere Elements toolbar, and choose Windows Media from the menu that appears.
Alternatively, you can choose File --> Export --> Windows Media.
2. In the Export Windows Media dialog box that appears, choose Cable Modem/DSL in the menu on the left and click OK.
The exact format you choose isn't important right now.
3. In the Save File dialog box that appears, choose a location in which to save the file, type a filename for the movie file, and click Save.
A Rendering dialog box appears.
Rendering is the process that Premiere Elements goes through when it applies your edits and compresses a movie project into its final output format. Rendering may take a few seconds or minutes, depending on the length of your movie and the speed of your computer.
4. When rendering is complete, locate the movie file, and double-click it to open it in Windows Media Player.
Congratulations! You've just made your first movie!

