
Like many dSLR cameras, the Nikon D7100 offers Live View, a feature that enables you to use the monitor instead of the viewfinder to compose photos. Turning on Live View is also the first step in recording a movie; using the viewfinder isn't possible when you shoot movies.
In most respects, the process of shooting pictures in Live View mode is the same as for viewfinder photography. But a few critical steps, including focusing, work very differently.
The basics of taking advantage of Live View are pretty simple:
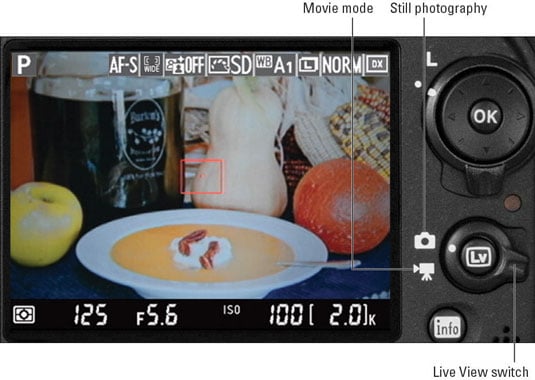
Enabling Live View for photography: Rotate the Live View switch on the back of the camera to the still photography camera icon, and then press the LV button in the center of the switch.
You hear a clicking sound as the internal mirror that normally sends the image from the lens to the viewfinder flips up, permitting the Live View preview to start. Then your subject appears on the monitor, and you can no longer see anything in the viewfinder. The Information screen, too, is no longer available; instead, settings appear over the live scene.
Enabling Live View for movie recording: Set the Live View switch to the movie camera icon and press the LV button to fire up Live View movie mode. The image reflects an aspect ratio of 16:9, the movie aspect ratio, as opposed to the normal 3:2 aspect ratio for still photos.

To start and stop recording, press the red movie record button on top of the camera.
Exiting Live View mode: Just press the LV button.
Be aware of the following warnings when you enable Live View:
Cover the viewfinder to prevent light from seeping into the camera and affecting exposure. The camera ships with a cover for this purpose.
Live View puts additional strain on the battery. Keep an eye on the battery level to avoid running out of power at a critical moment.
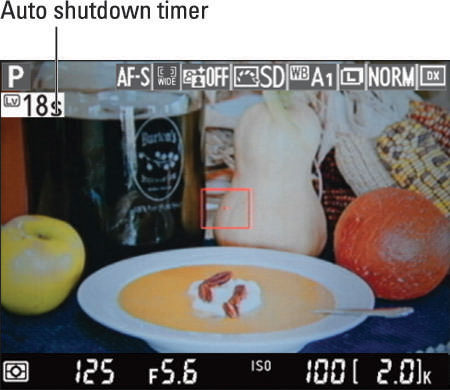
By default, the monitor turns off after ten minutes of inactivity to save battery power. When 30 seconds remain before monitor shutoff, a countdown timer appears in the upper-left corner of the screen. The warning doesn’t appear during playback or when menus are active, however.
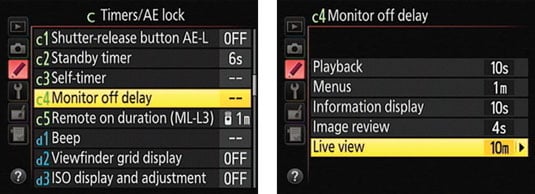
You can adjust the shutdown timing via the Monitor Off Delay option, found in the Timers/AE Lock section of the Custom Settings menu and shown on the left. Choose the Live View option, as shown on the right, and press the Multi Selector right to reveal the screen where you can change the setting. Options range from 5 to 30 minutes. You also can disable the automatic shutdown by choosing No Limit.
Using Live View for an extended period can harm your pictures and the camera. In Live View mode, the camera heats up more than usual, and that extra heat can create the right conditions for noise, a defect that gives your pictures a speckled look. More important, the increased temperatures can damage the camera.
For that reason, Live View is automatically disabled if the camera detects a critical heat level, regardless of the Monitor Off Delay setting.
Aiming the lens at the sun or other bright lights also can damage the camera. Of course, you can cause problems doing this even during normal shooting, but the possibilities increase when you use Live View.
Some lights interfere with Live View performance. The operating frequency of some lights, including fluorescent, sodium, and mercury vapor lamps, can create electronic interference that causes the display to flicker or exhibit odd color banding. Usually, the defect appears only on the screen, but in some cases it may also show up in your pictures.
Changing the Flicker Reduction option on the Setup menu may resolve this issue. At the default setting, Auto, the camera gauges the light and chooses the right flicker reduction setting for you. You also can choose from two specific frequencies: 50 Hz and 60 Hz. (In the United States and Canada, the standard frequency is 60 Hz; in Europe, it’s 50 Hz.)
The risk of camera shake during handheld shots is increased. When you use the viewfinder, you can help steady the camera by bracing it against your face. With Live View, you have to hold the camera away from your body to view the monitor, making it harder to keep the camera still.
Camera movement during the exposure can blur the shot, so using a tripod is the best course of action. When you do handhold the camera, try enabling Vibration Reduction, if your lens offers it. This option helps compensate for small amounts of camera shake.