


Lists styled with cascading style sheets (CSS) are much more robust than lists styled with standard list HTML formatting. With CSS, you can easily select the list type for both numbered and bulleted lists, set the position of the bullets relative to the contents within the list, and even choose to use your own graphic for the bullet image.
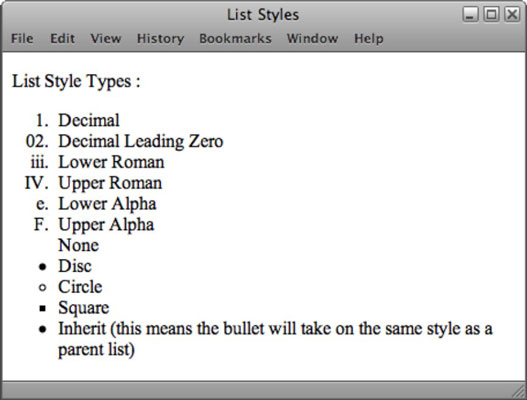
list-style-type: For ordered lists, set the list type to decimal, lower-roman, upper-roman, lower-alpha, upper-alpha, or none. When creating unordered lists, choose the disc, circle, or square list type. The illustration shows examples of each of these list types.
li { list-style-type: circle; }
list-style-image: To use your own custom image as a bullet, enter the location and filename of the desired image as an attribute for the unordered list tag. You can also remove the bullet part of list styling by using the property value none.
ul { list-style-image: url(images/mybullet.gif); }
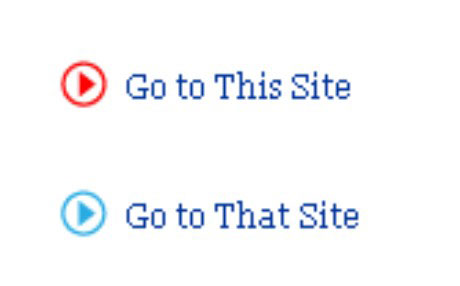
To create a list with different graphics for each list item, create custom styles for each list item and then append each tag with the matching class attribute, as illustrated below and shown in the following code example, which also makes each item in the list a hyperlink:
.redarrow {
list-style-image: url(redarrow.gif);
}
.bluearrow {
list-style-image: url(bluearrow.gif);
}
<ul>
<li class="redarrow"><a href="http://www.thiswebsite.com" />Go to This Site</a></li>
<li class="bluearrow"><a href="http://www.thatwebsite.com" />Go to That Site</a></li>
</ul>
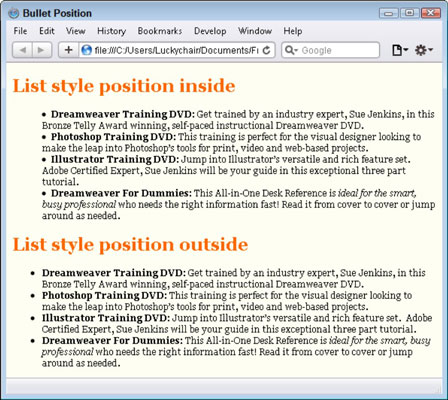
list-style-position: With the position property, you can position the bullet relative to content inside each list item. The position can be located either inside or outside the text. As illustrated below, when set to inside, the text wraps beneath the bullet along the left margin, and when set to outside, the bullet stays outside any wrapped text, like a hanging indent.
li { list-style-position: outside; }
With extension properties, you can change the way the cursor displays in different circumstances, create page breaks, and add special-effect filters to certain elements on the page.
Unfortunately, since their inception, very few of them are supported by the most popular browsers. If you’d like to use any of these attributes, test them in as many browsers as you can on both Mac and PC platforms to make sure that they work and/or fail in an acceptable way.
page-break-before/-after: This attribute forces a page break when printing a page, either before or after the object styled with this attribute. Choose left, right, always, or auto values for before and/or after the desired styled object, as in the following:
#sidebar3 {
page-break-before: always;
page-break-after: left;
}
cursor: You can specify a different cursor to appear when a visitor mouses over an object that is styled with this attribute. Choose from crosshair, text, wait, default, help, e-resize, ne-resize, n-resize, nw-resize, w-resize, sw-resize, s-resize, se-resize, and auto.
There are also 15 new CSS3 cursor options, all of which work in the latest version of Firefox, Chrome, Safari, Opera, and IE9+: none, context-menu, cell, vertical-text, alias, copy, no-drop, not-allowed, ew-resize, ns-resize, news-resize, nwse-resize, col-resize, row-resize, and all-scroll. To see examples of these cursors in action, visit Sitepoint.
#helpmenu {
cursor: help;
}
filter: You can choose from several special-effect filters, including Alpha, BlendTrans, Blur, Chroma, DropShadow, FlipH (flip horizontal), FlipV (flip vertical), Glow, Gray, Invert, Light, Mask, RevealTrans, Shadow, Wave, and Xray. Most filters require numeric input such as the mask filter, which must contain the hexadecimal value of the color for the mask, as in filter:Mask(Color=#ffcc33);.
#details {
filter: invert;
}
Although it’s true that these filters can do some cool and unusual things, for the longest time they haven’t worked in any browsers other than IE. To see an example of a few of these filters, open the following link within an IE browser: Xentrik. Thankfully, many of these filters have been reinvented as new CSS3 styles that have much better browser support.

