


You can make any kind of cable by suspending (holding) a number of stitches on a cable needle (cn) while you knit that same number of stitches from the LH needle. Then you knit the suspended stitches either by returning them to the LH needle and knitting them or by knitting them straight from the cable needle. This process of knitting stitches out of order enables you to cross stitches, creating cables. Whether you're making simple or intricate cables, all you're doing is crossing stitches. Easy, right?
Standard or rope cables are the most basic cables. They generally cross stitches predictably up a single column of stitches. You can make a rope cable over almost any even number of stitches from two to twelve — or more. (To see how it’s done, check out How to Knit Standard Cable Stitch [Rope Cable].)- If you want to make a cable that looks like it's twisting to the left, you hold your suspended stitches in front of your work while you knit from the LH needle.
- If you want to make a cable that twists to the right, hold the suspended stitches in back.
You may also see abbreviations like C3F and C3B. The C before the number tells you that these stitches are cable stitches. The number tells you how many stitches are involved with this particular maneuver. The F or B indicates whether you should suspend the stitches to the front or the back of your work.
Knitting a standard cable
When you knit cables, you don't have to cross stitches on every row. (Thank goodness!) The row on which the stitches are crossed over each other is called the turning row. After the turning row, you work several plain rows, and then you work another turning row. Standard cables have the same number of plain rows between turning rows as there are stitches in the cable. If the cable is 6 stitches wide, for example, you work the turning row every 6 rows.To try a 6-stitch left-twisting cable, cast on 14 stitches and then follow these steps:
1. Work Row 1 (RS): P4, k6, p4.
The first and last k4 (knit four) stitches make up the background fabric for your cable. The six stitches in the middle are where you'll form your cable stitches.
2. Work Row 2: K4, p6, k4.
3. Work Row 3: P4, k6, p4. (same as row 1).
4. Work Row 4: k4, p6, k4 (same as row 2).
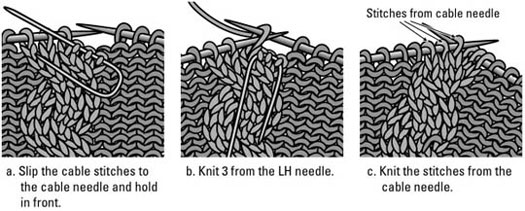
5. Work Row 5, the turning row: P4, sl 3 sts to cn and hold in front (see Figure 1a), k3 from LH needle (see Figure 1b), k3 from cn (see Figure 1c), p4.
6. Work Row 6: K4, p6, k4 (same as Row 2).
Instead of knitting stitches directly from the cable needle, you may prefer to return the suspended stitches to the LH needle before you knit them. Try both ways and use whichever technique is more comfortable to you.
When you suspend stitches on the cable needle, let the cable needle dangle down in front of your work, giving the yarn a slight tug to keep it taut (you don't need to close the gap).
7. Repeat Steps 1 through 6 and watch your stockinette stitches become a cabled rope.
When you work cables, you go back and forth from purl stitches to knit stitches. From a knit to a purl stitch, bring your yarn between the needles to the front before you make the next stitch. From a purl to a knit stitch, bring your yarn between the needles to the back before you make the next stitch.
Checking gauge in a cable pattern
The combination of knit panels with purl panels (think ribs) and crossing stitches over stitches causes cable patterns to pull in widthwise. A sweater worked in a cable pattern will be significantly narrower than one worked in the same number of stitches in stockinette stitch. You'll need more yarn and more stitches for a cable sweater than for one of the same dimensions in a knit/purl pattern.If you decide to add a cable (or several) to a plain sweater, be sure to increase enough stitches after you knit your border to maintain the overall width. Although there are no hard and fast rules, you'll be safe if you add 1 to 2 for every 4 stitches in your cable. If you have a ribbed border, you can add the stitches evenly on the last ribbed row.
If you're making a project in a repeating cable pattern, be sure to work a large enough swatch to be able to measure gauge accurately. (See How to Knit a Gauge Swatch.) The swatch should include at least two repeats of the cable pattern horizontally and vertically. If you're working several different cables, you have to check your gauge over each one.
Feel like you're wasting time making swatches to check gauge? Make two gauge swatches and sew them together for a cabled pillow or bag.
Starting and stopping
Cables should begin and end on a row between turnings where the cable stitches are relaxed and the fabric is smooth. Because the cable stitches spread out a bit between turning rows, for the smoothest transition between the beginnings and endings of cables, plan to increase a stitch or two over the cable stitches when beginning a cable and decrease a stitch or two when binding off over a cable.To start a cable pattern
If you're adding a cable(s) to an uncabled sweater pattern, for every 4 stitches in the planned cable(s), add 1 or 2 stitches to the number of stitches to cast on. (For step-by-step instructions for casting on, see How to Use the Cable Cast-On Method.) Then work a few rows in the knit/purl pattern you've established for your cables (which How to Knit the Stockinette Stitch describes) before working a turning row.To end a cable pattern
When you're binding off cables, decrease across the top of the cable 1 or 2 stitches for every 4 stitches in the cable to prevent the bound-off edge from flaring out. Follow these steps for a neat finish:1. Bind off the background stitches as they present themselves (knit the knits and purl the purls as you bind off) until you reach the cabled stitches.
2. When you get to the cable stitches, bind off as follows: *k1, bind off, k2tog, bind off, k1, bind off; rep from * to the end of the cable (stockinette) stitches.
3. After binding off the cable stitches, go back to binding off the stitches of the background as they present themselves.

