
As you take pictures on your Nikon D5500, you want to make sure that you have the proper settings for your pictures. Your D5500 gives you the following ways to monitor important picture‐taking settings:
Information display: The left screen gives you a look at this display, which appears when you first turn on the camera and then disappears after a few seconds. To redisplay it, take either of these steps:
Press the Info button. Press once to display the screen; press again to turn off the monitor.
Press the shutter button halfway and release it. Pressing and holding the button halfway down turns off the screen and fires up the autofocusing and exposure metering systems. Because those two systems use battery power, you may want to avoid this technique when the battery is running low.
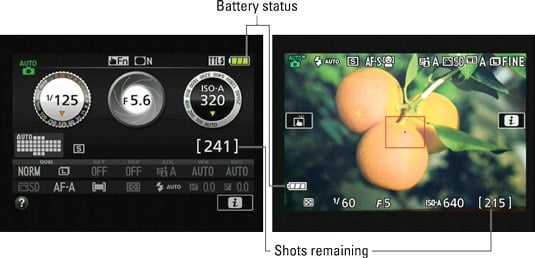 Press the Info button to view picture‐taking settings on the monitor.
If your Information screen appears different than the ones shown in this book, don’t freak out: The camera actually offers six Information screen display styles. You choose your favorite via the Info Display Format option on the Setup menu.
Live View display: In Live View mode, where you compose pictures using the monitor, the shooting data appears atop the live preview. To switch to Live View mode, rotate the Live View switch (top of the camera, next to the Mode dial).
You can vary the type of data displayed on the Live View screen by pressing the Info button.
Viewfinder: You also can view some settings at the bottom of the viewfinder. The information that appears depends on the exposure mode.
 Picture settings also appear at the bottom of the viewfinder (left); enable the grid for help with aligning objects in the frame (right).
You can display gridlines in the viewfinder. The gridlines help you ensure the alignment of objects in your photo — for example, to make sure that the horizon is level in a landscape. When your eye is up to the viewfinder and the touchscreen is enabled, tap the right half of the monitor to toggle the grid on and off. (If the monitor is swung to the side of the camera, you can tap anywhere on the screen.)
This trick works only if you stick with the default Touch Function setting on the Setup menu, however. You also can hide and display the grid via the Viewfinder Grid Display option, found on the Shooting/Display section of the Custom Setting menu.
If what you see looks like a confusing mess, don’t worry. Many settings relate to options that won’t mean anything to you until you explore the advanced exposure modes (P, S, A, and M). But make note of the following bits of data that are helpful in any exposure mode:
Battery status indicator: A full‐battery icon shows that the battery is fully charged; if the icon appears empty, look for your battery charger.
Just for good measure, the camera also displays a low‐battery symbol in the viewfinder. If the symbol blinks, the camera won’t take more pictures until you charge the battery.
Shots remaining: This value indicates how many more pictures you can store on the memory card. If the number exceeds 999, the initial K appears, to indicate that the value is in the thousands. For example, 1.0K means that you can store 1,000 more pictures (K is a universally accepted symbol indicating 1,000 units). The number is rounded down to the nearest hundred. So if the card has room for, say, 1,230 more pictures, the value reads 1.2K.
Also, remember that the viewfinder display, Live View screen, and Information screen automatically shut off after a specific period of inactivity to preserve battery power. You alter these auto‐shutdown times through the Auto Off Timers option, found in the Timers/AE Lock section of the Custom Setting menu. Normal is the default setting.