Regular Yoga practice is a perfect antidote for the stresses of everyday life that can strain the upper back and neck. Think about all the activities you do during the course of the day that have you hunched over, with your shoulders tensed and raised up to your ears, and your head jutting forward. Is this you while sitting at your computer or driving in your car?
Your general Yoga practice may be all you need for garden-variety tightness in the upper back and neck. However, sometimes a little focused attention to these areas can be a godsend and can help you feel like yourself again.
The following sections guide you through a Yoga routine that can help you make peace with your upper back and neck when they’re calling out for a little TLC.
Do’s and don’ts for a healthy upper back and neck
The following list gives you some tips on what you can usually do to help your upper back and neck issues:
Aim to perfect your mountain posture, and apply those lessons to your posture off the mat in your daily life. In mountain posture, you stand tall but relaxed, with your feet at hip width (that is, down from your sits bones, not the outer curves), and hang your arms at your sides, with your palms turned toward your legs.
Discover how to let go of your tension with relaxation techniques. Becoming a student of yogic breathing can also help you let go. The most basic yogic breathing technique is to breathe through the nose on both the inhalation and the exhalation. This technique slows the breath and stimulates a relaxation response. Elongating the exhalation is even more calming and relaxing.
Use the routine in the following section.
Some actions can exacerbate your problems. Avoid these activities:
Skip the headstand and the full shoulder stand. No matter how much you may want to look like the models in many Yoga magazines, these poses aren’t for you. You can safely explore a world of other postures.
Avoid neck routines that recommend full circles of the neck. This movement can cause serious problems, especially if you have a history of neck trouble.
An upper back and neck routine
You can use the postures in this next section in a few ways. If your upper back and neck need focused attention, use the postures therapeutically and do the full routine once or twice daily. When you feel stabilized and in better physical balance, you can integrate the postures into a larger routine to keep your upper back and neck feeling good. You can substitute them for other postures that strain your upper back and neck so that you’re working these areas in a way that’s safe for you. You can also pick out one or two postures to use as needed to work out your kinks at any point during your day.
This routine isn’t for anyone who’s in acute pain or who experiences numbness, tingling, or weakness in the neck, shoulders, or arms. If you’re in acute pain, you need to see a medical professional. Yoga therapy is for after you’ve addressed and resolved the acute pain.
Seated chair posture
This posture is the base for the entire upper back routine, so make sure you understand how to sit in a way that feels steady and comfortable.
Sit comfortably in an armless chair with your back up nice and tall; place your palms comfortably on your thighs.
Look straight ahead and bring your head comfortably back until the middle of your ears, your shoulders, and your hip sockets are in alignment (see Figure 1).
With your eyes open or closed, stay for 6 to 8 breaths.
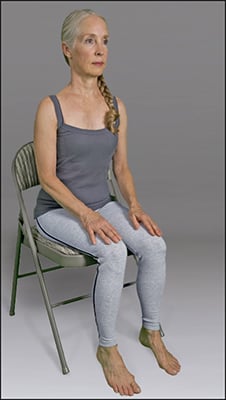 Figure 1: Seated chair posture.
If your feet don’t touch the floor, place a folded blanket, rolled-up mat, or other prop underneath them.
Seated alternate arm raise sequence
Many of the muscles that go to your neck start between your shoulders, so this sequence is a good way to bring circulation to that area. Be sure to use both parts of the sequence — the arm raise and then the arm raise and head turn — to get the proper results.
Start in the seated chair posture.
As you inhale, raise your slightly bent right arm, as in Figure 2a.
As you exhale, return your right palm to your right thigh; repeat Steps 2 and 3, alternating with your right and left arms two to three times each.
Continue raising and alternating your arms and turning your head away from each arm for two to three additional rounds, as in Figure 2b.
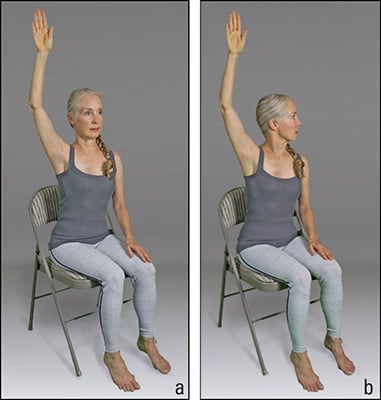 Figure 2: Seated alternate arm raise sequence.
Seated shoulder rolls
The neck and shoulders are two of the most frequent sites of tension for Westerners. Seated shoulder rolls can bring instant stress relief for stored-up tension.
Start in the seated chair posture.
Hang your arms at your sides, and roll your shoulders up and back as you inhale (see Figure 3).
As you exhale, roll your shoulders down.
Repeat Steps 2 and 3 four to six times, and then reverse the direction of the rolls for four to six repetitions.
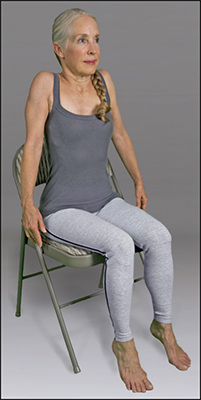 Figure 3: Seated shoulder rolls.
Wing-and-prayer sequence
Think of your upper back and neck as your wingspan; this sequence (as well as the ones in the following sections) helps you keep that wingspan in balance.
Start in the seated chair posture.
Join your palms in the prayer position, as in Figure 4a.
As you inhale, raise your arms comfortably above your head, keeping your hands in the prayer position, as Figure 4b demonstrates.
As you exhale, bring your hands and arms back down, still maintaining the prayer position.
As you inhale, separate your hands and move your arms out like wings to the sides, at about shoulder height; lift your chest and look straight ahead (see Figure 4c).
As you exhale, bring your hands and arms to the starting position in Step 2.
Repeat Steps 1 through 6 four to six times.
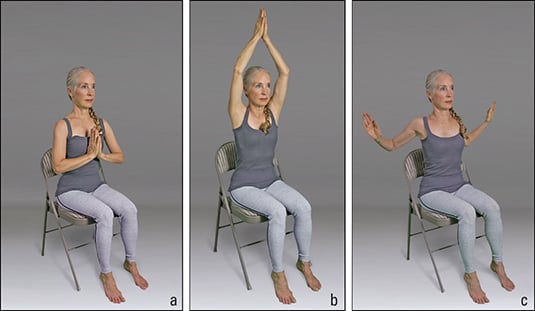 Figure 4: Wing-and-prayer sequence.
Mirror-on-the-hand sequence
This sequence safely reaches subtle muscles in your neck and shoulders.
Start in the seated chair posture.
As you inhale, raise the back of your right hand to eye level, as in Figure 5a.
As you exhale, bring your right hand inward and place your palm and fingers at the top of your left shoulder, turning your eyes and head down and to the left as you follow your right hand (see Figure 5b).
If you have a problem rotating your neck outward to the right or the left, turn only as far as you feel comfortable.
As you inhale, return the back of your right hand to eye level, and keep it moving and opening around to the right as far as is comfortable (see Figure 5).
As you exhale, bring the back of your right hand in front of you, again at eye level.
Continue exhaling as you bring your right hand back down to the seated chair posture.
Repeat Steps 1 through 6, alternating right and left sides three to four times each.
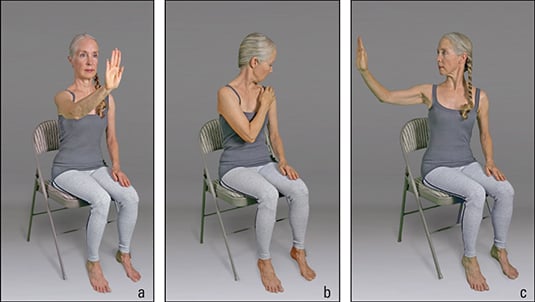 Figure 5: Mirror-on-the-hand sequence.
Newspaper sequence
This sequence is the most challenging to coordinate. Give yourself some time to get used to it, and it may become one of your favorites.
Start in the seated chair posture.
Inhale and then, as you exhale, move both hands up to eye level, with your palms facing you as though you’re looking at a newspaper (Figure 6a demonstrates).
As you inhale, move both hands up, and follow your hands with your eyes and head until your hands are just above your forehead (see Figure 6b).
Try not to turn your head too far back when you’re looking up at your hands; think of rotating up from the level of your ears instead of your collar.
As you exhale, bring your chin down to your chest without moving your arms, as in Figure 6c.
As you inhale, separate your hands and move your arms out like wings to the sides, at about shoulder height; lift your chest and look straight ahead (see Figure 6d).
As you exhale, extend your bent arms forward like they’re going over a log, and round your back like a camel as you look down (see Figure 6e).
As you inhale, lift your chest; rotate your elbows and palms inward as you raise your hands back to eye level, as in Step 2 (see Figure 6a).
Repeat Steps 1 through 7 four to six times.
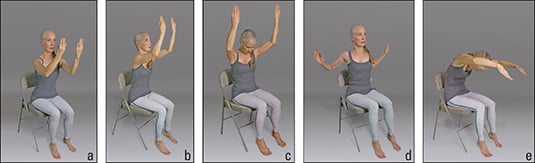 Figure 6: The newspaper sequence.
Seated sage twist
This twist rejuvenates the upper back and the entire spine. It also tones the abdomen.
Resist the temptation to crank this twist too hard. Move slowly and carefully. If you experience pain or discomfort, leave the twist out of your routine and check with your health professional before further use. Pregnant yoginis will want to avoid this one altogether.
Start in the seated chair posture, turned sideways, with the back of the chair to your right; hold the sides of the chair back with your hands, as in Figure 7.
As you inhale, lift your spine and head upward.
As you exhale, twist your torso and head farther to the right.
Repeat Steps 2 and 3, gradually twisting to your comfort level; stay in the twist for 4 to 6 breaths.
Repeat Steps 1 through 4 on the left side.
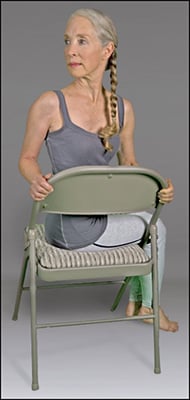 Figure 7: Seated sage twist.
Seated forward bend variation
A forward bend almost always follows a twist, to rebalance the spine and hips. Here’s one to counter the twist in the preceding section.
Start in the seated chair posture, turned sideways, with the chair back on either your left or your right.
As you exhale, bend forward from your hips and slide your hands down your legs as you comfortably hang your head, chest, and arms (see Figure 8).
Stay in Step 2 for 6 to 8 breaths.
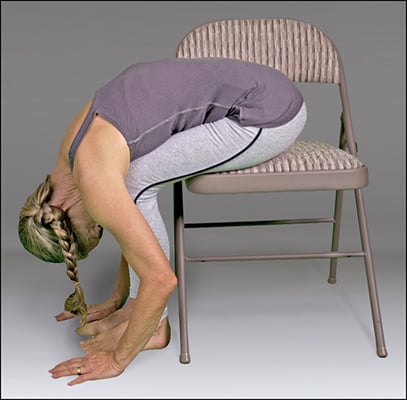 Figure 8: Seated forward bend variation.
Seated neck and shoulder massage
This simple technique is good for releasing land mines between your neck and shoulders.
Start in the seated chair posture, and bring your right arm up and across toward your left shoulder; place your right palm between the top of your left shoulder and your neck, as in Figure 9.
Slowly and gently massage the surface area between your neck and your left shoulder in a circular motion (starting toward your neck) six to eight times, noticing any tight spots.
Find the tightest spots you identified in Step 2, and grab or squeeze each one firmly for 6 to 8 counts.
Finish the self-massage by repeating Step 2 six to eight times.
Repeat Steps 1 through 4 with your left hand on your right side.
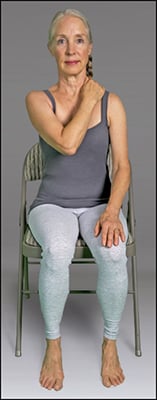 Figure 9: Seated neck and shoulder massage.
Holding, squeezing, or compressing tight spots is called ischemic massage. Body workers often use it to release trigger points or sensitive and irritable areas of the body.
Seated relaxation
All the concentration, breath, and movement leads to this moment. You may also replace this breathing exercise with a relaxation technique.
Start in the seated chair posture with your eyes closed, as in Figure 10.
Use belly breathing, and gradually increase the length of your exhalation until you reach your comfortable maximum.
Take 20 to 30 belly breaths at your comfortable maximum, and then gradually come back to your normal resting breath.
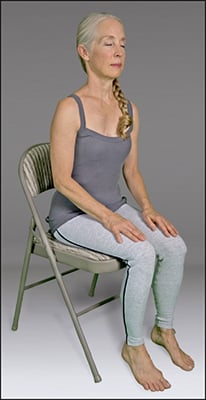 Figure 10: Seated relaxation.