


The key to pulling off lots of tricks in Word 2013 is to know how to move the insertion pointer to the exact spot you want. The beauty of the word processor is that you can edit any part of your document; you don't always have to work at "the end."
Moving the insertion pointer is important! Scientific studies have shown that merely looking at the computer screen does no good. As hard as you wish, new text appears only at the insertion pointer. And, the text you edit or delete? Yup, the insertion pointer's location is important there as well. Obviously, knowing how to move the insertion pointer is a big deal.
Command the insertion pointer
The easiest way to put the insertion pointer exactly where you want it is to point the mouse at that spot in your text and then click the mouse button. Point, click, move insertion pointer. Simple.
If you have a touchscreen monitor or are using a tablet, you can move the insertion pointer to any specific location by touching the text with your finger. Use the circle that appears below the insertion pointer for precise positioning.
Move in small increments
For short hops, nothing beats using the keyboard’s arrow keys to quickly move the insertion pointer around a document. The four basic arrow keys move the insertion pointer up, down, right, and left:
| Press This Key | To Move the Insertion Pointer |
|---|---|
| ↑ | Up to the preceding line of text |
| ↓ | Down to the next line of text |
| → | Right to the next character |
| ← | Left to the preceding character |
Moving the cursor doesn’t erase characters.
If you press and hold the Ctrl (Control) key and then press an arrow key, you enter Jump mode. The invigorated insertion pointer leaps desperately in all four directions:
| Press This Key Combo | To Move the Insertion Pointer |
|---|---|
| Ctrl+↑ | Up to the start of the previous paragraph |
| Ctrl+↓ | Down to the start of the next paragraph |
| Ctrl+→ | Right to the start (first letter) of the next word |
| Ctrl+← | Left to the start (first letter) of the previous word |
You can use either set of arrow keys on the computer keyboard, but when using the numeric keypad, ensure that the Num Lock light is off. Do this by pressing the Num Lock key. If you don’t, you see numbers in your text rather than the insertion pointer dancing all over — like444this.
Move from beginning to end
The insertion pointer also bows to pressure from those cursor keys without arrows on them. The first couple consists of End and Home, which move the insertion pointer to the start or end of something, depending on how End and Home are used:
| Press This Key or Combination | To Whisk the Insertion Pointer |
|---|---|
| End | To the end of a line of text |
| Home | To the start of a line of text |
| Ctrl+End | To the end of the document |
| Ctrl+Home | To the tippy-top of the document |
The remaining cursor keys are the Page Up or PgUp key and the Page Down or PgDn key. As you might guess, using these keys doesn't move up or down a page in your document. Nope. Instead, they slide through your document one screen at a time. Here’s the roundup:
| Press This Key or Combination | To Whisk the Insertion Pointer |
|---|---|
| PgUp | Up one screen or to the tippy-top of your document, if you happen to be near it |
| PgDn | Down one screen or to the end of the document, if you happen to be near it |
| Ctrl+Alt+PgUp | To the top of the current screen |
| Ctrl+Alt+PgDn | To the bottom of the current screen |
The key combinations to move to the top or bottom of the current screen are Ctrl+Alt+PgUp and Ctrl+Alt+PgDn. That’s Ctrl+Alt, not just the Ctrl key. And yes, few people use these commands.
You may be tempted to use Ctrl+PgUp and Ctrl+PgDn, but don’t: These keyboard shortcuts work with the Find command.
Go Back to Where You Once Edited
Considering all the various commands for moving the insertion pointer, it's quite possible to make a mistake and not know where you are in a document. Yea, verily, the insertion pointer has gone where no insertion pointer has gone before.
Rather than click your heels together three times and try to get back the wishful way, just remember this keyboard combination:
Shift+F5
Pressing the Shift+F5 keys forces Word to return you to the last spot you edited. You can do this as many as three times before the cycle repeats. But the first time should get you back to where you were before you got lost.
Go to Wherever with the Go To Command
Word's Go To command allows you to send the insertion pointer to a specific page or line or to the location of a number of interesting elements that Word can potentially cram into your document. The Go To command is your word processing teleporter to anywhere.
To use the Go To command, click the Find button in the Home tab’s editing group. Choose the Go To command from the menu. Or you can use the Ctrl+G keyboard shortcut. Either way, the Go To tab portion of the Find and Replace dialog box appears.
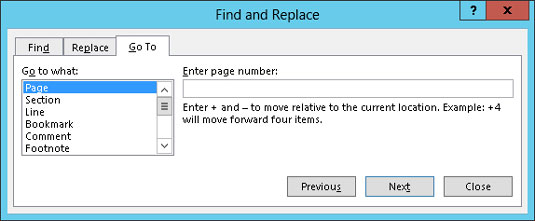
Choose which element to go to, such as a page, from the scrolling list on the left side of the dialog box. Then type the relevant information, such as a page number, in the box on the right side of the dialog box. Click the Go To button to go to that location.
For example, type 14 in the box and press Enter, and you go to page 14 — if you have a page 14 to go to.
Note that you can go to a page relative to the current page. For example, to go three pages forward, choose Page and type +3. To go 12 pages backward, type -12 in the box.

