The Canon EOS Digital Rebel lets you use the best photography techniques of a manual camera, or you can take advantage of a digital camera’s advanced functions. You access many of your digital camera’s features via internal menus.
The Canon EOS Rebel T1i/500D menus, conveniently enough, appear when you press the Menu button. Features are grouped into six main menus, described briefly in the following table.
| Open This Menu . . . | to Access These Functions |
|---|---|
| Shooting Menu 1 | Picture Quality settings, Red-Eye Reduction flash mode, and a few other basic camera settings. |
| Shooting Menu 2 | Advanced photography options including Exposure Compensation, Metering mode, and custom White Balance. Appears only in P, Tv, Av, M, and A-DEP modes. |
| Playback Menu 1 | Rotate, protect, and erase pictures as well as functions related to transferring and printing directly from the camera. |
| Playback Menu 2 | Additional playback features, including histogram display and image jump. |
| Setup Menu 1 | Memory card formatting plus basic custom-ization options, such as the file-numbering system and auto shutdown timing. |
| Setup Menu 2 | More customization options, Live View options, and maintenance functions, such as sensor cleaning. Some options available only in advanced exposure modes. |
| Setup Menu 3 | Custom Functions, firmware information, and options for resetting camera functions to factory defaults; menu appears only in P, Tv, Av, M, and A-DEP modes. |
| My Menu | User-customized menu setup; also available only in advanced exposure modes. |
| Movie Menu | Settings related to shooting movies, including whether sound is recorded. Appears only when Mode dial is set to Movie mode. |
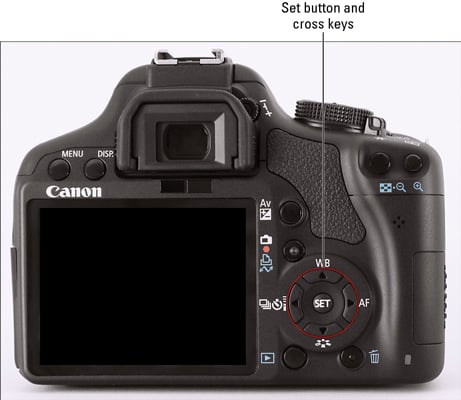
The Set button and cross keys, shown below, are the key to the navigating menus. You press the cross keys to navigate up, down, left, and right through the menus. Press Set to access available settings.
After you press the Menu button, you see on the camera monitor a screen similar to the one shown below. At the top of the screen, you see icons, each representing one of the available menus. (Remember that which icons appear depends on the setting of the Mode dial.) The highlighted icon marks the active menu; options on that menu automatically appear on the main part of the screen. In the figure on the left, Shooting Menu 1 is active, for example.

To select a different menu: Press the right or left cross keys or rotate the Main dial to cycle through the available menus.
To select and adjust a function on the current menu: Press the up or down cross key to highlight the feature you want to adjust. Next, press the Set button. Settings available for the selected item then appear either right next to the menu item or on a separate screen, as shown on the right side of the figure. Either way, use the cross keys to highlight your preferred setting and then press Set again to lock in your choice.
In case you didn’t notice, the icons that represent the menus are color coded. Shooting Menus 1 and 2 have red icons, as does the Movie menu; Setup Menus 1, 2, and 3 sport yellow icons; the Playback menus have a blue symbol; and the My Menu icon is green.