Feel free to throw away any datebook you have. You never need to buy another one again. That’s because your Samsung Galaxy tablet is the ideal datebook and appointment calendar. Thanks to the Calendar app and the Google Calendar feature on the Internet, you can manage all your scheduling right on your Galaxy tablet. It’s almost cinchy.
Google Calendar works with your Google account to keep track of your schedule and appointments. You can visit Google Calendar on the web.
You automatically have a Google Calendar; it comes with your Google account.
Before you throw away your datebook, copy into the Calendar app some future appointments and info, such as birthdays and anniversaries.
The Calendar app may be called the S Planner app on some tablets. They’re both the same thing.
How to browse your schedule on your Samsung Galaxy tablet
To see what’s happening next, to peruse upcoming important events, or just to know which day of the month it is, summon the Calendar (or S Planner) app. It’s located on the Apps screen along with all the other apps that dwell on your Galactic tablet.
The Calendar app has three views: Month, Week, and Day. They look subtly different in horizontal orientation but provide the same information. There’s also Agenda view, which displays only upcoming events. Each view is chosen from the View menu.
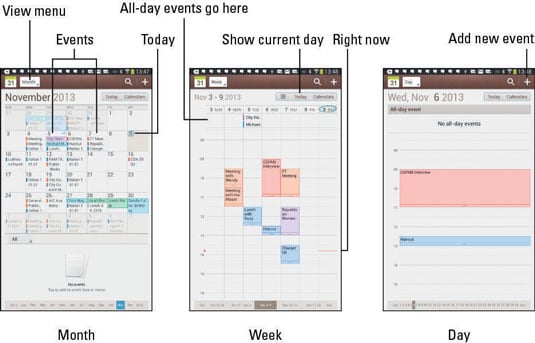
Use Month view to see an overview of what’s going on, and use Week or Day view to see your appointments.
To scroll from month to month, swipe the screen up or down. In Week view and Day view, scroll from left to right.
Touch the Today button to be instantly whisked back to the current day.
The current date, if it’s visible on the screen, is circled in blue. A horizontal red bar marks the current time.
Different colors flag your events, as seen by the teensy squares next to event names. The colors represent a calendar category to which the events are assigned.
How to review appointments on your Samsung Galaxy tablet
To see more detail about an event, touch it. When you’re using Month view, touch the event’s date to see the Week view. Then choose the event again to see its details.

The details you see depend on how much information was recorded when the event was created. Some events have only a minimum of information; others may have details, such as a location for the event. When the event’s location is listed, you can touch that location, and the Maps app pops up to show you where the event is being held.
Touch the Back button to dismiss the event’s details.
Birthdays and a few other events on the calendar may be pulled from the Contacts app or even from some social networking apps. That probably explains why some events are listed twice — they’re pulled in from two sources.
The best way to review upcoming appointments is to choose the List item from the View menu or from atop the screen when the tablet is held horizontally.
To quickly view upcoming events from the Home screen, slap down the Calendar widget. As in List view, the widget displays only a list of your upcoming appointments.
Google Now also lists any immediate appointments or events.
How to create an event on your Samsung Galaxy tablet
The key to making the Calendar app work is to add events: appointments, things to do, or meetings, or full-day events such as birthdays or colonoscopies. To create an event, follow these steps in the Calendar app:
Select the day for the event.
Or if you like, you can switch to Day view, where you can touch the starting time for the new event.
Touch the Add (+) icon.
The Add Event screen appears. Your job is to fill in the blanks to create the event.
Type an event title.
You can simply write the name of the person you’re meeting.
Choose a calendar category for the event.
Calendar categories are handy because they let you organize and color-code your events.
Set the meeting duration by using the From and To buttons.
Because you followed Step 1, you don’t have to set the date (unless the event is longer than a day). Touch the time buttons, if necessary, to adjust when the event starts and stops.
Specify whether the event repeats.
Touch the Repeat menu to set up a recurring schedule. For example, if your meeting is held every month on the third Wednesday, choose the item Monthly (Every Third Wednesday).
Type a location for the event.
My advice is to type information in the event’s Location field just as though you’re typing information to search for in the Maps app. When the event is displayed, the location is a link; touch the link to see where it is on a map.
Fill in other fields if you like.
Touch the Save button (in the upper-right corner of the Add Event window) to create the new event.
The Save button now has a check mark by it.
You can change an event at any time: Simply touch the event to bring up more information. Touch the Menu icon and choose the Edit command to modify the event.

To remove an event, touch the event to bring up more information, touch the Menu icon, and choose the Delete command. Touch the OK button to confirm.
It’s necessary to set an event’s time zone only when that event takes place in another time zone or when an event spans time zones, such as an airline flight. In that case, the Calendar app automatically adjusts the starting and stopping times for events, depending on where you are.
If you forget to set the time zone and you end up hopping around the world, your events are set according to the time zone in which they were created, not the local time.