


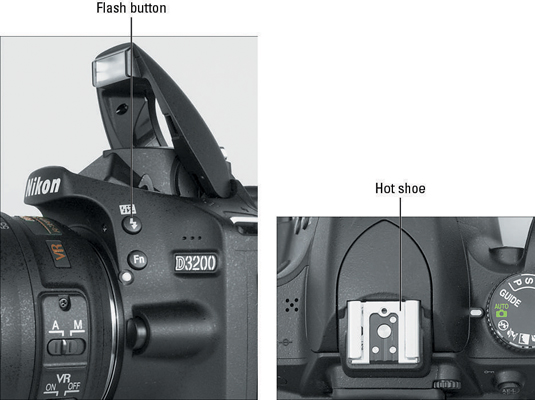
The built-in flash on your Nikon D3200, shown in its raised position on the left in the following figure, offers an easy, convenient way to add light to a scene. For even more lighting power, you can attach an external flash head to the camera via the hot shoe, shown on the right in the figure. (The hot shoe's contacts are covered by a little black insert when you receive the camera; leave the cover in place until you're ready to attach a flash.)
The rest of this article covers of using the built-in flash.
How to enable flash on your Nikon D3200
Whether you have any control over the flash depends on your exposure mode, as follows:
Auto, Portrait, Child, Close-Up, and Night Portrait mode: The built-in flash pops up and fires automatically if the camera thinks the existing lighting is insufficient. However, you can disable the flash by changing the Flash mode, explained in the next section. What you can't do is force the flash to fire if the camera thinks the ambient light is sufficient to expose the image. That limitation can be problematic for outdoor daytime portraits and close-ups, which often can benefit from a little bit of extra light, even on a sunny day. Chapter 7 has some further advice on the subject.
Landscape, Sports, and Auto Flash Off: Flash is disabled. That setup makes sense for Auto Flash Off mode, of course. But why no flash in Sports and Landscape mode, you ask? Well, Sports mode is designed to capture moving subjects, and the flash makes that more difficult because it needs time to recycle between shots. On top of that, the maximum shutter speed possible with the built-in flash is 1/200 second, which often isn't fast enough to ensure a blur-free subject. Finally, action photos often aren't taken at a range close enough for the flash to reach the subject, which is also why flash is disabled for Landscape mode.
Guide mode: In Guide mode, available flash controls depend on the path you take through the guided menus. For example, if you select the Easy Operations menu item and then select Close-ups as the type of photo you want to take, you can choose from three Flash modes: Auto, Auto with Red-Eye Reduction, and Off. To get to the flash options, select the More Settings menu item after you select the picture type. Chapter 3 provides additional details about Guide mode photography.
P, S, A, and M: You have complete control over the flash. To raise the flash, press the Flash button, labeled in Figure 2-7. The flash will fire on your next shot regardless of the ambient light. To disable flash, just close the flash unit by pressing it down gently.
If you use flash, check out the next section to find out how to set the Flash mode.
When you're not using flash, by the way, keep the flash unit closed. Keeping the flash recycled and ready to fire consumes power, so you can preserve battery life by doing so.
How to set the Flash mode on your Nikon D3200
For exposure modes that allow flash, you can adjust the flash behavior via the Flash mode setting. The following table offers a quick-reference guide to the six basic modes. In addition to these basic modes, the camera also offers some combo modes, such as Auto with Red-Eye Reduction, Slow-Sync with Red-Eye Reduction, and the like.
| Flash Mode | What It Does |
|---|---|
| Auto | Fires the flash automatically if the camera thinks the ambient light is insufficient or the subject is backlit |
| Fill | Fires the flash regardless of the ambient light |
| Off | Disables the flash |
| Red-Eye Reduction | AF-assist lamp lights briefly before the flash goes off to help reduce red-eye reflections |
| Slow-Sync | Results in a longer-than-normal exposure time so that the background is illuminated by ambient light and the foreground is lit by the flash |
| Rear-Curtain Sync | When combined with a slow shutter speed, causes illuminated, moving objects (such as car headlights) to appear as long, trailing fingers of light behind the subject |
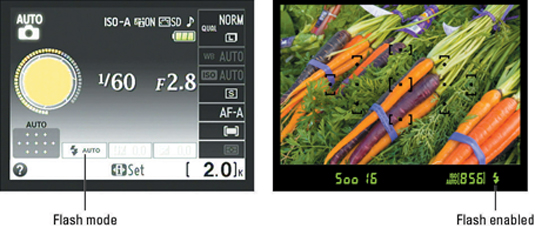
You can check the current Flash mode in the Information display, as shown on the left in the following figure. The viewfinder doesn't advise you of the specific Flash mode but instead displays the lightning-bolt icon — the universal symbol for flash — when the flash is enabled, as shown on the right in the figure.
If you disable the flash and the camera thinks you're making a mistake, the flash symbol blinks in the viewfinder. You also see a blinking question mark in both the viewfinder and Information display, indicating that you can press the Zoom Out button to display a help screen with advice on getting a better exposure.
To change the Flash mode, use either of these two methods:
Flash button plus Command dial: Press and hold the Flash button (refer to the first figure in this article) to display the screen shown in the following figure. Keep holding the button as you rotate the Command dial to cycle through the Flash modes available for your selected exposure mode.
 The fastest way to change the Flash mode is to hold down the Flash button while rotating the Command dial.
Info Edit screen: You can also change the Flash mode by using the Info Edit screen. Press the Info Edit button twice to shift to the screen and then use the Multi Selector to highlight the Flash mode icon, as shown on the left in the last figure, below. Press OK to display the screen shown at right in the figure, highlight your choice, and press OK again.
 You also can change the Flash mode by using Info Edit screen.
Now for the bad news: When you try to change the Flash mode, you'll quickly discover that you have access to only a couple Flash modes when you shoot in the fully automatic exposure modes (Auto, Auto Flash Off, and the Scene modes). For the Auto, Portrait, Child, Close-Up, and Night Portrait modes, the flash mode reverts to the default setting if you switch to another exposure mode. Additionally, you don't have access to Flash Compensation, which enables you to diminish or strengthen the burst of light the flash produces, as well as a few other flash features your camera offers. Bummer, as the youngsters say.
