
Notes is a super-simple app on your iPhone that you can use to make lists, jot down ideas, and record anything you’d normally scribble down on a sticky pad or cocktail napkin. Notes you create are stored on your iPhone and, optionally, synced with your computer and other iOS devices through iCloud, Gmail, or another IMAP account, through Microsoft Exchange 2010 or later.
To get started, open the Notes app. The main Notes screen shows a list of any notes already saved in Notes.

You may see one or more notes listed even if you hadn’t previously created a single note using the Notes app. That’s because Notes can also come from email accounts set up on your iPhone for which you’ve turned on Notes.
Creating a new note
Tap the New button to create a new note. The keyboard appears, ready to capture your every thought or idea. Type the things you want to remember or tap the Dictate button and speak your mind. Tap Done to save your note and hide the keyboard. Tap Back to return to the Notes list.
Turning your iPhone sideways displays the landscape mode keyboard, which can help increase your typing speed and accuracy — although it does decrease the number of lines you see as you write your note.
If the wider keyboard doesn’t appear when you turn your iPhone sideways, flick up from the bottom of the screen to open the Control Center, and then tap the Portrait Orientation Lock button to unlock the Portrait Orientation Lock feature and flick down to close the Control Center.
Press and hold the Home button to activate Siri. When Siri is ready, just say, “Create a note,” and when asked, dictate your note. If your iPhone is connected to a power source and you turned voice activation on in the General settings of the Settings app, you can also say “Hey, Siri” to get Siri’s attention.
Searching and managing your Notes list
Notes are listed in chronological order, with the newest note appearing at the top of the list, and the least recently modified note relegated to the bottom of the list. Notes titles are automatically generated based on each note’s first line; if you enter a return in the first line, only the word(s) before the return appear in the title — you see more of the note title in landscape view.
When viewing the Notes list, you can do the following:
Swipe left across a note title to display the Delete button, and then tap Delete to delete the note. If you swipe by mistake, just tap Cancel at the top right of the screen.
Tap a note to view, edit, share, or delete the note.
When viewing a list of notes, tap the Status bar at the top of iPhone’s screen or drag your finger down the list to reveal the Search field, and then type in the first few characters of whatever you’re looking for. Note contents are searched and the titles of any notes containing matches to your search criteria are displayed; tap the note title to view that note.
If you’ve selected Notes in the Settings app by tapping General and then tapping Spotlight Search, any searches you perform from the Spotlight Search Home screen will search in Notes, too.
Browsing, editing, deleting, and emailing Notes
Notes you create can contain regular and accented letters, numbers, and symbols (in other words, any of the alphanumerical stuff you can type with the keyboard), as well as images you save in Photos.
When viewing a note, you can do the following:
To add more text or edit a note, tap where you want to begin typing or editing; the keyboard appears and you can then type or edit to your heart’s content.
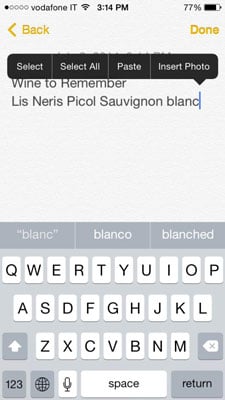
Tap a second time to see the formatting menu and do the following:
Tap Select or Select All to highlight the text you want to edit. After you select text, the menu gives you editing options.
Tap Insert Photo to open Photos; tap the photo you want to insert in your Note, and then tap Choose. Notes reopens and you see the image in your note.
Shake your iPhone to display the Undo message; tap Undo to, well, undo what you just did. Shake again to display the Redo option and tap Redo to redo what you undid.
Tap Back at the top of the screen to return to the Notes list.
Tap the Delete button (the trashcan) to delete your note.
Tap the Share button to open the Share Sheet, and then tap the method you want to use to share your note — AirDrop, Message, Mail, Copy, or Print.
Tap the New Note button to create a new note.