


Notability iPad app creates notes that integrate handwriting, typing, drawings, audio, and pictures. Use Notability for iPad to create lecture notes and other classroom materials. Notability for iPad can also be used to annotate PDF documents, such as student assignments and PDF forms.
To create a new note, tap the Compose icon in the Library. Tapping the Bookshelf icon at any time returns you to the Library, and your note will automatically be saved. Choose a paper background by tapping the Page icon on the top toolbar. Examples include graph paper, lined paper, canvas, colored paper, and so on.
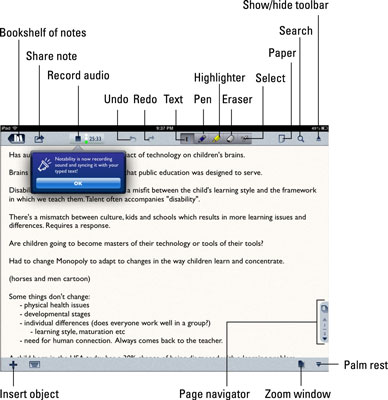
Notability has a powerful set of tools that can accommodate all your note-taking needs and preferences:
Text: You can type text notes using the following techniques:
Tap the Text icon in the top toolbar; then tap in the document wherever you want to type.
Tap Outline to select your outline style: bullets, numbers, or plain text.
Tap the Font icon (Tt) to select your font, color, size, and style.
Create a text style by setting the font size, style, and color, and then tapping and holding a font preset button (Aa, Bb, Cd, or Dd). Tap the Keyboard icon to lock it.
Note that the keyboard needs to be closed for the button to appear.
Keyboard toolbar customization: You can customize your keyboard toolbar by tapping and holding the toolbar above the keyboard to open the tool window. Simply drag the tools onto the keyboard toolbar to create your ideal tool set, including font presets, bold, italic, underline, cursor controls, and bullet or numbered outline styles. Tap Done when you’re finished.

Finger or stylus writing: Double-tap the Pencil icon to select color and line width; then proceed to write with your finger or stylus.
Notability improves the look of your handwriting, giving you smooth and organic-looking strokes. It mimics the way a marker writes by creating lines with varying thickness that give you the tapered look of a natural marker stroke.

Highlight: Tap the Highlighter icon to draw attention to information in your note. As with the pencil, tapping it a second time will display options for color and width.
Eraser: Tap this icon to erase handwriting or drawings. It removes whole strokes as a single object, which makes it quick to erase but doesn’t allow fine control.
Scrolling: Use two fingers to scroll through a note.
Palm rest: Tap the Palm Rest icon to lay the heel of your hand on the iPad without making marks on the page. Adjust the palm rest to a height that suits you by tapping and dragging the icon with three horizontal bars on the top right of the palm rest.

Zoom: Tap the Zoom icon to open the Zoom window and a zoom target box that you can move around the page to magnify any area. Write or sketch in the magnified zoom window to gain finer control over handwriting and so on. Resize the zoom target box by dragging the lower-right handle.

Cut/copy/paste: Tap the scissors icon and circle an area with your finger or stylus to cut, copy, paste, and restyle content you have handwritten or sketched. Move the selected object anywhere on the page, or tap it to display menus with options to cut, copy, or change styles such as color and line width.
Left-hand capability: Don’t fret if you’re a lefty; you haven’t been forgotten. Tap the Library icon and then tap the Settings icon on the bottom toolbar. Scroll down to the Other Settings section and turn on Left Handed mode.
Synchronized audio recording: The audio recording feature really makes Notability stand out from many other handwriting apps. It’s a simple way to listen to important audio that’s synchronized with the notes you were taking at the very same time! To use this feature, follow these steps:
Tap the microphone icon to start recording at any time.
Tap the Stop button when you’re ready to stop the recording.
Any notes taken during a recording are synchronized to the audio taking place at the same time.
Tap the Playback button to listen to the recording.
Tap any text or media object to hear what was said at that point in the recording.
Playback options include volume control, fast forward, rewind, and deletion of recordings.
Whether you have attention deficit problems, difficulty hearing or processing audio, or just plain don’t understand anything being said during an important class, you’ll absolutely love the recording option.
Page navigation: Tap or drag the pages icon on the right of the screen to open the Page Navigation tool. A window slides open along the right of your screen, with thumbnails of all the pages in your document. Add, delete, or reorder pages, or simply tap to go to a specific page.

Media insertion: Tap the Insert Media + icon on the bottom left to insert web clips, photos, figures, text, and writing boxes into your note:
You can write or draw over the top of any media. It’s a great way to add notes and little captions for additional detail on images. Text will automatically wrap around images.
Tap with two fingers on any media object to select it and display the menus. Tap Edit to enter the figure editor, where you can crop, use prebuilt shapes, or use a pen to edit your media.
Tap the caption field at the bottom of any image to insert your caption text.
Tap the Web Clip icon to open a browser and select a page to insert into your notes. Once you’ve inserted it, you can add notes and highlights.
Use the Text media object as a great way to fill out forms, annotate PDFs, or move text anywhere on the page. Tap the Insert Media + icon; then tap to select Text. You can tap anywhere on the page to insert your text box and then start typing in it.

