
The Canon EOS 70D provides a range of powerful controls, offering just about every feature a serious photographer could want. It also offers fully automated exposure modes that enable people with no experience to capture beautiful images. For the most automatic of automatic photography, set your camera's Mode dial to one of the following settings:
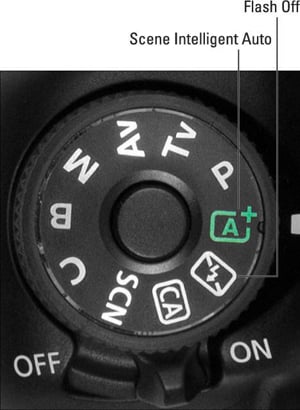
Scene Intelligent Auto: The name of this mode, labeled in the figure below, refers to the fact that the camera analyzes the scene and selects the picture-taking options that it thinks will best capture the subject.
 These two modes are identical except that one disables flash.
Flash Off: Also labeled in the above figure, this mode does the same thing as Scene Intelligent Auto, except flash is disabled. This mode provides an easy way to ensure that you don't break the rules when shooting in locations that don't permit flash.
In either mode, follow these steps to take a picture:
Set the focusing switch on the lens to the AF (autofocus) position, as shown in the figure below.
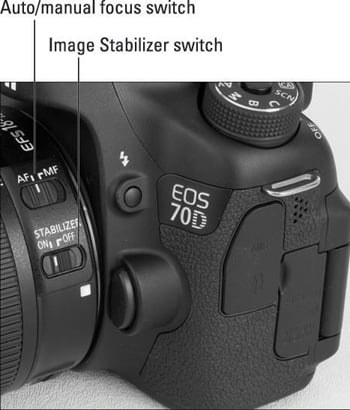 Set the lens switch to AF to use autofocusing.
The figure features the 18–135mm kit lens; the switch looks the same on the 18–55mm kit lens. If you own a different lens, the switch may look and operate differently; check your lens manual for details. (Note that these steps assume that your lens offers autofocusing; if not, ignore autofocusing instructions and focus manually.)
Unless you're using a tripod, set the Image Stabilizer switch to the On setting, as shown in the above figure.
Image stabilization helps produce sharper images by compensating for camera movement that can occur when you handhold the camera. If you're using a tripod, you can save battery power by turning stabilization off. Again, if you use a lens other than one of the two kit lenses, check your lens manual for details about its stabilization feature, if provided.
Set the Drive mode.
By default, the camera sets the Drive mode to Single, which means that you capture one picture with each press of the shutter button. The Single mode is represented by the single rectangle symbol you see in the following figure.
To access the other settings, the fastest route is via the Drive button on top of the camera. You also can adjust the setting through the Quick Settings screen.
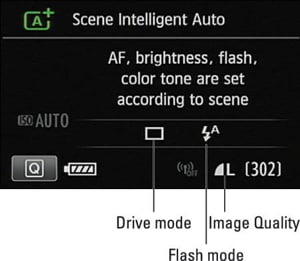 In Scene Intelligent Auto and Flash Off modes, you still have control over the Drive mode and Image Quality settings.
Select the Image Quality setting via Shooting Menu 1.
The default setting is Large/Fine. The icon representing that setting looks like the one shown in the figure above.
In Scene Intelligent Auto mode, set the Flash mode to Auto.
In this mode, the flash fires if the camera thinks it's necessary. The symbol for the Auto flash mode appears as shown in the preceding figure; if you see the Flash Off or Flash On symbol instead, use the Quick Control screen to adjust the option.
If you're shooting a portrait in dim lighting, try enabling Red-Eye Reduction flash (found on Shooting Menu 2).
Looking through the viewfinder, frame the image so that your subject appears within the autofocus brackets.
Those brackets represent the area of the frame that contains the autofocus points.
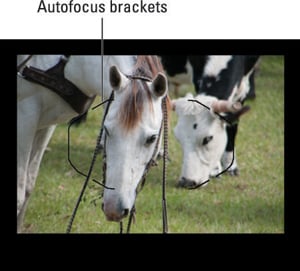 Frame your subject so that it falls within the autofocus brackets.
Press and hold the shutter button halfway down.
The autofocus and autoexposure systems begin to do their thing. In dim light, the flash pops up when you use the Scene Intelligent Auto exposure mode. Additionally, the flash may emit an AF-assist beam, a few rapid pulses of light designed to help the autofocusing mechanism find its target.
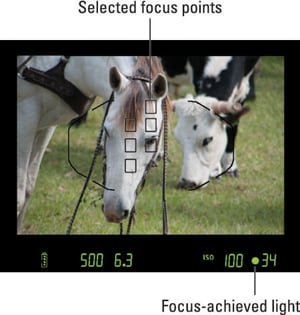
After the camera meters exposure, it displays its chosen aperture (f-stop) and shutter speed settings at the bottom of the viewfinder. In the figure below, for example, the shutter speed is 1/500 second, and the f-stop is f/6.3. You also see the current ISO setting and the maximum burst rate (in this case, 100 and 34, respectively).
 When you photograph stationary subjects, the green focus indicator lights when the camera locks focus.
If the shutter speed value blinks, the camera needs to use a slow shutter speed to expose the picture. Because any movement of the camera or subject can blur the picture at a slow shutter speed, use a tripod and tell your subject to remain as still as possible.
When focus is established, one or more autofocus points appear to indicate which areas are in focus, as shown in the above figure. (The camera typically locks focus on the object closest to the lens.) In most cases, you also hear a beep and see the focus indicator light, labeled in the figure. Focus is now locked as long as you keep the shutter button halfway down.
These focus signals vary if the camera detects a moving subject, however. You may hear a series of small beeps, and the focus lamp may not light. Both signals mean that the camera switched to an autofocusing option that enables it to adjust focus as necessary up to the time you take the picture. As long as you keep the subject within the area covered by the autofocus brackets, focus should be correct.
Press the shutter button the rest of the way to take the picture.
When the camera finishes recording image data to the memory card, the picture appears briefly on the monitor.
Two more pointers about these modes:
Exposure: In dim lighting, the camera may need to use a very high ISO setting, which increases the camera's sensitivity to light, or very slow shutter speed (longer exposure time). Both can create noise, a defect that makes your picture look grainy.
Color: Color decisions are handled automatically. Normally, the camera's color brain does a good job of rendering the scene, but if you want to tweak color, you're out of luck.