
When a custom placeholder page is created for a client’s webpage, be sure you get your client’s approval on the page before publishing it. This gives the client the opportunity to review your work and suggest any changes that may need to be made. After all, this page represents the client’s company, and she will want to put her best face forward.
If the client does recommend some changes, make any adjustments to the code as needed and then resubmit the page for approval. When the client grants approval, you can then upload the placeholder HTML file, the images folder that contains any graphics, and any other files needed to support the page to the host server.
To transfer the placeholder page and supporting files to the host server, you can use the host provider’s control panel, a standalone File Transfer Protocol (FTP) program, an FTP program that is built into an HTML editor (Dreamweaver has one), or a browser that supports FTP.
Before you begin, download and install the free cross-platform Firefox FireFTP add-on from FireFTP. If after clicking the Download button you see an alert that says “Firefox prevented the site from asking you to install the software on your computer,” click the Allow button and follow the onscreen prompts to install the add-on. When finished, restart Firefox.
If you have any difficulty using FireFTP, view the Help files or contact the host provider for further assistance.
Follow these steps to transfer your local placeholder files to the remote host server using Firefox:
Get the FTP address, username, and password for the domain from the host provider or from your client.
This information is typically sent by e-mail to the person who signed up for the hosting account. The FTP address should be something like ftp.domainame.com.
With a live Internet connection, open Firefox and choose Tools→web Developer→FireFTP to launch FireFTP.
The FireFTP tool opens in a separate browser tab. Notice that the screen is split into two sides. Your local files are listed on the left and the remote files from the server will be listed on the right after a connection to the server is established.
From the account menu at the top of the window, choose Create an Account to launch the Account Manager dialog box.
This is where you enter the FTP access information to connect with the remote host server.
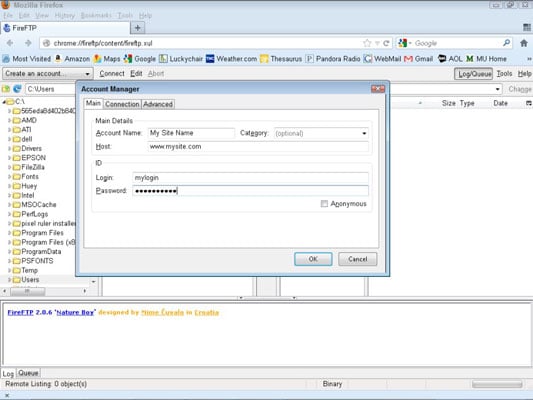
In the Account Name and Host fields, enter a name for your site and the URL of the domain you want to access.
The name is for your eyes only so it can be anything you like. The URL should be the exact domain name as in www.domainname.com.
Enter the FTP Login (username) and Password provided by your host provider.
Click OK to close the dialog box and click the Connect button at the top of the window to connect to your site.
After a connection is established, the browser window automatically refreshes and displays all the files on the host server for the domain. Those files will probably include a default placeholder home page named index.html, a CGI-BIN folder for processing scripts, and possibly a few other preinstalled files and folders that the host server requires to make the site accessible to visitors.
Some host providers place your site’s files inside of a folder named public-html or www. If you see one of those folders, double-click to open it. You should then see your host provider’s default index.html file.
If, for some reason, you’d like to save this file for archival purposes, select the file, right-click to open the context menu, and choose Rename file. You can rename it anything you like such as _hostindex.html or zhostindex.html so it will fall alphabetically at the top or bottom of the list of files.
Drag and drop a copy of your Placeholder folder’s index.html file along with a copy of the images folder from the Local files on the left of the screen into the Remote files listed on the right.
Your browser begins copying the files to the remote host.
If prompted to overwrite the index.html page, click the Yes button so that your new custom placeholder page will appear as the new default home page.
When the files have fully been copied to the server, you are finished ftp-ing and can disconnect by clicking the Disconnect button.
To test the success of the file transfer, type the URL of the domain into the browser’s address bar, such as http://www.mydomainname.com.
Your new placeholder page should appear. If you don’t see it, try refreshing the browser window (usually by pressing F5) and/or clearing your browser’s cache.
For simple directions on how to clear your browser’s cache, visit Brookhaven National Laboratory. If you still don’t see your placeholder page, your server might use the default.html homepage naming convention. To test that theory, rename index.html to default.html and upload the file to the server. The new placeholder page should appear if your theory is correct.