
When you're ready to get going with your new iPad be sure you're within range of a Wi-Fi network that you can connect with, and then hold the iPad with one hand on either side, oriented like a pad of paper. Plug the Lightning to USB Cable (or the Dock Connector to USB Cable) that came with your device into your iPad and plug the other end into a USB port on your computer just in case you might lose your battery charge during the setup process.
Now follow these steps to set up and register your iPad:
Press and hold the Sleep/Wake button on the top of your iPad until the Apple logo appears.
In another moment, a screen appears with a cheery Hello on it
Slide your finger to the right on the screen where it says "Slide to Set Up"
You next see a series of screens that involve the following settings:
Language: Choose the language you prefer iPad screens to display.
Country or Region: Select the place where you live.
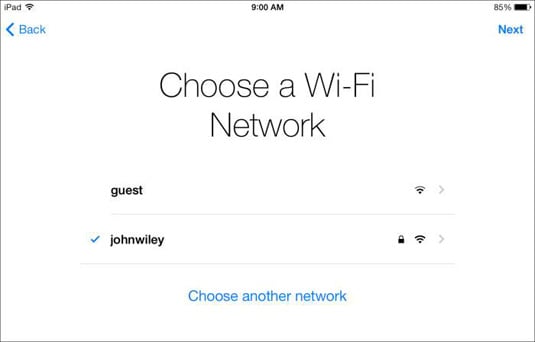
Choose a Wi-Fi Network (see the following figure): This is where you get online so you can connect with Apple, register your iPad, and make certain settings.
Location Services: You can Enable or Disable this feature which allows certain apps, such as Maps and Find My iPad to determine the physical location of your iPad.
Set Up iPad: On this screen you can choose to set your device up as a new iPad, or to restore settings and content you've previously backed up to iCloud, or saved in iTunes. If you choose the latter you should have connected your iPad to the computer on which you have iTunes installed.
Apple ID: Here you can sign in with an existing Apple ID, or create a new one.
Terms & Conditions: Tap Agree to proceed; if you tap Disagree you can proceed. If you want a copy of the terms and conditions tap Send by Email. After you agree a screen appears saying it may take a few minutes to set up your Apple ID.
iCloud: Tap Use or Don't Use depending on whether you want content automatically backed up to iCloud. (Consider using it though — iCloud backup is a handy feature.)
Find My iPad: If you tap Use this feature of iCloud is turned on and if you lose your iPad, it can help you locate it.
Create a Passcode: If you want to require a passcode be entered to access your iPad for security reasons, enter a four digit code on this screen.
iCloud Keychain: Keychain is an optional service you can use to store your passwords and credit card information in one handy and secure place. If you don't want to set this up you can tap Set Up Later.
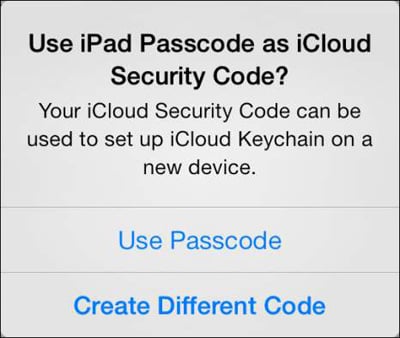
Use iPad Passcode as iCloud Security Code: By choosing Use on this screen the passcode you entered a couple of screens ago will be used to access iCloud; if you'd rather have a unique passcode, tap Create Different Code on this screen (see the following figure).
Phone Number: The phone number you enter, which must be able to receive text messages, will be used to verify your security code.
Siri: Siri is a personal assistant feature that can answer questions, make appointments, create and send emails, and more. Tap Use to use the Siri feature; note that if you tap Don't Use here you can still turn Siri on later through General Settings.
Diagnostics: If you don't mind if information about any errors or problems on your iPad is shared with Apple, tap Automatically Send. If you want to opt out, tap Don't Send.
Registration: Tap to register your iPad with Apple, which is a good idea so they can send you information about updates and cover your device with a warranty.
After you deal with all the setup screens, a Welcome to iPad screen appears; tap Get Started to display the Home screen.
You can choose to have certain items transferred to your iPad from your computer when you sync via iTunes or a wireless sync, including music, videos, downloaded apps, contacts, audiobooks, calendars, e-books, podcasts, and browser bookmarks. You can also transfer to your computer any content you download directly to your iPad by using the iTunes, iTunes U, Newsstand, iBooks, Podcasts, and App Store apps.
If you set up iCloud when registering or after registering, updates to your operating system will be pushed to your iPad without your having to plug it into a computer running iTunes. Apple refers to this feature as PC Free, simply meaning that your device has been liberated from having to use a physical connection to a computer to get upgrades.