
If you chose to use Dreamweaver to create your website, you have a number of ways to transfer files to your webpage through the Files panel. The smartest way to transfer files is to use the expanded Files panel so that you can view both the local and remote files at the same time, much like a standalone FTP client.
To transfer files to the remote server with Dreamweaver’s expanded Files panel, follow these steps:
Launch Dreamweaver and select the desired managed site from the drop-down list at the top of the Files panel.
If you don’t see your site listed here, you need to manage a site. Choose Site→New Site to open the Site Definition dialog box, inside which you can enter a name for the site in the Site Name text box and the location of the site on your local computer in the Local Site Folder text box.
Then switch over to the Servers category and set up a new FTP profile for your site. When finished, click the Save button.
Click the Expand/Collapse button in the upper-right corner of the Files panel to expand the panel.

After the panel is expanded, the Files panel displays two separate panes, one for the local files and one to display remote files. By default, the local files display in the right pane and the remote files display on the left.
Most standalone FTP programs show the local files on the left and the remote files on the right. To swap the location of the local and remote files in Dreamweaver, collapse the Files panel by clicking the Expand/Collapse button and open Dreamweaver’s Preferences by choosing Edit→Preferences (Windows) or File→Preferences (Mac).
In the Site category of the Preferences dialog box, modify the Always Show and On The drop-down lists to suit your particular needs, such as selecting Local Files from the Always Show drop-down list and selecting Left from the On The drop-down list. Click OK to close the dialog box with your new settings and expand the Files panel before proceeding to Step 3.
You won’t see any files in the remote listing until you establish a connection via FTP.
Click the Connect to Remote Server button on the toolbar at the top of the expanded Files panel to establish a connection.
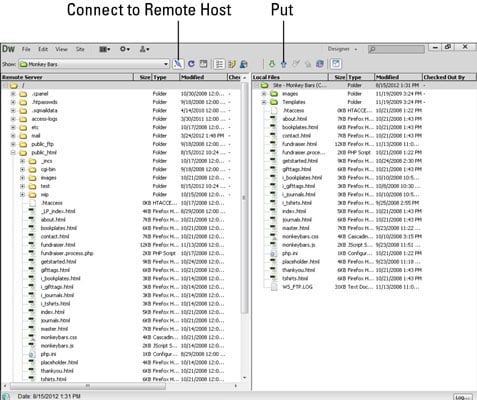
The button looks like a blue plug and socket. When clicked, the plug connects with the socket, and a green light appears next to it, indicating that the connection was a success. Upon connection, you also see all the files on the remote server appear in the Remote Site pane of the Files panel.
To transfer files from the local site to the remote site, select the file(s) that you’d like to transfer from the Local Files pane and click the blue up-arrow Put button on the panel’s toolbar.
To transfer your files to a specific folder on the remote server, you must open that folder (by double-clicking it) before transferring files from the local pane.
To select more than one file at a time for a multiple file transfer, press and hold the Ctrl (Windows) or Command (Mac) key while selecting each additional file.
Upon clicking the Put button, Dreamweaver displays a Dependent Files dialog box. Click the Yes button to upload dependent files or the No button to upload only the selected file(s).
Depending on your Internet connection speed and the size of the files being transferred, the upload may take anywhere from one second to several minutes.
To end the FTP session, click the Connect to Remote Server button to disconnect from the remote server, and then collapse the Files panel by clicking the Expand/Collapse button.
To reestablish a connection with the remote server for future transfer sessions, repeat Steps 2–6.