


The DC motor in your Arduino kit is the most basic of electric motors and is used in all types of hobby electronics. When current is passed through, it spins continuously in one direction until the current stops. Unless specifically marked with a + or -, DC motors have no polarity, meaning that you can swap the two wires over to reverse the direction of the motor.
The Motor sketch
You will need a simple control circuit to turn your motor on and off.
You need:
An Arduino Uno
A breadboard
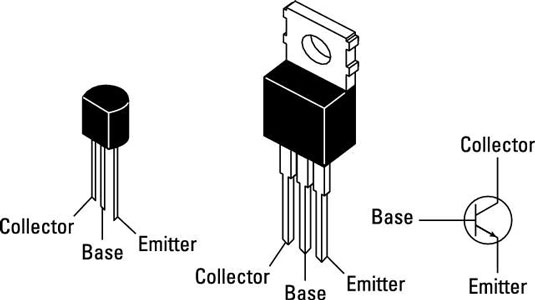
A transistor
A DC motor
A diode
A 2.2k ohm resistor
Jump wires
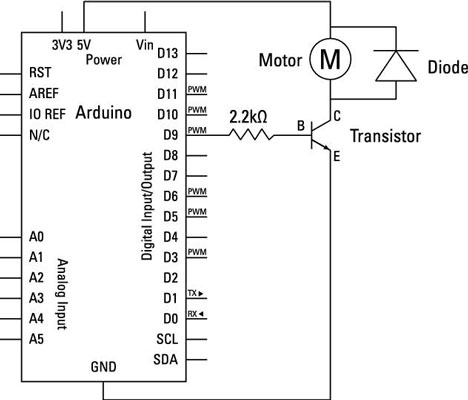
To power the motor, you need to send 5V through it and then on to ground. This voltage spins the motor, but you have control of it. To give your Arduino control of the motor’s power, and therefore its rotation, you place a transistor just after the motor.
The transistor is an electrically operated switch that can be activated by your Arduino’s digital pins. In this example it is controlled by pin 9 on your Arduino, in the same way as an LED except that the transistor allows you the turn the motor circuit on and off.
This circuit works, but it still allows the chance of creating a reverse current because of the momentum of the motor as it slows down, or because the motor could be turned. If reverse current is generated, it travels from the negative side of the motor and tries to find the easiest route to ground.
This route may be through the transistor or through the Arduino. You can’t know for sure what will happen, so you need to provide a way to control this excess current.
To be safe, you place a diode across the motor. The diode faces toward the source of the voltage, meaning that the voltage is forced through the motor, which is what you want. If current is generated in the opposite direction, it is now be blocked from flowing into the Arduino.
If you place the diode the wrong way, the current bypasses the motor and you create a short circuit. The short circuit tries to ground all the available current and could break your USB port or at the very least, show a warning message, informing you that your USB port is drawing too much power.
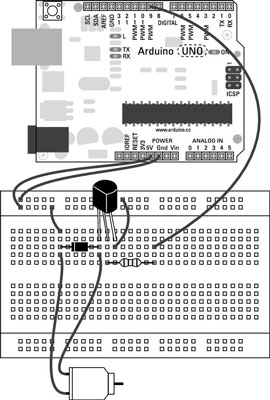
Build the circuit as shown, and open a new Arduino sketch. Choose the Save button and save the sketch with a memorable name, such as myMotor, and then type the following code:
<b>int</b> motorPin = 9;
void setup() {
 <b>pinMode</b>(motorPin, <b>OUTPUT</b>);
}
void loop() {
 digitalWrite(motorPin, HIGH);
 <b>delay</b>(1000);
 <b>digitalWrite</b>(motorPin, <b>LOW</b>);
 <b>delay</b>(1000);
}
After you’ve typed the sketch, save it and press the Compile button to check your code. The Arduino Environment checks your code for any syntax errors (grammar for your code) and highlights them in the message area. The most common mistakes include typos, missing semicolons, and case sensitivity.
If the sketch compiles correctly, click Upload to upload the sketch to your board. You should see your motor spinning for one second and stopping for one second repeatedly.
If that’s not what happens, you should double-check your wiring:
Make sure that you’re using pin number 9.
Check that your diode is facing the correct way, with the band facing the 5v connection.
Check the connections on the breadboard. If the jump wires or components are not connected using the correct rows in the breadboard, they will not work.
The Motor sketch breakdown
This is a very basic sketch, and you may notice that it’s a variation on the Blink sketch. This example changes the hardware but uses the same code to control an LED.
First, the pin is declared using digital pin 9.
<b>int</b> motorPin = 9;
In setup, pin 9 is defined as an output.
void setup() {
 <b>pinMode</b>(motorPin, <b>OUTPUT</b>);
}
The loop tells the output signal to go to HIGH, wait for 1000mS (1 second), go to LOW, wait for another 1000mS, and then repeat. This scenario gives you the most basic of motor control, telling the motor when to go on and off.
void loop() {
 digitalWrite(motorPin, HIGH);
 <b>delay</b>(1000);
 <b>digitalWrite</b>(motorPin, <b>LOW</b>);
 <b>delay</b>(1000);
}
