
Still portrait means that your subject isn’t moving. When shooting a still portrait with your Nikon D3300, the classic portraiture approach is to keep the subject sharply focused while throwing the background into soft focus. This artistic choice emphasizes the subject and helps diminish the impact of any distracting background objects. The following steps show you how to achieve this look:
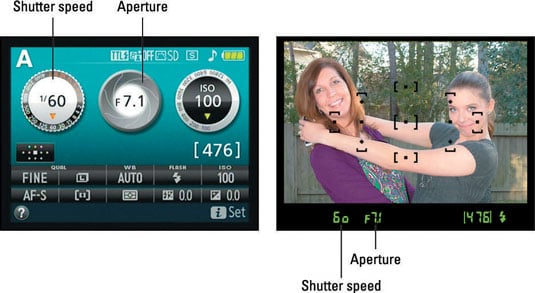
Set the Mode dial to A (aperture-priority autoexposure) and select a low f-stop value.
A low f-stop setting opens the aperture, which not only allows more light to enter the camera but also shortens depth of field. However, for a group portrait, don’t go too low or else the depth of field may not be enough to keep everyone in the sharp-focus zone.
To adjust f-stop in A mode, rotate the Command dial. The camera then selects the shutter speed for you, but you need to make sure that the selected speed isn't so slow that movement of the subject or camera will blur the image. You can monitor the f-stop and shutter speed in the Information display and viewfinder, as shown in this figure.
To further soften the background, zoom in, get closer, and put more distance between the subject and background.
Zooming in to a longer focal length also reduces depth of field, as does moving closer to your subject. And the greater the distance between the subject and background, the more the background blurs.
Avoid using a lens with a short focal length (a wide-angle lens) for portraits. It can cause features to appear distorted. A lens with a focal length of 85–120mm is ideal for a classic head-and-shoulders portrait.
Check composition.
Just two quick pointers on this topic:
Consider the background. Scan the entire frame, looking for background objects that may distract the eye from the subject. If necessary, reposition the subject against a more flattering backdrop.
Frame the subject loosely to allow cropping to a variety of frame sizes. Your camera produces images that have an aspect ratio of 3:2. That means your portrait perfectly fits a 4 x 6 print size but will require cropping to print at any other proportion, such as 5 x 7 or 8 x 10.
For indoor portraits, shoot flash-free, if possible.
Shooting by available light rather than by flash produces softer illumination and avoids the problem of red-eye. To get enough light to go flash-free, turn on room lights or, during daylight, pose your subject next to a sunny window, as in this figure.
In the A exposure mode, simply keeping the built-in flash unit closed disables the flash.
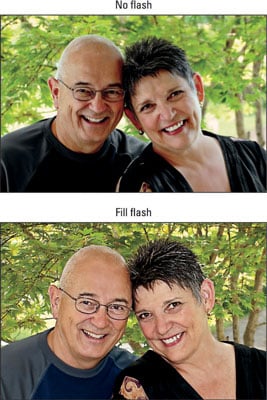
For outdoor portraits, use a flash if possible.
Even in daylight, a flash adds a beneficial pop of light to subjects’ faces, as illustrated in the following figure. A flash is especially important when the background is brighter than the subjects, as in this example.

In the A exposure mode, press the Flash button on the side of the camera to raise the built-in flash. For daytime portraits, set the Flash mode to Fill Flash. (That’s the regular, basic Flash mode.) For nighttime images, try red-eye reduction or slow-sync flash.
By default, the top shutter speed for flash photography is 1/200 second, so in bright light, you may need to stop down the aperture to avoid overexposing the photo, as was done for the bottom image in the previous figure. Doing so, of course, brings the background into sharper focus, so if that creates an issue, move the subject into a shaded area instead.
Press and hold the shutter button halfway to initiate exposure metering and autofocusing.
Or, if you're focusing manually, set focus by rotating the focusing ring on the lens.
Press the shutter button the rest of the way.