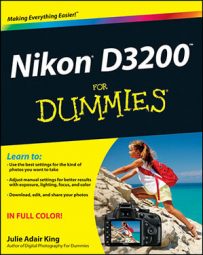
When you want to shoot a movie with your Nikon D3200, you have to remember two camera settings that affect the quality of your video: Frame Size/Frame Rate and Movie Quality. You access both through the Shooting menu; look for the Movie Settings option, shown on the left in the following figure, and press OK to display the options shown on the right.
The Frame Size/Frame Rate options
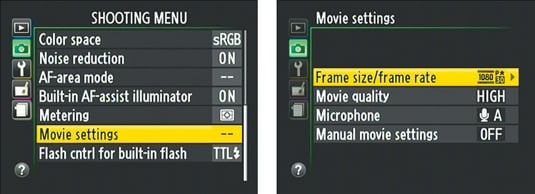
The first option on the Movie Settings menu list is Frame Size/Frame Rate, as shown in the next figure. Through this setting, you select the resolution, or frame size, of your movie, as well as the number of frames per second, both of which affect video quality. Select the option and press OK to display the second screen in the figure.
The available options depend on whether you choose NTSC or PAL as the Video Mode setting. For NTSC, you see the options shown on the right in the figure just above. (More about how it varies when PAL is selected in a moment.) Your choices break down as follows:
-
Frame size (resolution): You can choose from three frame sizes, measured in pixels:
-
1920 x 1080: Produces a so-called Full HD (High-Definition) movie that has a 16:9 aspect ratio.
-
1280 x 720: Standard HD, also 16:9.
-
640 x 424: This setting gives you a regular definition (that is, not high-def) movie. Frames are much smaller and have an approximate aspect ratio of 3:2. (This smaller resolution can be useful for online videos.)
-
-
Frame rate (fps): The frame rate, measured in frames per second (fps), determines the smoothness of the playback. Assuming NTSC as the video standard, the following frame rate choices are available for the three frame sizes as follows:
-
1920 x 1080: 30 or 24 fps
-
1280 x 720: 60 fps
-
640 x 424: 30 fps
Notice that frame rate settings are listed as 30p, 24p, and 60p on the camera screens. The p stands for progressive, which is related to how the video frames are recorded. With progressive video, frames are created by scanning one line of pixels at a time, from the top to the bottom of the frame. An older recording technology, interlaced video, scans and records the even and odd lines of video separately and then combines them to create a full frame. Progressive is the newer (and, theoretically, higher-quality) option. However, some folks prefer interlaced video for certain types of recordings (and some older video-editing programs support only interlaced video). On the D3200, it's a moot point anyway — your only choice is progressive.
For the non-techie, here are a few pointers to help you choose which frame rate is best:
-
24 fps is the standard for motion pictures, giving your videos a softer, more movie-like look.
-
30 fps is the standard for most network broadcast TV and produces a crisper picture.
-
60 fps is often used for creating slow-motion footage. With more frames per second, the video is smoother when you slow down the movie playback. Just note that you give up resolution flexibility if you opt for this setting because it's available only at the 1280 x 720 frame size.
-
Now for the promised discussion of the options for PAL video: The only difference is with the frame rate: For PAL, you can choose from 24p, 25p, and 50p instead of 24p, 30p, and 60p.
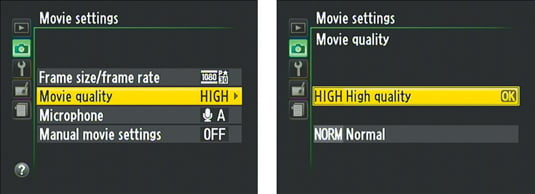
The Movie Quality option (bit rate)
For each combination of frame rate and size, you also can choose a High or Normal setting via the Movie Quality option, as shown in the following figure. Your choice determines how much compression is applied to the video file, which in turn affects the bit rate, or how much data is used to represent one second of video, measured in Mbps (megabytes per second). The High setting results in a higher bit rate, which means better quality and larger files. Choose Normal for a lower bit rate and smaller files.